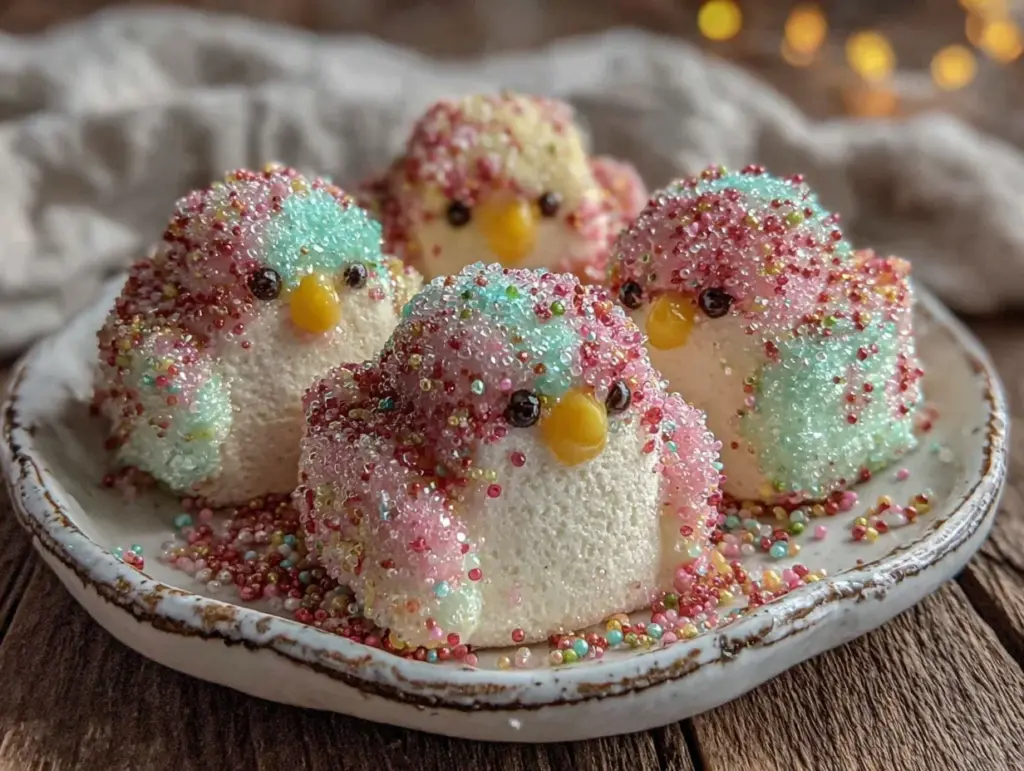
“You really think we can make those marshmallow chicks at home?” my niece asked, eyes wide as I pulled out a handful of gelatin packets and a big bowl of sugar. Honestly, I was half skeptical myself. Peeps have always felt like a quirky store-bought magic, the kind you either love or pretend to avoid because of that neon sugar crunch. But that spring afternoon, with the kitchen windows flung open to a breeze that smelled like fresh grass and blooming tulips, I figured—why not? The idea of whipping up easy homemade Peeps marshmallow chicks dipped in colored sugar started as a fun distraction from my usual Easter chaos, but it quickly became a mini obsession.
It wasn’t just about making candy; it was about capturing that playful, nostalgic vibe in a way that felt personal and, yes, a little bit crafty. As the gelatin bloomed and the sugar shimmered in pastel hues, I realized this wasn’t just a recipe. It was a little moment of springtime joy, right there in my hands. And you know, after a couple of tries—some sticky fingers, a few shapes that looked more like blobs than chicks—I nailed it. These marshmallow chicks are soft, sweet, and coated in just the right amount of colored sugar to make your teeth tingle in the best way.
What stuck with me most was how simple the ingredients were, and how that made the whole thing feel like a small kitchen miracle rather than a complicated baking project. If you’ve ever wondered whether you could make those iconic marshmallow Peeps yourself, this recipe is your answer. It’s approachable, fun, and perfect for a quiet afternoon or a last-minute treat for a spring gathering. And honestly, there’s something kind of satisfying about pulling these out of your own kitchen, no neon packaging needed.
Why You’ll Love This Recipe
There are plenty of reasons why this easy homemade Peeps marshmallow chicks recipe quickly became a favorite in my house. I’m not the only one who fell for it—friends and family have all asked for the recipe, which is always a good sign, right?
- Quick & Easy: You can whip these up in under an hour, making them perfect for busy spring afternoons or last-minute celebrations.
- Simple Ingredients: No weird chemicals or mystery powders here—just everyday pantry staples like gelatin, sugar, and vanilla extract.
- Perfect for Spring & Easter: The pastel-colored sugar coating makes these marshmallow chicks ideal for seasonal festivities or even as cute edible gifts.
- Crowd-Pleaser: Kids love the fun shapes and sparkly sugar, while adults appreciate the homemade twist on a classic treat.
- Unbelievably Delicious: The soft, fluffy marshmallow texture combined with that crunchy sugar coating is just pure happiness.
What really sets this recipe apart is the easy dipping technique that gives you a gorgeous, even sugar coating without the mess. Plus, the recipe is flexible—you can tweak the colors or shapes to suit your mood. The marshmallows come out with a texture that’s just right, thanks to carefully tested gelatin timing and sugar ratios. It’s not just another marshmallow recipe; it’s a thoughtfully crafted way to bring a little magic back to your spring treats.
What Ingredients You Will Need
This recipe uses simple, wholesome ingredients to deliver that iconic marshmallow chick flavor and texture without fuss. Most are pantry staples, so you’re probably already set to go!
- Unflavored gelatin: 3 packets (about 21 grams) – This is the key to that perfect, bounce-back marshmallow texture. I prefer Knox brand for consistent results.
- Cold water: 1/2 cup (120 ml) – To bloom the gelatin properly.
- Sugar: 2 cups (400 grams) – Granulated white sugar works best for the marshmallow base.
- Light corn syrup: 2/3 cup (160 ml) – Helps keep the marshmallows soft and chewy.
- Salt: 1/4 teaspoon – Just a pinch to balance sweetness.
- Vanilla extract: 1 tablespoon – Adds warmth and classic marshmallow flavor.
- Colored sanding sugar: about 1 cup total – Use pastel colors like yellow, pink, blue, and green for that authentic Peeps look. You can find these at most craft or baking stores. Or make your own by mixing granulated sugar with a few drops of food coloring and letting it dry.
- Powdered sugar and cornstarch mix: 1/4 cup each – For dusting and preventing stickiness while you shape the marshmallows.
If you want to swap out the corn syrup, light honey or a homemade simple syrup can work in a pinch, but the texture might change slightly. For a gluten-free version, this recipe is naturally safe, and you can use any natural food coloring to avoid artificial dyes if preferred.
Equipment Needed
- Stand mixer with whisk attachment: This is hands-down the easiest way to whip the marshmallow mixture into fluffy perfection. A hand mixer can work, but it takes more elbow grease.
- Medium saucepan: For heating the sugar syrup.
- Candy thermometer: Essential for hitting the right sugar temperature (240°F/115°C). Without it, the texture won’t be quite right.
- Baking pan (8×8 inches or similar): For setting the marshmallow slab.
- Rubber spatula: To scrape down the bowl and spread the marshmallow.
- Cookie cutters shaped like chicks: To create the classic Peeps shapes. If you don’t have chick cutters, small oval or bunny shapes work, too.
- Mixing bowls and measuring cups/spoons: Standard kitchen basics.
If you don’t have a candy thermometer, a digital one is inexpensive and worth adding to your baking toolkit. For shaping, I’ve also used silicone molds with success, which cut down on stickiness and helped keep edges neat.
Preparation Method
- Bloom the gelatin: Pour 1/2 cup (120 ml) cold water into the mixer bowl and sprinkle the gelatin evenly over the surface. Let it sit for 10 minutes until it swells and becomes spongy.
- Make the sugar syrup: In a medium saucepan, combine 2 cups (400 g) sugar, 2/3 cup (160 ml) light corn syrup, 1/4 teaspoon salt, and 1/2 cup (120 ml) water. Heat over medium-high until the sugar dissolves, then clip on your candy thermometer. Boil without stirring until the mixture reaches 240°F (115°C) — the soft-ball stage. This usually takes about 8-10 minutes. (Tip: Watch closely as it nears 230°F to avoid overcooking.)
- Whip the marshmallow base: With the mixer on low speed, slowly pour the hot syrup into the bloomed gelatin. Once all is added, increase speed to high and whip until the mixture is thick, glossy, and about tripled in volume. This takes 10-12 minutes. Add 1 tablespoon vanilla extract about halfway through whipping.
- Prepare the pan: Mix 1/4 cup powdered sugar with 1/4 cup cornstarch and dust your 8×8-inch baking pan well to prevent sticking.
- Spread the marshmallow: Using a lightly oiled spatula, scrape the marshmallow mixture into the pan and smooth the top. Dust the top with more powdered sugar-cornstarch mix. Let it set uncovered at room temperature for at least 4 hours or overnight.
- Cut out shapes: Once set, turn the marshmallow slab out onto a dusted surface. Peel off the parchment and dust a cookie cutter with the sugar mixture before pressing it firmly into the marshmallow. Clean the cutter between cuts to keep edges clean.
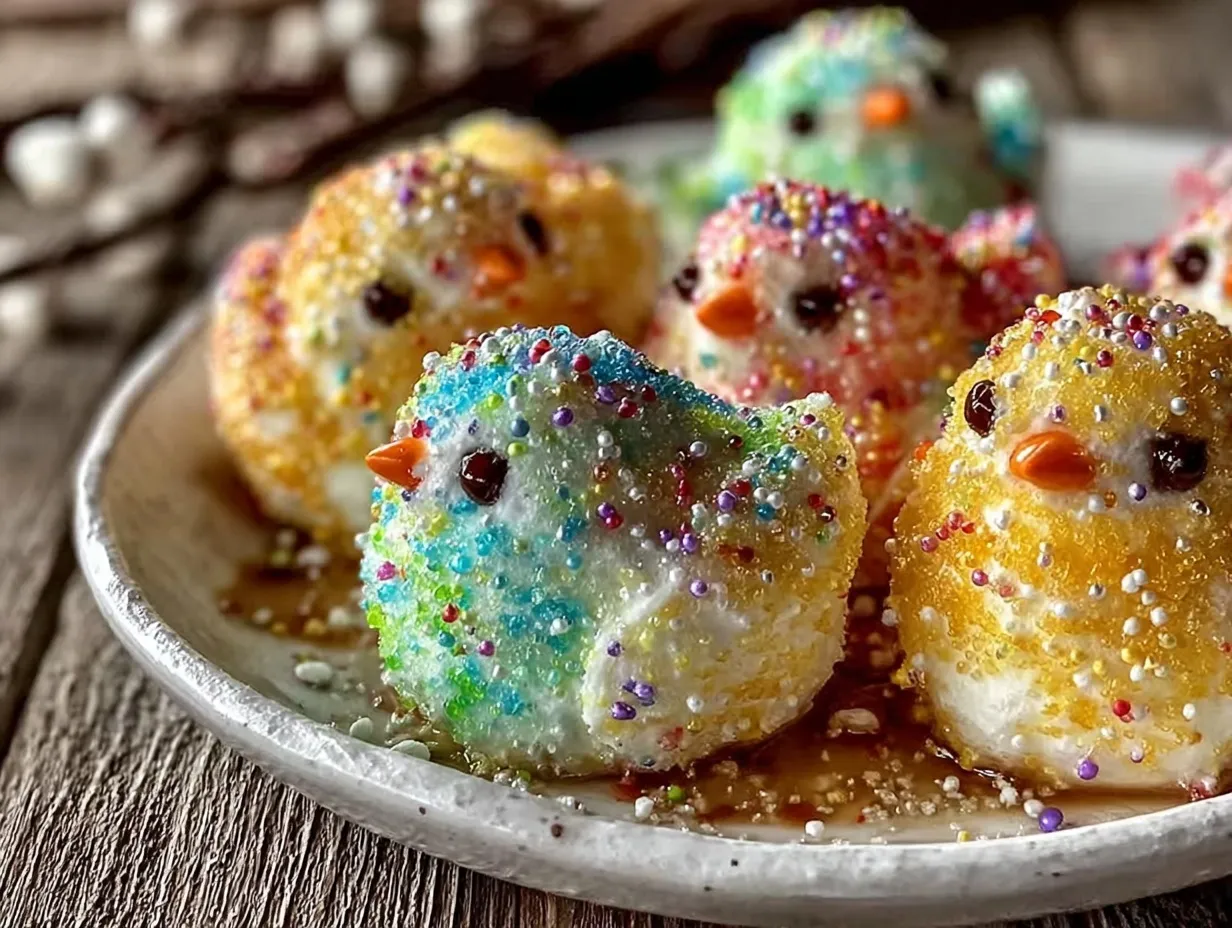
- Dip in colored sugar: Use shallow bowls filled with different colored sanding sugar. Gently press each marshmallow chick into the sugar until fully coated. Shake off excess sugar and set on parchment paper to dry for an hour.
Pro tip: If the marshmallow sticks to your cutter, dip the cutter in hot water and dry it before next use. It makes cutting much smoother. Also, don’t rush the setting time—patience here means perfectly firm yet soft marshmallow shapes.
Cooking Tips & Techniques
Making homemade marshmallows can feel tricky, but a few tricks make a world of difference. First, blooming your gelatin properly is non-negotiable—it gives marshmallows that perfect bounce rather than a rubbery chew. I’ve learned to sprinkle gelatin evenly over cold water and let it rest without stirring.
Temperature control is everything. The sugar syrup has to hit the soft-ball stage (240°F/115°C) exactly. I’ve burned batches by rushing or guessing this step, and trust me—it’s worth investing in a good candy thermometer. Also, pour the syrup slowly into the mixer to avoid splashing and ensure the gelatin melts evenly.
Whipping time is another key. The mixture should be glossy, thick, and tripled in size before you stop. I usually give it a taste test—if it’s still grainy, keep whipping. Adding vanilla midway helps the flavor bloom without getting lost in the heat.
For shaping, a dusted surface with powdered sugar and cornstarch is your best friend to prevent stickiness. If it’s too sticky, a light dusting of cornstarch on your hands helps, too. And when coating with colored sugar, press gently; you want that sparkly crunch without squishing the marshmallows.
Lastly, the drying time sets the texture and helps the sugar coating adhere perfectly. Don’t skip it, even if you’re eager to taste. Those extra hours make the difference between gooey and just right.
Variations & Adaptations
This easy homemade Peeps marshmallow chicks recipe is a fantastic base for creativity. Here are some ways to change it up:
- Flavor twists: Try adding 1 teaspoon of almond extract or lemon zest instead of vanilla for a fresh spin.
- Color variations: Use natural food powders like beetroot for pink or matcha for green instead of food coloring in your sanding sugar.
- Shape swaps: Use bunny or egg-shaped cookie cutters for a full spring-themed batch. I once made pastel-colored marshmallow eggs that disappeared almost instantly!
- Dietary adaptations: Swap light corn syrup with a homemade simple syrup made from sugar and water if you avoid corn-based products.
- Alternative coatings: Instead of colored sugar, roll marshmallows in toasted coconut flakes or finely chopped freeze-dried fruit for a different texture.
I once experimented by dipping these marshmallow chicks in melted dark chocolate before adding the colored sugar—talk about a game changer! It added a grown-up twist that balanced the sweetness beautifully. Feel free to play around; it’s all part of the fun.
Serving & Storage Suggestions
These marshmallow chicks are best served at room temperature to keep that soft and pillowy texture. Arrange them on a pastel-colored platter or nestle them in little cupcake liners for a festive look that’s perfect for springtime gatherings or an Easter basket surprise.
They make a delightful companion to a cup of tea or a creamy hot chocolate—speaking of which, if you love marshmallow treats, you might also enjoy the hot cocoa bombs recipe I perfected last winter.
For storage, keep the marshmallows in an airtight container at room temperature. They stay fresh for up to two weeks but are honestly best within the first week for optimal softness. Avoid refrigeration, as it can make them tough.
If you want to store longer, you can freeze them individually wrapped in plastic wrap and placed in a freezer-safe bag—just thaw at room temperature before enjoying. Reheating isn’t necessary, but a few seconds in a microwave can soften them if they’ve become a little firm over time.
Nutritional Information & Benefits
Each homemade marshmallow chick is a small indulgence, typically containing about 70 calories, mostly from sugars. The recipe contains no fats or cholesterol, making it a relatively light sweet treat when enjoyed in moderation.
Using simple ingredients without artificial preservatives or dyes means you avoid many additives found in store-bought Peeps. Plus, making your own lets you control the sugar type and colorings, which can be adjusted for dietary needs.
Though marshmallows are not a health food, this recipe is naturally gluten-free and can be made with organic or natural ingredients for a cleaner treat. It’s a sweet way to bring a little homemade joy without the overwhelming chemical aftertaste sometimes found in commercial marshmallows.
Conclusion
Easy homemade Peeps marshmallow chicks dipped in colored sugar are more than just a springtime treat—they’re a way to bring a little hands-on magic to your kitchen. Whether you’re crafting them with kids, prepping for an Easter celebration, or just indulging your sweet tooth, this recipe is approachable, fun, and surprisingly satisfying.
I love this recipe because it reminds me that sometimes the best treats come from simple ingredients and a little patience. It’s a recipe you can tweak and make your own, perfect for adding that personal touch to classic marshmallow fun.
Give it a try, take your time, and don’t be afraid to get a bit messy—it’s all part of the charm. And if you experiment with flavors or shapes, I’d love to hear how your batch turned out!
Frequently Asked Questions
Can I use gelatin substitutes to make this recipe vegan?
Traditional marshmallows rely on gelatin for their texture, which is animal-based. You can try agar-agar or other plant-based gelling agents, but results vary and usually require different techniques.
How do I prevent marshmallows from sticking to my hands and tools?
Dust your hands and surfaces with a mix of powdered sugar and cornstarch. Lightly oiling your spatula or cookie cutters also helps with sticking.
Can I make these marshmallow chicks ahead of time?
Yes, they set overnight and keep well in an airtight container at room temperature for up to two weeks.
What if I don’t have colored sanding sugar?
You can make your own by mixing granulated sugar with a few drops of food coloring and spreading it out to dry before using.
Is there a way to make these marshmallows less sweet?
You can slightly reduce the sugar, but keep in mind it may affect the texture. Using natural sweeteners or experimenting with flavor extracts can balance sweetness too.
For more sweet and easy homemade treats, you might enjoy the snowball cookies recipe or the cranberry orange bread—both perfect for sharing and full of cozy flavors.
Pin This Recipe!
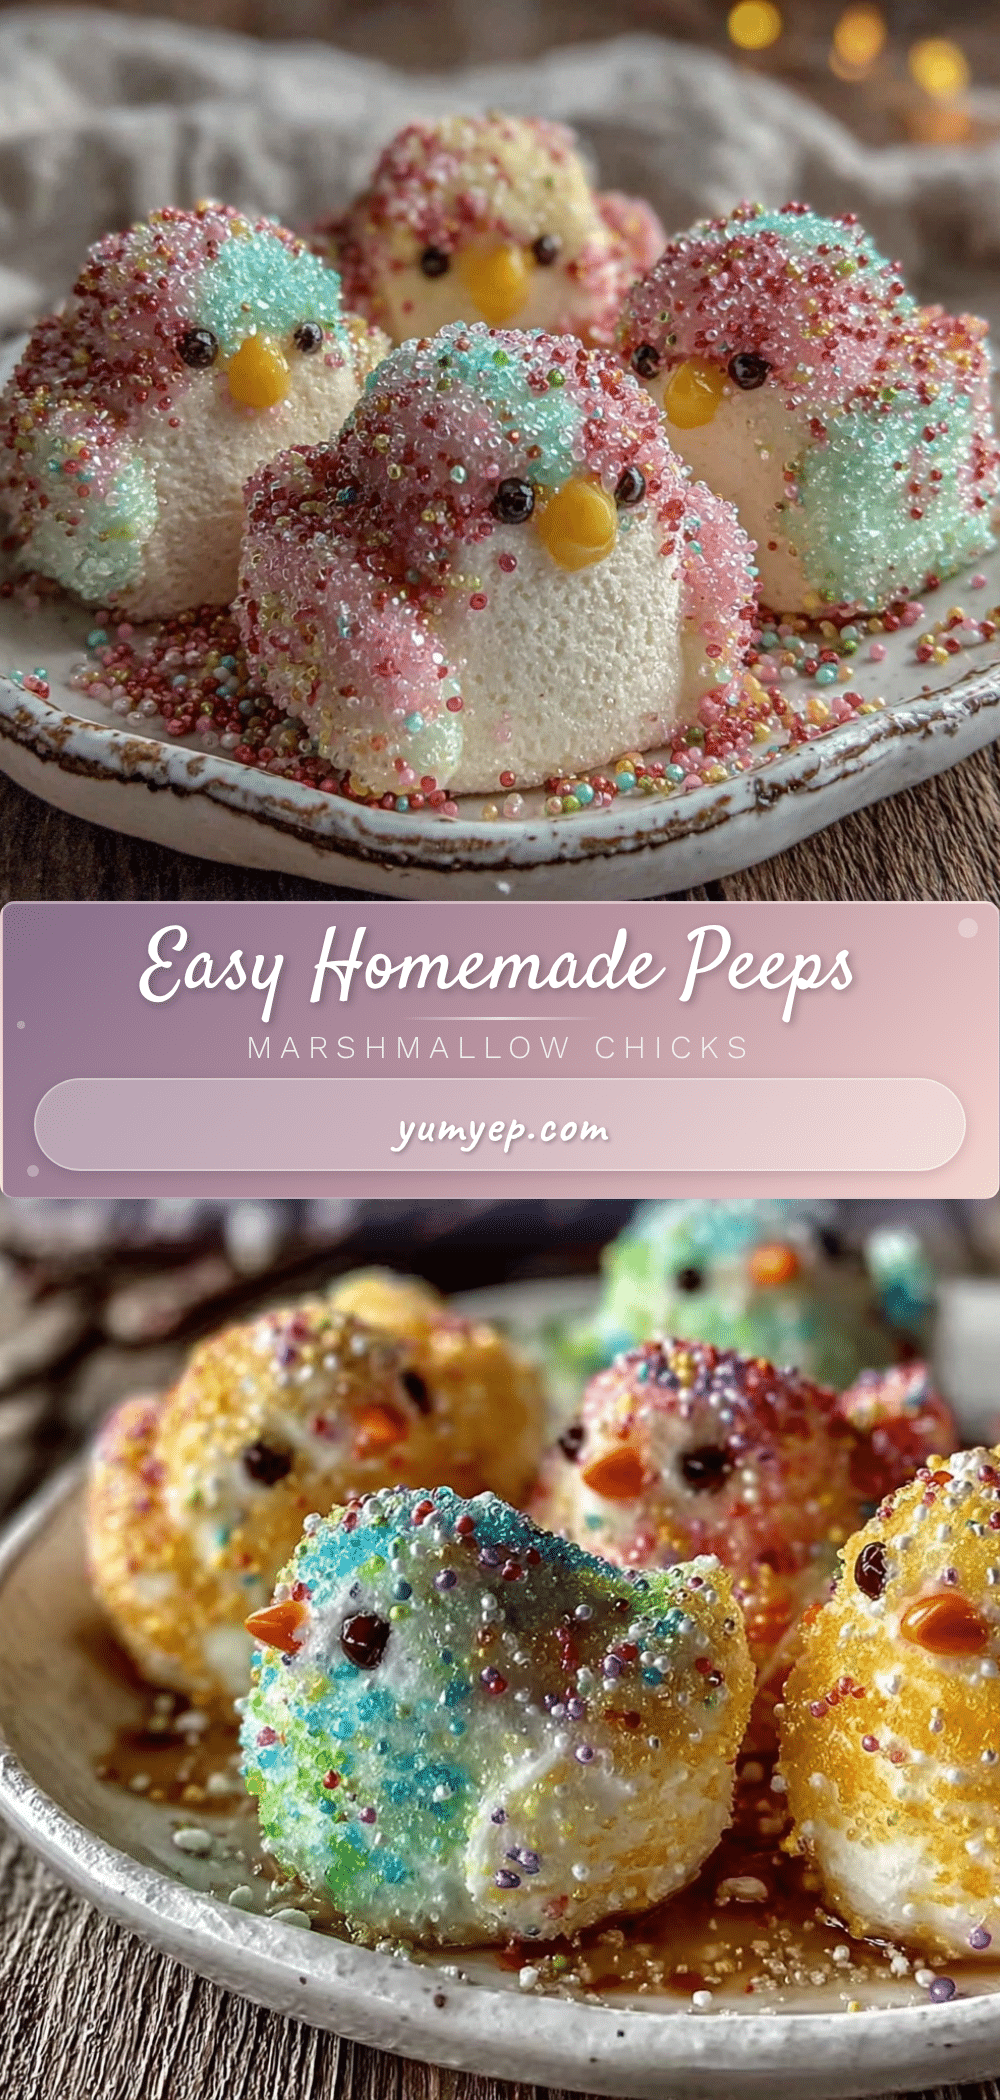
Easy Homemade Peeps Marshmallow Chicks Dipped in Colored Sugar

A simple and fun recipe to make soft, fluffy marshmallow chicks coated in pastel-colored sugar, perfect for spring and Easter celebrations.
- Prep Time: 15 minutes
- Cook Time: 20 minutes
- Total Time: 4 hours 35 minutes
- Yield: About 24 marshmallow chicks 1x
- Category: Dessert
- Cuisine: American
Ingredients
- 3 packets (about 21 grams) unflavored gelatin
- 1/2 cup (120 ml) cold water
- 2 cups (400 grams) granulated white sugar
- 2/3 cup (160 ml) light corn syrup
- 1/4 teaspoon salt
- 1 tablespoon vanilla extract
- about 1 cup colored sanding sugar (pastel colors like yellow, pink, blue, and green)
- 1/4 cup powdered sugar
- 1/4 cup cornstarch
Instructions
- Pour 1/2 cup (120 ml) cold water into the mixer bowl and sprinkle the gelatin evenly over the surface. Let it sit for 10 minutes until it swells and becomes spongy.
- In a medium saucepan, combine 2 cups (400 g) sugar, 2/3 cup (160 ml) light corn syrup, 1/4 teaspoon salt, and 1/2 cup (120 ml) water. Heat over medium-high until the sugar dissolves, then clip on your candy thermometer. Boil without stirring until the mixture reaches 240°F (115°C) — the soft-ball stage, about 8-10 minutes.
- With the mixer on low speed, slowly pour the hot syrup into the bloomed gelatin. Once all is added, increase speed to high and whip until the mixture is thick, glossy, and about tripled in volume, about 10-12 minutes. Add 1 tablespoon vanilla extract about halfway through whipping.
- Mix 1/4 cup powdered sugar with 1/4 cup cornstarch and dust your 8×8-inch baking pan well to prevent sticking.
- Using a lightly oiled spatula, scrape the marshmallow mixture into the pan and smooth the top. Dust the top with more powdered sugar-cornstarch mix. Let it set uncovered at room temperature for at least 4 hours or overnight.
- Once set, turn the marshmallow slab out onto a dusted surface. Peel off the parchment and dust a cookie cutter with the sugar mixture before pressing it firmly into the marshmallow. Clean the cutter between cuts to keep edges clean.
- Use shallow bowls filled with different colored sanding sugar. Gently press each marshmallow chick into the sugar until fully coated. Shake off excess sugar and set on parchment paper to dry for an hour.
Notes
Bloom gelatin properly for best texture. Use a candy thermometer to reach the soft-ball stage (240°F/115°C). Dust hands and surfaces with powdered sugar and cornstarch to prevent sticking. Let marshmallows set overnight for best firmness. Dip cookie cutters in hot water and dry before cutting to avoid sticking.
Nutrition
- Serving Size: 1 marshmallow chick
- Calories: 70
- Sugar: 17
- Sodium: 10
- Carbohydrates: 18
Keywords: homemade Peeps, marshmallow chicks, spring treats, Easter candy, colored sugar, marshmallow recipe, easy marshmallows