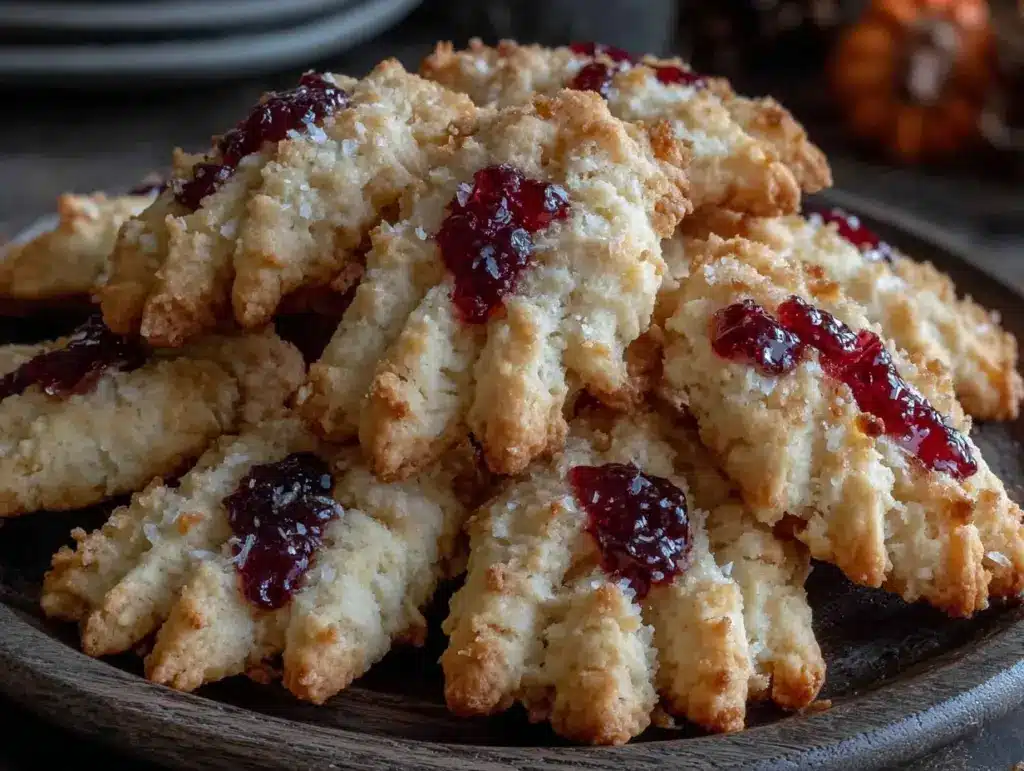
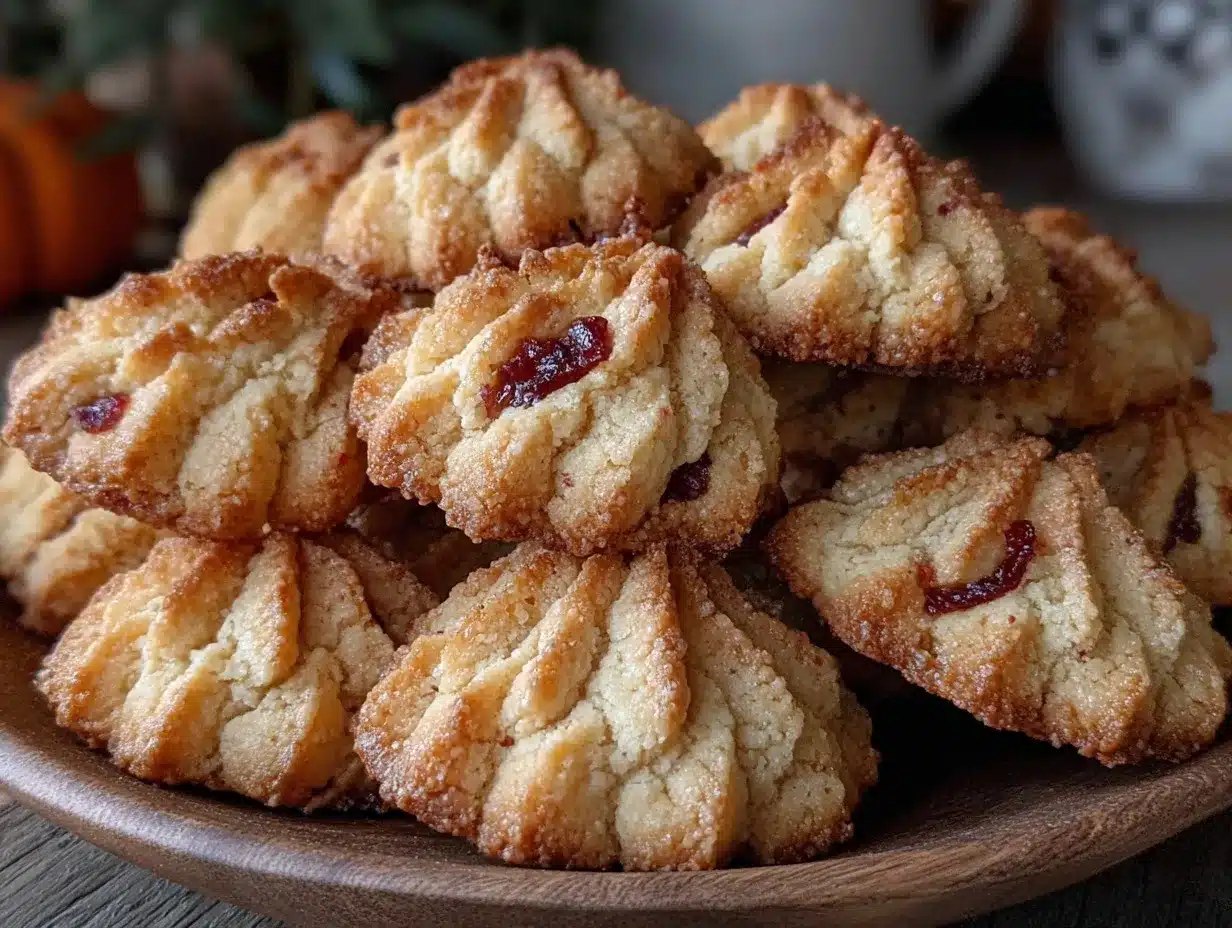
“Watch out! Those fingers look real!” my niece squealed, clutching the plate as if the creepy cookies might actually grab her back. Honestly, I half expected my husband to jump at the sight of these crispy witch finger cookies, the way they curl and snap with just the right eerie crunch. This recipe started as a last-minute scramble—Halloween was creeping closer, and the usual candy stash just didn’t cut it anymore. I was digging through the pantry, hoping to whip up something spooky but easy, when the idea hit me: why not go for something creepy yet utterly delicious?
Admittedly, I was skeptical at first. Shaping dough into gnarly fingers seemed more like a craft project than a baking triumph. But the magic happened in the oven—the aroma of toasted almonds and vanilla filled the kitchen, and the texture came out perfectly crisp, not crumbly or dry. Over the next week, this recipe got repeated more times than I care to admit (sorry, neighbors). What made it stick, I realized, was how fun and unexpectedly tasty these were. The crunchy snap combined with just a hint of spice made them a hit for anyone brave enough to bite into a “witch’s finger.” It’s a little spooky, a little sweet, and honestly, just the kind of treat that makes Halloween at home feel special without all the fuss or mess.
So if you want a cookie that’s both a conversation starter and delightfully crunchy, these crispy witch finger cookies are your go-to. They’re simple enough to make last minute but impressive enough to make you look like a baking wizard. Plus, you might find yourself making them well past October, just for that addictive crunch.
Why You’ll Love This Recipe
After testing this crispy witch finger cookies recipe multiple times, here’s why it’s become a favorite in my Halloween lineup:
- Quick & Easy: The dough comes together in under 20 minutes, making it perfect for last-minute spooky parties or unexpected guests.
- Simple Ingredients: No need for fancy or hard-to-find items; most are pantry staples like almond flour and vanilla extract.
- Perfect for Halloween and Beyond: Great for kids’ parties, potlucks, or even casual cozy nights at home when you want something a little playful and crunchy.
- Crowd-Pleaser: Both kids and adults love the fun shape and irresistible snap, making it a guaranteed hit.
- Unbelievably Delicious Texture: The crispness combined with a slightly nutty undertone from the almonds makes these unlike your typical sugar cookie.
What sets this recipe apart is the way the dough is crafted to hold its shape perfectly during baking, ensuring those creepy finger details stay sharp. Plus, adding a touch of almond extract along with vanilla gives the cookies a subtle complexity that you don’t usually find in Halloween treats. Honestly, it’s one of those recipes that makes you pause between bites, savoring the crunch and flavor.
And here’s a little secret: if you want to impress without sweating it, these cookies pair beautifully with a warm cup of cider or even a fun hot chocolate bomb like the ones from my hot cocoa bombs recipe. A little spooky, a little sweet, and totally satisfying!
What Ingredients You Will Need
This recipe uses straightforward ingredients that work together to create that signature crispness and spooky detail. Most are common pantry staples, so you probably have everything on hand already.
- All-purpose flour: 2 ½ cups (315 g) – the base for structure; you can swap for gluten-free flour blend if needed.
- Unsalted butter: 1 cup (227 g), softened – adds richness and helps in crisping.
- Granulated sugar: ¾ cup (150 g) – for sweetness and slight crunch.
- Large egg: 1, room temperature – binds the dough nicely.
- Pure vanilla extract: 1 teaspoon – classic flavor enhancer.
- Almond extract: ½ teaspoon – gives a subtle nutty undertone (don’t skip this, trust me!).
- Baking powder: 1 teaspoon – for a slight lift.
- Salt: ½ teaspoon – balances sweetness and enhances flavor.
- Sliced almonds: 1 cup (90 g) – these become the “fingernails” and add crunch.
- Red food coloring gel: Just a dab to tint the almond nails blood-red (optional but spooky).
- Powdered sugar: For dusting (optional, but adds a nice finishing touch).
If you want to swap out butter for a dairy-free alternative, a firm coconut oil works fairly well, but the texture will be a bit different. For the almond nails, you can use slivered almonds or even pecan halves if you want a different look. If fresh almonds seem pricey, sliced almonds from a bulk store do the trick just fine.
Equipment Needed
- Mixing bowls: One large for the dough, plus a small one for color mixing.
- Electric hand mixer or stand mixer: Speeds up creaming butter and sugar but you can mix by hand if you’re patient.
- Baking sheets: Two standard-sized sheets lined with parchment paper or silicone mats.
- Cooling rack: Essential for letting the cookies cool crisp and stay crunchy.
- Measuring cups and spoons: Accuracy matters here for texture.
- Knife or small kitchen scissors: To create the knuckle details on the fingers.
I’ve tried making these with just a wooden spoon and bowl, but the electric mixer really helps get that smooth creamy butter stage, which leads to better texture. For budget-friendly parchment paper, reusable silicone mats are a great investment and keep cookies from sticking without added fat.
Preparation Method
- Preheat your oven: Set to 350°F (175°C). Line two baking sheets with parchment paper or silicone mats. (About 10 minutes prep)
- Cream the butter and sugar: In a large bowl, beat 1 cup softened butter and ¾ cup granulated sugar together until fluffy and pale, about 3–4 minutes using an electric mixer. If you mix by hand, keep at it until smooth and creamy.
- Add egg and extracts: Beat in 1 large egg, 1 teaspoon vanilla extract, and ½ teaspoon almond extract until combined. The dough will smell wonderfully fragrant here.
- Mix dry ingredients: In a separate bowl, whisk together 2 ½ cups all-purpose flour, 1 teaspoon baking powder, and ½ teaspoon salt.
- Combine wet and dry: Gradually add the dry flour mixture into the wet, mixing on low speed until a soft dough forms. It should be pliable but not sticky. If too dry, add a teaspoon of milk; if too sticky, dust with a little flour.
- Shape the fingers: Divide dough into 24 equal pieces (about 1 tablespoon or 15 g each). Roll each piece into a finger shape about 3 inches (7.5 cm) long and slightly tapered at one end. Place on baking sheets, spaced about 1 inch (2.5 cm) apart.
- Create knuckle details: Use the dull side of a butter knife or kitchen scissors to make small indents along the finger to mimic knuckles. Press a sliced almond at the tapered end as the fingernail.
- Add “blood” effect: If using red food coloring, mix a tiny dab with water and brush lightly onto almond nails for a creepy touch.
- Bake: Place in the oven for 15–18 minutes. The cookies should be firm and golden around the edges but not browned. Overbaking makes them too hard.
- Cool properly: Transfer cookies to a wire rack immediately to cool completely, which helps maintain crispness.
- Optional dusting: Once cooled, dust lightly with powdered sugar for a ghostly, dusty finish.
Pro tip: If your dough feels too soft to shape, pop it in the fridge for 10 minutes before rolling. Also, keep an eye on the baking time—every oven is different, and you want that perfect snap, not a burnt finger!
Cooking Tips & Techniques
Getting the texture right on these crispy witch finger cookies is key, and I’ve learned a few tricks along the way. First, the butter should be softened but not melting. Too warm, and your dough will spread too much during baking, losing that finger shape. I keep mine on the counter for about an hour before starting.
When shaping, don’t rush. The fingers need to be uniform in size for even baking. I usually line them up on the counter before moving to the sheet to make sure. Using kitchen scissors for knuckle marks gives a sharper, more natural effect than a knife.
Watch the almonds closely—they toast quickly and can burn if the oven’s too hot or the baking time too long. If you want extra crispness, let the cookies cool completely on a rack before storing. Storing them in an airtight container with a slice of bread inside actually keeps them from drying out too fast (odd but true!).
Lastly, multitasking while baking helps—while the first batch is in the oven, I prep the next batch. This keeps the pace steady and prevents dough from warming up too much.
Variations & Adaptations
Want to switch things up with these creepy cookies? Here are a few ways to customize your witch fingers:
- Chocolate-Dipped Fingers: Once cooled, dip the tips into melted dark chocolate for a richer, more decadent treat. Add sprinkles or crushed candy for extra fun.
- Gluten-Free Version: Use a 1:1 gluten-free flour blend that includes xanthan gum. The texture will be slightly different but still delightfully crisp.
- Spiced Fingers: Add 1 teaspoon cinnamon and ½ teaspoon ground nutmeg to the dry ingredients for a warm, autumnal twist.
- Vegan Adaptation: Replace butter with vegan margarine and egg with a flax egg (1 tbsp ground flax + 3 tbsp water). The dough might be a bit more delicate but still tasty.
- Colorful Nails: Instead of red, try green or purple food gel for a witchier vibe. You can also use candy eyes or mini chocolate chips for a playful twist.
Personally, I love adding cinnamon for that cozy fall feel. It pairs nicely with the almond notes and makes these cookies feel a bit less spooky and more like a warm fall treat, similar to the comforting vibes in my cinnamon roll casserole recipe.
Serving & Storage Suggestions
These crispy witch finger cookies are best served at room temperature, which keeps their signature crunch intact. Arrange them on a dark platter or a rustic wooden board to highlight their creepy shape—makes for quite the Halloween centerpiece.
They pair wonderfully with warm drinks like apple cider, hot chocolate, or even a lightly spiced chai latte. If you’re hosting a Halloween party, these cookies add a fun, interactive element—kids especially love pretending they’re biting into a real witch’s finger!
For storage, keep cookies in an airtight container at room temperature for up to 5 days. To maintain crispness, avoid refrigeration which can introduce moisture. If you want to keep them longer, freeze in a sealed bag for up to 3 months and thaw at room temp before serving.
Reheating briefly in a warm oven (about 300°F/150°C for 3–5 minutes) refreshes the crispness nicely. Over time, the almond nails might soften a bit, but that only adds to the homemade charm.
Nutritional Information & Benefits
Each cookie contains approximately:
| Calories | 90 |
|---|---|
| Fat | 5 g |
| Carbohydrates | 10 g |
| Protein | 2 g |
Thanks to almond slices, these cookies have a small boost of healthy fats and protein. Almonds also provide vitamin E and magnesium, which are great little bonuses. Although these are treats, they’re made with real butter and no artificial preservatives, which feels better than many store-bought options.
For those watching gluten, swapping in a gluten-free flour blend keeps them accessible. They’re naturally free of nuts aside from the almonds, so you can omit or replace those if allergies are a concern.
From my experience, this recipe strikes a good balance between indulgence and mindful eating—perfect for a Halloween treat that doesn’t leave you feeling overly stuffed or guilty.
Conclusion
These crispy witch finger cookies have become my go-to Halloween treat because they’re as fun to make as they are to eat. The spooky look sparks smiles (and sometimes shrieks!), but the crunchy, buttery bite wins over even the pickiest eaters.
Feel free to play with flavors or colors—make them your own. Whether you serve them at a party, hand them out to trick-or-treaters, or just nibble on them during a quiet night, they’re a little spooky magic in cookie form.
Don’t be shy to share how your batch turns out or any twists you try. I love hearing stories about what makes these creepy cookies special in your kitchen. Happy baking and may your Halloween be full of fun, flavor, and just a touch of fright!
Frequently Asked Questions
Can I make the dough ahead of time?
Yes! You can prepare the dough and refrigerate it for up to 24 hours before shaping and baking. It actually helps the flavors meld and makes shaping easier.
What if I don’t have almond extract?
Vanilla extract alone works fine, but almond extract adds a subtle nuttiness that really makes these cookies stand out. If you skip it, consider adding a pinch of almond flour for a mild nutty flavor.
How do I keep the cookies crispy?
Store them in an airtight container at room temperature and avoid refrigeration. Adding a slice of bread inside the container can help absorb moisture and keep cookies crisp longer.
Can I make these cookies without nuts?
Yes, omit the almonds or replace them with pumpkin seeds for a nut-free alternative. The texture will differ slightly, but they’ll still be tasty and spooky.
What’s the best way to shape the knuckles?
Using kitchen scissors to press small cuts along the sides of the fingers gives a realistic knuckle effect. A butter knife can work but scissors create sharper, cleaner indentations.
Pin This Recipe!

Crispy Witch Finger Cookies
These crispy witch finger cookies are a spooky and delicious Halloween treat with a crunchy snap and subtle almond undertones. Perfect for parties or cozy nights, they combine fun shapes with irresistible texture.
- Prep Time: 15 minutes
- Cook Time: 15-18 minutes
- Total Time: 30-33 minutes
- Yield: 24 cookies 1x
- Category: Dessert
- Cuisine: American
Ingredients
- 2 ½ cups (315 g) all-purpose flour (can substitute gluten-free flour blend)
- 1 cup (227 g) unsalted butter, softened
- ¾ cup (150 g) granulated sugar
- 1 large egg, room temperature
- 1 teaspoon pure vanilla extract
- ½ teaspoon almond extract
- 1 teaspoon baking powder
- ½ teaspoon salt
- 1 cup (90 g) sliced almonds
- Red food coloring gel (optional, for tinting almond nails)
- Powdered sugar (optional, for dusting)
Instructions
- Preheat your oven to 350°F (175°C). Line two baking sheets with parchment paper or silicone mats.
- In a large bowl, cream together 1 cup softened butter and ¾ cup granulated sugar until fluffy and pale, about 3–4 minutes with an electric mixer or until smooth by hand.
- Beat in 1 large egg, 1 teaspoon vanilla extract, and ½ teaspoon almond extract until combined.
- In a separate bowl, whisk together 2 ½ cups all-purpose flour, 1 teaspoon baking powder, and ½ teaspoon salt.
- Gradually add the dry flour mixture into the wet ingredients, mixing on low speed until a soft dough forms. If too dry, add 1 teaspoon milk; if too sticky, dust with a little flour.
- Divide dough into 24 equal pieces (about 1 tablespoon or 15 g each). Roll each piece into a finger shape about 3 inches (7.5 cm) long and slightly tapered at one end. Place on baking sheets spaced about 1 inch (2.5 cm) apart.
- Use the dull side of a butter knife or kitchen scissors to make small indents along each finger to mimic knuckles. Press a sliced almond at the tapered end as the fingernail.
- If using red food coloring, mix a tiny dab with water and brush lightly onto almond nails for a blood-red effect.
- Bake for 15–18 minutes until cookies are firm and golden around the edges but not browned.
- Transfer cookies to a wire rack immediately to cool completely to maintain crispness.
- Once cooled, optionally dust lightly with powdered sugar for a ghostly finish.
Notes
If dough is too soft to shape, refrigerate for 10 minutes before rolling. Avoid overbaking to keep cookies crisp but not too hard. Store in an airtight container with a slice of bread to maintain crispness. For a dairy-free option, substitute butter with firm coconut oil. Almond nails can be replaced with slivered almonds or pecan halves. Red food coloring is optional for a spooky effect.
Nutrition
- Serving Size: 1 cookie
- Calories: 90
- Fat: 5
- Carbohydrates: 10
- Protein: 2
Keywords: Halloween cookies, witch finger cookies, crispy cookies, almond cookies, spooky treats, easy Halloween recipe


