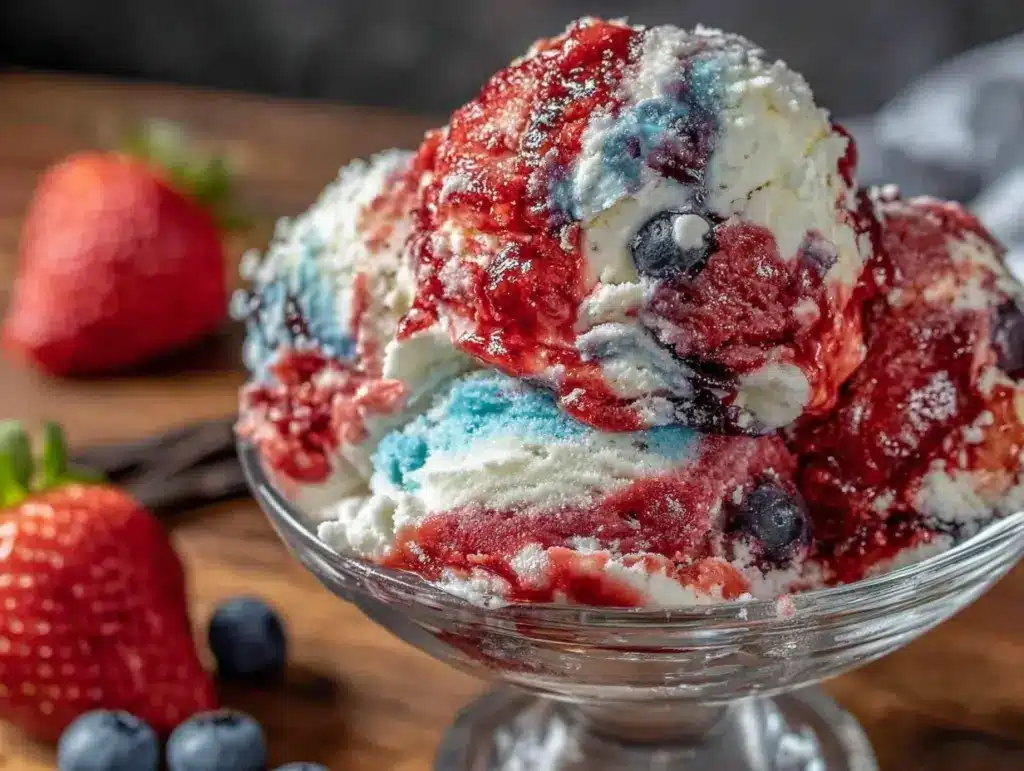
“Wait, you made this without an ice cream maker?” My cousin’s skeptical look lingered as I scooped out a dollop of this creamy no-churn red white blue ice cream. Honestly, I was half-expecting a disaster the first time I whipped this up—just a lazy attempt to bring a bit of festive flair to our backyard barbecue. But as soon as the first spoonful hit my tongue, that skepticism melted away faster than the ice cream itself on a summer afternoon. This recipe started from a spur-of-the-moment impulse, a quick idea born out of a busy week when I needed something fast, colorful, and cool to impress a crowd without spending hours fussing over fancy equipment or complicated steps.
The vibrant red, white, and blue layers remind me of those long, sun-drenched Fourth of July nights where the sky bursts with fireworks and laughter floats in the air. It’s not just a dessert; it’s a little celebration in a bowl. I’ve made it over and over since then—sometimes swapping the blueberries for raspberries, other times sneaking in a swirl of homemade strawberry sauce. But the core of this creamy no-churn red white blue ice cream always stays the same: simple, satisfying, and shockingly good.
What I didn’t expect was how many people would ask for the recipe afterward. It became my go-to for any patriotic event, and honestly, it’s the kind of recipe that sticks with you—not just because of the colors, but because it’s so darn easy and delicious. No fancy gadgets, no tricky tempering, just creamy goodness that feels homemade and festive. If you’re looking for a dessert that’s as charming as it is effortless, you’re in the right place.
There’s a quiet joy in knowing you can pull off something so delightful without a fuss. And that’s why this recipe has stayed in my rotation—comfort food made simple, with a pop of color and a whole lot of smiles.
Why You’ll Love This Creamy No-Churn Red White Blue Ice Cream Recipe
This recipe is honestly a lifesaver when you want that classic, creamy ice cream vibe without the mess or wait of churning. After testing it several times (and yes, sampling way too much), I’m confident it stands out for a few solid reasons:
- Quick & Easy: You can have this ice cream ready in about 15 minutes of prep, then just freeze. No ice cream maker, no complicated steps—perfect for last-minute get-togethers or unexpected summer cravings.
- Simple Ingredients: Most of what you need is probably already in your fridge or pantry. It’s straightforward—heavy cream, sweetened condensed milk, and natural food colors or fresh berries. No weird additives or fancy stuff.
- Perfect for Patriotic Celebrations: Whether it’s Fourth of July, Memorial Day, or just a fun summer picnic, the red, white, and blue theme hits the spot for making any day feel special.
- Crowd-Pleaser: Kids love the colorful layers, and adults appreciate the creamy texture with real berry flavor. I’ve never had leftovers at parties!
- Unbelievably Delicious: The texture is rich and smooth, with just the right balance of sweetness and fresh berry tang. Honestly, it tastes like something you’d expect from a fancy ice cream shop.
What sets this recipe apart? Well, the layering technique with real berries and natural colorings gives it a fresh, homemade charm. Plus, using sweetened condensed milk means the ice cream is creamy without needing eggs or heavy churning. I’ve played around with variations, but this recipe’s balance of flavors and ease keeps bringing me back.
This isn’t just another patriotic dessert—it’s the kind you feel proud serving, the kind that makes you smile after the first bite. It’s a no-fuss way to celebrate with something that tastes like summer itself.
What Ingredients You Will Need for Creamy No-Churn Red White Blue Ice Cream
This recipe uses simple, wholesome ingredients to deliver bold flavor and satisfying texture without the fuss. Most are pantry staples or fresh produce, easy to find year-round or swap seasonally.
- For the Cream Base:
- 2 cups (480 ml) heavy cream, cold (I prefer organic heavy cream for a richer taste)
- 1 can (14 oz / 396 g) sweetened condensed milk (makes the ice cream creamy and sweet without eggs)
- 1 teaspoon pure vanilla extract (adds subtle warmth and depth)
- For the Red Layer:
- 1 cup (150 g) fresh strawberries or raspberries, pureed (for natural color and fresh flavor)
- Optional: a few drops of red food coloring if you want a more vivid hue
- For the Blue Layer:
- 1 cup (150 g) fresh blueberries, pureed or lightly mashed
- Optional: natural blue food coloring (like butterfly pea powder) if desired
- For the White Layer:
- About 1 cup (240 ml) of the plain cream base reserved before mixing with berries
For best results, I recommend using ripe, fresh berries for natural sweetness and vibrant color. Frozen berries can work but thaw and drain excess liquid first to avoid watery ice cream. Brands like Organic Valley for heavy cream and Eagle Brand for sweetened condensed milk have never let me down.
Looking for substitutions? Use coconut cream and sweetened coconut condensed milk for a dairy-free twist, or swap in almond milk-based condensed milk alternatives. For a low-sugar version, try sugar-free condensed milk, but the texture may vary slightly.
Equipment Needed
- Large mixing bowl – for whipping the cream
- Electric hand mixer or stand mixer – essential for whipping heavy cream to stiff peaks
- Measuring cups and spoons – to keep ingredient ratios spot on
- Spatula – for folding the whipped cream and berry purees gently
- Loaf pan or airtight container – to set the ice cream in the freezer (I use a 9×5-inch / 23×13 cm loaf pan)
- Plastic wrap or lid – to cover the container and prevent freezer burn
If you don’t have an electric mixer, a hand whisk can work, but expect more arm work and a longer whipping time. For budget-friendly options, a manual whisk and a sturdy container can still get you there, though the texture may be less airy. I’ve tried silicone spatulas for folding and found they’re gentler on the whipped cream compared to metal spoons, helping keep the cream light and fluffy.
Preparation Method
- Chill Your Equipment: Place the mixing bowl and beaters in the fridge for at least 15 minutes before starting. Cold equipment helps whip the cream faster and hold its shape better.
- Puree the Berries: In separate bowls, puree the strawberries (or raspberries) and blueberries using a blender or food processor. If you prefer a chunkier texture, mash them lightly with a fork. Set aside.
- Make the Cream Base: Pour the cold heavy cream into the chilled mixing bowl. Beat on medium-high speed with an electric mixer until soft peaks form (about 3-4 minutes). Soft peaks mean when you lift the beater, the cream holds a peak but the tip folds over slightly.
- Add Sweetened Condensed Milk and Vanilla: Gently fold in the sweetened condensed milk and vanilla extract with a spatula, being careful not to deflate the whipped cream. The mixture should look smooth and creamy.
- Divide the Cream Base: Scoop about 1 cup (240 ml) of the plain cream base into a small bowl for the white layer. The rest will be combined with berry purees for the red and blue layers.
- Mix Red and Blue Layers: Fold the strawberry puree into one portion of the cream base until well combined but still fluffy. Repeat with the blueberry puree and the remaining cream base. Be gentle to keep the texture light.
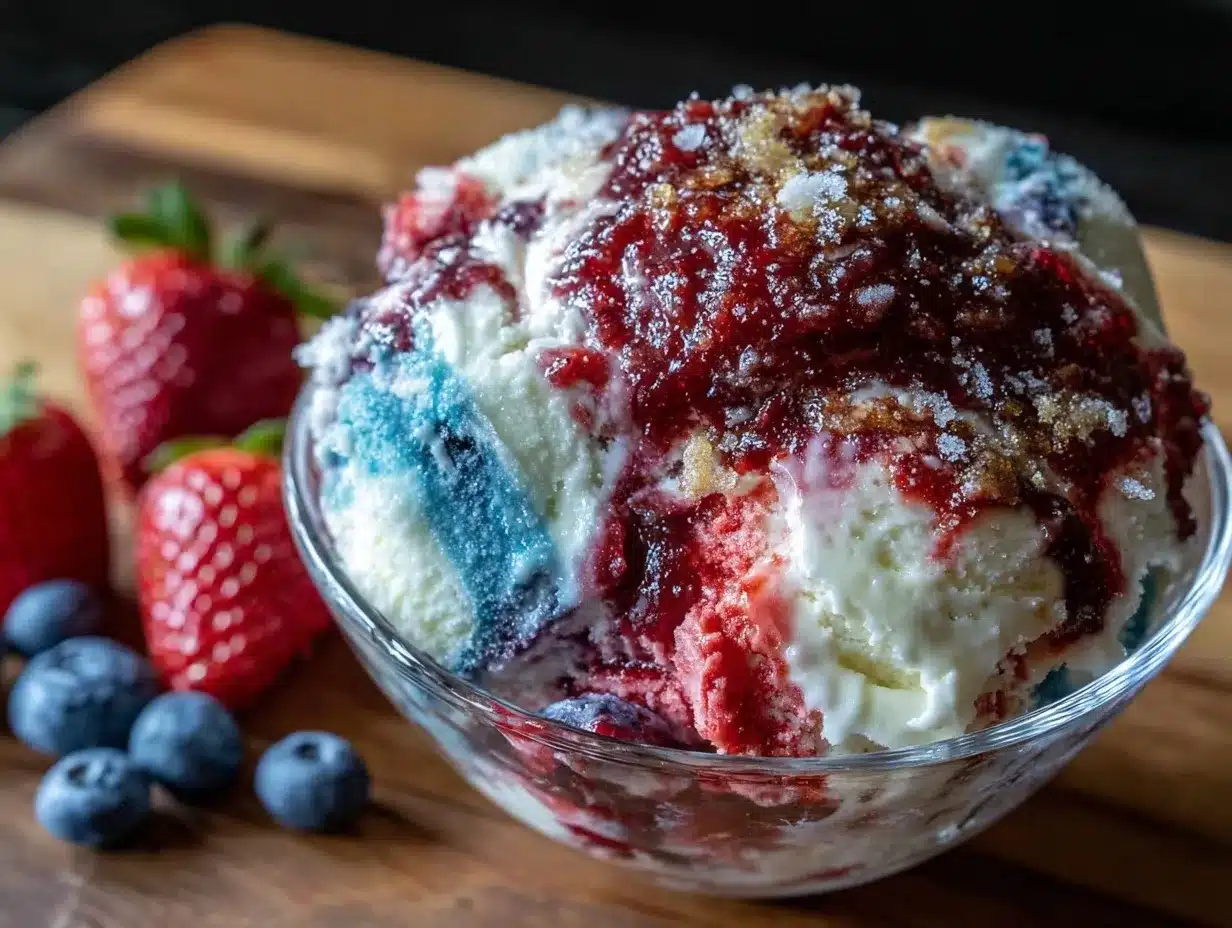
- Layer the Ice Cream: In your loaf pan or container, spoon the red layer evenly along the bottom. Add the white layer next, smoothing the top gently, then finish with the blue layer. Use a spatula to create swirls if you like a marbled effect.
- Freeze: Cover tightly with plastic wrap or a lid. Freeze for at least 6 hours or overnight until firm. For best texture, remove from the freezer 10 minutes before serving to soften slightly.
Watch out for overmixing the whipped cream once the berries are added; it can deflate and make the ice cream dense. Also, layering while the cream is still fluffy helps keep the colors distinct and the texture light. If you want a smoother, more uniform color, mix the layers more thoroughly, but you’ll lose the striking red, white, and blue effect.
Cooking Tips & Techniques
Whipping cream to just the right consistency can be tricky—too soft and your ice cream won’t hold up, too stiff and it becomes grainy. I learned over multiple attempts that stopping at soft peaks and folding gently is the sweet spot.
Using sweetened condensed milk gives sweetness and creaminess without needing eggs or complex custard steps. It also helps keep the ice cream scoopable straight from the freezer, which is a game changer for no-churn recipes.
Layering is more than just aesthetics. Adding each color separately and gently helps keep the vibrant patriotic theme intact. If you try to mix everything at once, you end up with a purple mess (trust me, been there!).
For a smoother finish, use a spatula to swirl the layers delicately just before freezing, but don’t overdo it or the colors will blend too much. Also, letting the ice cream sit at room temperature for a few minutes before serving makes scooping easier and brings out the flavors better.
Finally, keep your freezer at a consistent temperature to avoid icy crystals. If you want to prep in advance, making this a day ahead works perfectly.
Variations & Adaptations
- Dairy-Free Version: Swap heavy cream for full-fat coconut cream and use sweetened condensed coconut milk. The flavor shifts slightly but remains creamy and rich.
- Flavor Twists: Add a splash of lemon juice or zest to the berry purees for a fresh citrus kick. Another idea is folding in mini chocolate chips or crushed candied pecans for added texture.
- Seasonal Berries: In summer, fresh berries are best, but in cooler months, frozen berries work fine after thawing and draining. You can also try cherries or blackberries for a richer color palette.
- Alcohol Infusion: For adults, swirl in a tablespoon of berry-flavored liqueur or vodka into the berry layers. It adds a grown-up twist and keeps the ice cream scoopable.
One of my favorite tweaks is mixing the white layer with a bit of lemon zest and juice for a subtle tartness that balances the sweet berries perfectly. I also experimented with layering a few crushed snowball cookies for a festive crunch.
Serving & Storage Suggestions
This creamy no-churn red white blue ice cream is best served slightly softened to bring out its creamy texture and vibrant flavors. I like to scoop it into clear glass bowls or patriotic-themed cups to show off the layers.
Pair it with fresh berries, a drizzle of berry coulis, or even a sprinkle of toasted coconut or crushed nuts to add texture. It also goes surprisingly well alongside a slice of cranberry orange bread for a fun summer brunch combo.
Store leftovers tightly wrapped or in an airtight container in the freezer for up to 2 weeks. When reheating, let it sit at room temperature for 10-15 minutes before scooping for the best texture. Flavors deepen slightly after resting, making it even more satisfying the next day.
Nutritional Information & Benefits
This recipe offers roughly 250-300 calories per serving (about 1/2 cup or 120 ml), with most calories coming from healthy fats in the cream and natural sugars from the condensed milk and berries.
The fresh berries provide antioxidants, vitamin C, and fiber, making this treat a bit more wholesome than typical store-bought ice cream. Thanks to the simple ingredients, it’s free from preservatives and artificial additives.
For those watching dietary needs, this recipe can easily be adjusted to fit gluten-free, dairy-free, or lower-sugar diets by using alternative dairy and sweetener options. Just be mindful that texture might shift slightly with substitutions.
From a wellness standpoint, this ice cream is a joy to indulge in without guilt, perfect for sharing moments of celebration and comfort.
Conclusion
This creamy no-churn red white blue ice cream recipe is a little slice of summer that’s as fun to make as it is to eat. It’s proof that you don’t need fancy tools or complicated steps to create a dessert that feels special and tastes like pure joy.
Whether you stick to the classic layers or add your own twist with fresh flavors or textures, this recipe invites you to get creative and make it your own. I love how it brings people together around the table, sparking smiles with every colorful spoonful.
Give it a try for your next summer celebration or whenever you want a no-fuss, delicious treat that’s sure to impress. And hey, if you try adding your own spin, I’d love to hear about it!
Happy scooping and savoring!
Frequently Asked Questions
- Can I make this ice cream without fresh berries?
Yes! You can use frozen berries, but thaw and drain them well to avoid excess water in the ice cream. Alternatively, natural food colorings can be used to maintain vibrant colors. - How long does it take for the ice cream to freeze properly?
Freeze for at least 6 hours or overnight to ensure it’s firm enough to scoop. - Can I prepare this recipe in advance?
Absolutely. This ice cream stores well for up to 2 weeks in an airtight container. Just soften slightly before serving. - Is there a way to make this recipe vegan?
Yes, substitute coconut cream for heavy cream and use a vegan sweetened condensed milk alternative. The texture and flavor will be slightly different but still delicious. - What’s the best way to get distinct red, white, and blue layers?
Gently fold berry purees into separate portions of the cream base and layer carefully without mixing. Chill layers slightly before adding the next for sharper separation.
Pin This Recipe!
Creamy No-Churn Red White Blue Ice Cream Recipe Easy Patriotic Dessert
A quick and easy no-churn ice cream featuring vibrant red, white, and blue layers made with fresh berries and a creamy base. Perfect for patriotic celebrations and summer gatherings.
- Prep Time: 15 minutes
- Cook Time: 0 minutes
- Total Time: 6 hours 15 minutes
- Yield: 8 servings 1x
- Category: Dessert
- Cuisine: American
Ingredients
- 2 cups (480 ml) heavy cream, cold
- 1 can (14 oz / 396 g) sweetened condensed milk
- 1 teaspoon pure vanilla extract
- 1 cup (150 g) fresh strawberries or raspberries, pureed
- Optional: a few drops of red food coloring
- 1 cup (150 g) fresh blueberries, pureed or lightly mashed
- Optional: natural blue food coloring (like butterfly pea powder)
- About 1 cup (240 ml) of the plain cream base reserved before mixing with berries
Instructions
- Chill your mixing bowl and beaters in the fridge for at least 15 minutes before starting.
- Puree the strawberries (or raspberries) and blueberries separately using a blender or food processor. Alternatively, mash lightly with a fork for chunkier texture. Set aside.
- Pour the cold heavy cream into the chilled mixing bowl. Beat on medium-high speed with an electric mixer until soft peaks form (about 3-4 minutes).
- Gently fold in the sweetened condensed milk and vanilla extract with a spatula, being careful not to deflate the whipped cream. The mixture should look smooth and creamy.
- Scoop about 1 cup (240 ml) of the plain cream base into a small bowl for the white layer. The rest will be combined with berry purees for the red and blue layers.
- Fold the strawberry puree into one portion of the cream base until well combined but still fluffy. Repeat with the blueberry puree and the remaining cream base.
- In a loaf pan or airtight container, spoon the red layer evenly along the bottom. Add the white layer next, smoothing the top gently, then finish with the blue layer. Use a spatula to create swirls if desired.
- Cover tightly with plastic wrap or a lid. Freeze for at least 6 hours or overnight until firm.
- Remove from the freezer 10 minutes before serving to soften slightly for easier scooping.
Notes
Use ripe fresh berries for best color and flavor. Frozen berries can be used if thawed and drained well to avoid watery ice cream. Avoid overmixing whipped cream after adding berries to keep texture light. Let ice cream sit at room temperature for 10 minutes before serving for easier scooping. Keep freezer temperature consistent to prevent icy crystals.
Nutrition
- Serving Size: 1/2 cup (120 ml)
- Calories: 275
- Sugar: 24
- Sodium: 55
- Fat: 18
- Saturated Fat: 11
- Carbohydrates: 26
- Fiber: 2
- Protein: 3
Keywords: no-churn ice cream, patriotic dessert, red white blue ice cream, easy ice cream recipe, summer dessert, Fourth of July dessert


