
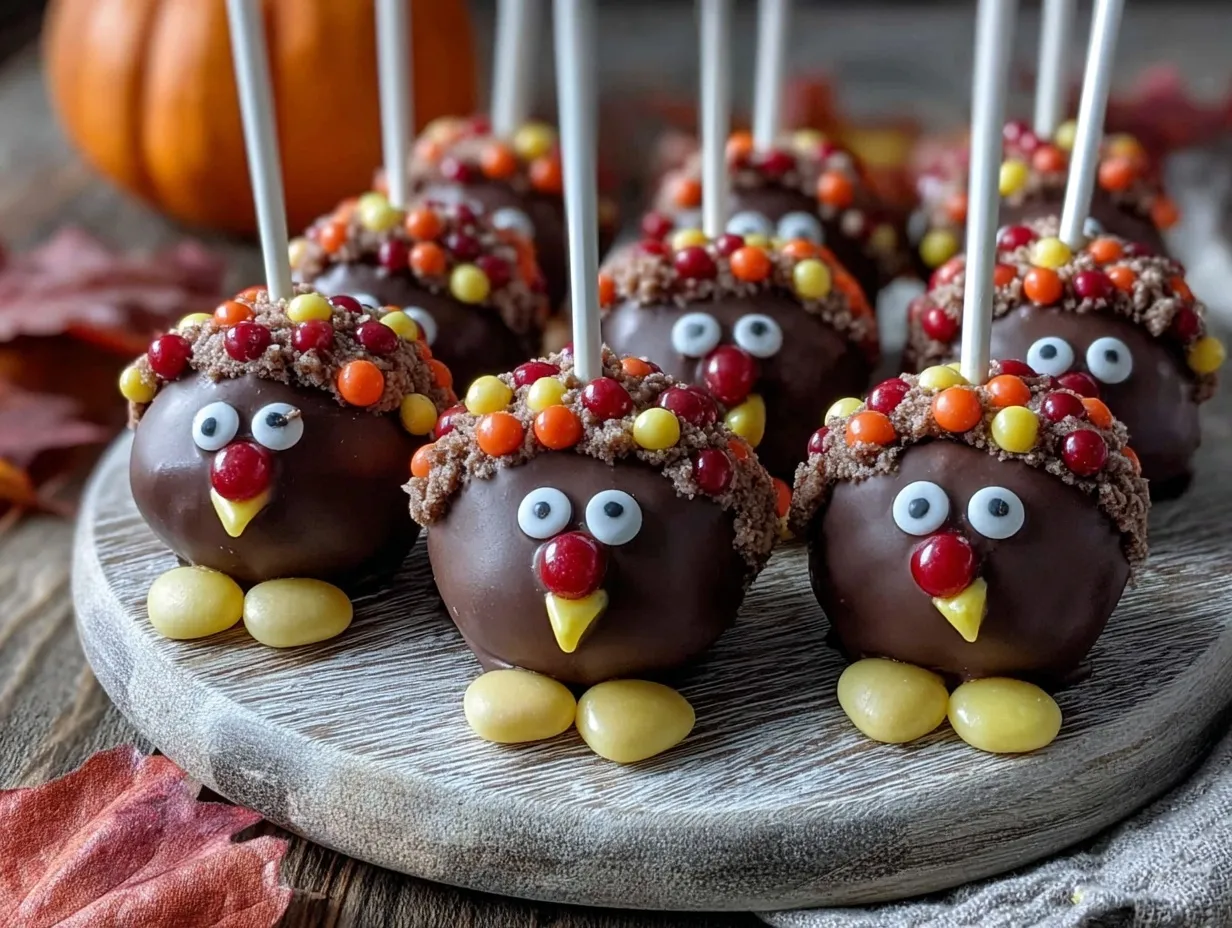
Let me paint you a picture: the scent of sweet vanilla cake crumbs mingling with creamy frosting fills my kitchen, while the golden glow of autumn sunlight dances across a tray of adorable Thanksgiving cake pops. Each one is a tiny canvas splashed with orange, brown, and gold—you know, those classic fall colors that just scream Thanksgiving. The first time I made these festive cake pops, I was knee-high to a grasshopper, helping my grandma roll leftover cake into sticky little balls (and sneaking way too many bites when she wasn’t looking).
Honestly, the moment I dipped my first cake pop into melted chocolate and sprinkled on colorful autumn jimmies, I paused, took a deep breath, and just grinned. It felt like I’d unlocked a secret to holiday magic—one that’s dangerously easy and ridiculously fun. My family couldn’t keep their hands off the cooling rack (and I can’t really blame them). These Thanksgiving cake pops have become a staple at our table, perfect for potlucks, gifting neighbors, or brightening up your Pinterest board with a pop of seasonal cheer.
Let’s face it, I wish I’d stumbled on this recipe years ago. It’s pure, nostalgic comfort—fast, forgiving, and totally customizable. Whether you’re a cake pop newbie or a seasoned baker, this is the kind of treat that brings smiles, starts conversations, and feels like a warm hug on a chilly November day. I’ve tested this recipe more times than I care to admit (in the name of research, of course), and every time, it’s a hit. Get ready—these easy Thanksgiving cake pops are about to become your new go-to for festive fun!
Why You’ll Love These Thanksgiving Cake Pops
If you’re hunting for a show-stopping holiday treat that doesn’t require hours in the kitchen, these Thanksgiving cake pops are your answer. I’ve made dozens of batches—some with kids helping, some solo, sometimes late at night before a big party. Each time, I find a new reason to love them. Here’s why they’re a must-make:
- Quick & Easy: Comes together in under 10 minutes if you use store-bought cake—yep, really! Perfect for busy schedules or last-minute guests.
- Simple Ingredients: No fancy shopping trips. Just cake, frosting, chocolate, and some festive sprinkles. You probably have most of these in your pantry right now.
- Perfect for Celebrations: These cake pops are a hit at Thanksgiving dinners, school parties, and even Friendsgiving gatherings. They travel well and look gorgeous on a dessert table.
- Crowd-Pleaser: Kids go wild for the fun shapes and colors, but honestly, adults sneak just as many. I’ve seen these disappear faster than pumpkin pie!
- Unbelievably Delicious: Soft, moist cake with creamy frosting, coated in chocolate—each bite is a mini celebration.
What sets this Thanksgiving cake pop recipe apart is the foolproof method. No crumbling cake disasters here! I blend the crumbs with frosting until just pliable—never soggy. Plus, the decorating possibilities are endless. Want turkey faces? Use candy corn and edible eyes. Just want autumn vibes? Orange, yellow, and brown sprinkles do the trick.
These cake pops aren’t just tasty—they’re memory-makers. They’re easy enough for kids to help, yet pretty enough to impress your in-laws. Whether you’re looking for low-stress holiday baking or a creative way to brighten up your dessert spread, this recipe delivers comfort, fun, and a sweet taste of tradition. Trust me, after one bite, you’ll see why they’ve become my favorite Thanksgiving treat.
What Ingredients You Will Need
This recipe uses simple, wholesome ingredients to deliver bold flavor and a festive look without the fuss. Most are pantry staples, and you can swap or adjust them easily to fit your preferences or dietary needs.
- For the cake pops:
- 1 (13×9-inch) vanilla or yellow cake, baked and cooled (store-bought or homemade)
- 1/2 cup (120g) cream cheese frosting (or classic buttercream)
- For coating and decorating:
- 12 oz (340g) white chocolate or candy melts (orange or brown, for a festive touch)
- Assorted Thanksgiving sprinkles (turkey shapes, autumn leaves, orange, yellow, brown jimmies)
- Candy corn, mini chocolate chips, or edible eyes (optional, for turkey faces)
- 1 tbsp vegetable oil or coconut oil (helps make the coating smooth and shiny)
- For assembling:
- 24 cake pop sticks (or sturdy paper straws)
- Styrofoam block or cake pop stand (for drying; you can use an egg carton flipped upside-down if needed)
Ingredient tips and swaps:
- Store-bought cake saves time, but homemade adds a personal touch—just make sure it’s cooled completely before crumbling.
- Cream cheese frosting gives a tangy, rich flavor, but classic buttercream works well too. I love using Philadelphia cream cheese for the best texture.
- Candy melts come in all colors—Wilton and Ghirardelli are my go-tos for smooth melting. If you only have white chocolate, add a few drops of gel food coloring.
- Sprinkles are where the fun begins! In summer, swap in pastel colors, or grab snowflake sprinkles for winter parties.
- Gluten-free? Use a gluten-free cake mix and certified gluten-free decorations.
- Dairy-free? Substitute vegan frosting and dairy-free chocolate chips.
Honestly, you can get creative—pumpkin cake, chocolate cake, or even leftover carrot cake all work. The key is a good crumb and just enough frosting to hold together, not drown it. That’s the magic formula for cake pops that are soft but never mushy!
Equipment Needed
You don’t need a fancy bakery setup to whip up these Thanksgiving cake pops. Here’s what I use in my own kitchen:
- Mixing bowls: One large for crumbling cake and mixing, one small for melting chocolate.
- Fork or potato masher: For breaking up cake; hands work too!
- Measuring cups and spoons: Precision helps, especially with frosting and chocolate.
- Baking sheet: To set shaped cake balls before dipping.
- Microwave-safe bowl: For melting candy melts or chocolate.
- 24 cake pop sticks: Paper straws work if you want a cute, colorful look.
- Styrofoam block or cake pop stand: For drying pops upright. In a pinch, I poke holes in an upside-down egg carton—works like a charm!
- Wax or parchment paper: Keeps cleanup easy and prevents sticking.
Don’t stress if you’re missing a fancy cake pop stand. I’ve balanced pops in mugs, glasses, and even colanders before. Just make sure your drying surface is sturdy and allows air to circulate. For cleaning up melted chocolate, a silicone spatula makes life easier, and wipes up fast. If you plan to make these often, reusable silicone mats and nonstick bowls are budget-friendly and last forever.
Preparation Method
Ready to make some festive Thanksgiving cake pops? Here’s how I do it, step by step:
- Crumble the cake: Place the cooled cake (about 13×9-inch, or 1 kg) into a large mixing bowl. Use your hands or a fork to break it into fine crumbs. Aim for even texture—no big lumps. This should take 2-3 minutes.
- Add frosting: Spoon in 1/2 cup (120g) cream cheese frosting. Blend with cake crumbs using a fork, spoon, or your fingers. Mix until just combined—stop when the mixture holds together when squeezed. Don’t over-mix or it’ll get mushy.
- Shape cake balls: Scoop out portions (about 1 tablespoon each, or 20g) and roll into smooth balls. Place on a baking sheet lined with parchment. You should get around 24 cake balls. Chill in the fridge for 15-20 minutes—this helps them firm up for dipping.
- Melt the coating: In a microwave-safe bowl, melt 12 oz (340g) candy melts or white chocolate with 1 tbsp oil. Microwave in 30-second bursts, stirring each time, until smooth. If using colored candy melts, melt separately for different colors.
- Insert sticks: Dip the tip of each cake pop stick into melted chocolate, then push halfway into each chilled cake ball. This “glues” the stick in place. Let set for 2-3 minutes.
- Dip cake pops: Holding by the stick, dip each cake pop into melted chocolate. Gently swirl and tap off excess. If your coating seems too thick, add a few drops of oil. Place upright in a styrofoam block or cake pop stand to dry.
- Decorate: While chocolate is wet, sprinkle with Thanksgiving-themed sprinkles, mini chocolate chips, or candy corn. For turkey faces, use candy eyes and candy corn for beaks. Work quickly—the coating sets in about a minute.
- Set and serve: Let cake pops dry completely (about 20 minutes). Once set, serve on a festive platter, pop into treat bags, or display upright in a mug filled with rice or beans for stability.
Troubleshooting tips: If cake pops crack or slide off sticks, they might be too warm—chill longer. If chocolate coating is streaky, it may have overheated; melt gently and stir well. Pops sticking to parchment? Use wax paper for easier release.
For extra efficiency, I roll and chill all cake balls first, then dip and decorate assembly-line style. It’s a little messy, but that’s half the fun. You’ll know you nailed it when the coating is smooth, the sprinkles stick, and everyone starts circling the kitchen for a first taste!
Cooking Tips & Techniques
Making Thanksgiving cake pops isn’t rocket science, but a few pro tricks go a long way. I’ve learned most of these by trial and error (and more than a few cake pops that fell off the stick!).
- Chill, chill, chill: Cold cake balls hold together better when dipping. If your kitchen is warm, pop them in the freezer for 5 minutes before coating.
- Don’t overdo the frosting: Too much makes cake pops mushy. Start with less—add more only if needed for binding.
- Use good melting chocolate: Candy melts work best. If using chocolate chips, add a bit of oil for a smoother finish.
- Decorate quickly: Sprinkles and decorations stick best when the coating is freshly dipped and still wet.
- Work in batches: Dip 6-8 pops at a time, then decorate, before moving to the next batch. Keeps everything fresh and manageable.
- Fixing cracks or drips: If a pop cracks, drizzle a little extra chocolate and smooth over with a spatula.
I’ve botched a few pops by rushing—patience pays off. If your coating’s too thick, don’t panic. Gently reheat and stir in extra oil. If sticks fall out, re-dip the tip in chocolate and re-insert. Cleaning up is easier if you use parchment under your work surface. For multitasking, I prep cake balls the night before and decorate in the morning—makes everything less stressful.
Consistency is key. Measure frosting and cake crumbs by weight for best results. And don’t be afraid to get a little messy—kids love helping with the sprinkle step, even if it means a few extra jimmies on the floor. That’s part of the fun, honestly!
Variations & Adaptations
Thanksgiving cake pops are endlessly customizable. Here are some fun ways to switch things up:
- Dietary swaps: Use gluten-free cake mix and certified gluten-free decorations for guests with sensitivities. For dairy-free, swap in vegan frosting and dairy-free chocolate chips.
- Seasonal flavors: Try pumpkin spice cake with cinnamon buttercream for a true fall vibe. Or use cranberry cake and white chocolate coating for a tart twist.
- Decorating styles: Make turkey cake pops by adding candy eyes, a candy corn beak, and chocolate sprinkles for feathers. Or go for simple autumn leaves using colored sprinkles and edible glitter.
- Cooking methods: No-bake option: use crushed sandwich cookies and frosting instead of cake for a quick shortcut.
- Taste preferences: Chocolate lovers? Use chocolate cake and ganache frosting. For lighter pops, try lemon cake and vanilla glaze.
One of my favorite personal variations was swapping classic vanilla for spice cake, then decorating with maple-flavored white chocolate. The flavor was outrageously good and felt like a grown-up twist on a childhood classic. Don’t hesitate to play—these cake pops are as forgiving as they are fun.
Serving & Storage Suggestions
Serve these cake pops at room temperature for the best texture. Arrange upright in a mug filled with beans or rice, or lay them flat on a festive platter lined with parchment.
They pair perfectly with hot apple cider, coffee, or even a glass of cold milk. Add a few on each dessert plate for a fun Thanksgiving surprise, or wrap individually in cellophane for easy gifting. For a truly Pinterest-worthy display, stick pops into a decorative pumpkin or floral foam block covered with autumn leaves.
To store, keep cake pops in an airtight container at room temperature for up to 3 days. For longer storage, refrigerate for up to a week (just let them come back to room temp before serving for best flavor). Freeze undecorated cake balls for up to a month, then thaw and decorate as needed. Reheat? Not needed—these are best served as-is, though a quick zap in the microwave for 5 seconds can soften if chilled too long.
Honestly, the flavors mellow and deepen after a day, so if you can resist snacking, they’re even better the second time around!
Nutritional Information & Benefits
Estimated per cake pop:
- Calories: 120
- Fat: 6g
- Sugar: 12g
- Protein: 1g
Key ingredients like cream cheese add a little protein and calcium, while homemade cake lets you control sugar and fat levels. If you use gluten-free cake mix or vegan frosting, these treats fit a wide range of dietary needs. Watch for allergens—wheat, dairy, and sometimes nuts in sprinkles or coatings. For a lighter option, use reduced-sugar cake and frosting.
From a wellness perspective, these Thanksgiving cake pops are all about balance—small portions, big flavor, and the joy of sharing. For me, the happiness they bring easily outweighs the calories (especially when paired with good conversation and laughter around the table).
Conclusion
If you’re looking for a festive, foolproof treat that brings everyone together, these easy Thanksgiving cake pops are it. They’re quick, customizable, and just plain fun—perfect for busy holiday schedules or spontaneous baking sessions with the kids.
Try swapping flavors, colors, or decorations to make them your own—there’s no wrong way to celebrate. I love them because they capture the spirit of Thanksgiving: sharing, creativity, and a little bit of sweetness for everyone. So go ahead, bookmark this recipe, and give it a whirl at your next gathering.
I’d love to hear how you make these your own! Drop your flavor twists or decorating ideas in the comments, and share your pops on social media for a chance to be featured. Wishing you a holiday filled with laughter, tasty treats, and plenty of cake pops—happy baking!
Frequently Asked Questions
How far in advance can I make Thanksgiving cake pops?
You can make them up to 3 days ahead and store in an airtight container at room temp. For longer storage, keep refrigerated for up to a week.
Can I freeze cake pops?
Yes, freeze undecorated cake balls for up to a month. Thaw, then dip and decorate just before serving for best results.
What’s the best cake flavor for Thanksgiving cake pops?
Vanilla, yellow, or spice cake are all great choices. Pumpkin cake is a fun seasonal twist!
How do I keep cake pops from falling off the stick?
Dip the stick in melted chocolate before inserting into the cake ball. Chill your pops before dipping to help them hold firm.
Can I make these gluten-free or dairy-free?
Absolutely! Use gluten-free cake and dairy-free frosting or chocolate for easy swaps. Just check your sprinkles for hidden allergens.
Pin This Recipe!
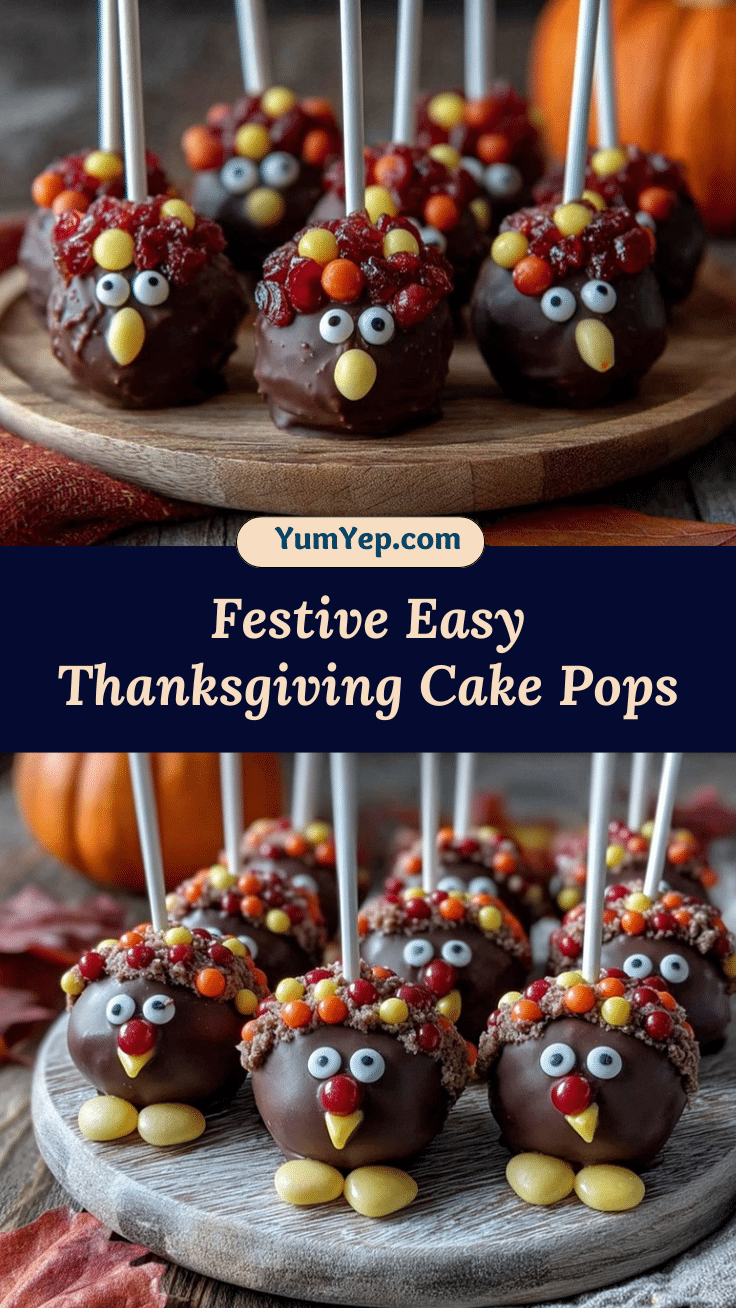
Thanksgiving Cake Pops: Easy 10-Minute Festive Treats for Holidays

These Thanksgiving cake pops are a quick, festive treat made with cake, frosting, and chocolate coating, decorated in autumn colors. Perfect for holiday gatherings, gifting, or adding a cheerful touch to your dessert table.
- Prep Time: 10 minutes
- Cook Time: 0 minutes
- Total Time: 30 minutes
- Yield: 24 cake pops 1x
- Category: Dessert
- Cuisine: American
Ingredients
- 1 (13×9-inch) vanilla or yellow cake, baked and cooled (store-bought or homemade)
- 1/2 cup (120g) cream cheese frosting (or classic buttercream)
- 12 oz (340g) white chocolate or candy melts (orange or brown, for a festive touch)
- Assorted Thanksgiving sprinkles (turkey shapes, autumn leaves, orange, yellow, brown jimmies)
- Candy corn, mini chocolate chips, or edible eyes (optional, for turkey faces)
- 1 tbsp vegetable oil or coconut oil
- 24 cake pop sticks (or sturdy paper straws)
- Styrofoam block or cake pop stand (for drying; or an upside-down egg carton)
Instructions
- Place the cooled cake into a large mixing bowl and crumble into fine crumbs using your hands or a fork.
- Add cream cheese frosting and blend with cake crumbs until just combined and the mixture holds together when squeezed.
- Scoop out portions (about 1 tablespoon each) and roll into smooth balls. Place on a baking sheet lined with parchment paper. Chill in the fridge for 15-20 minutes.
- In a microwave-safe bowl, melt candy melts or white chocolate with oil in 30-second bursts, stirring each time, until smooth.
- Dip the tip of each cake pop stick into melted chocolate, then push halfway into each chilled cake ball. Let set for 2-3 minutes.
- Holding by the stick, dip each cake pop into melted chocolate. Gently swirl and tap off excess. Place upright in a styrofoam block or cake pop stand to dry.
- While chocolate is wet, decorate with Thanksgiving-themed sprinkles, mini chocolate chips, or candy corn. For turkey faces, use candy eyes and candy corn for beaks.
- Let cake pops dry completely (about 20 minutes). Serve on a festive platter, pop into treat bags, or display upright in a mug filled with rice or beans.
Notes
Chill cake balls before dipping for best results. Use gluten-free cake and decorations for dietary needs. Decorate quickly while coating is wet. Store in an airtight container at room temperature for up to 3 days, or refrigerate for up to a week. Freeze undecorated cake balls for up to a month.
Nutrition
- Serving Size: 1 cake pop
- Calories: 120
- Sugar: 12
- Sodium: 65
- Fat: 6
- Saturated Fat: 3
- Carbohydrates: 16
- Protein: 1
Keywords: Thanksgiving, cake pops, holiday dessert, festive treats, easy baking, kid-friendly, party food, autumn, fall recipes


