Introduction
Let me tell you, the moment the scent of cinnamon and pumpkin puree mingled with freshly baked pecan crust in my kitchen, I knew I’d stumbled onto something truly magical. The creamy layers—velvety smooth, chilled, and flecked with autumn spices—are downright irresistible. There’s this gentle sweetness that mingles with the nutty crunch, and every bite feels like the coziest fall afternoon, all bundled up in dessert form.
The first time I whipped up this Fluffy Pumpkin Lush Dessert, it was a chilly Saturday in October. I was knee-high to a grasshopper (well, not really, but you get the picture!) when my grandma introduced me to her layered “lush” desserts. I remember pausing, fork in hand, just grinning because I’d discovered a dessert that blends nostalgia with a modern, creamy twist. Years ago, I’d only tasted the classic lemon lush, but when I tried this pumpkin version—wow, it was like autumn had come alive right there at my kitchen table.
My family couldn’t stop sneaking forkfuls off the cooling rack, which, honestly, is the highest form of praise in our house. We’ve served this pumpkin lush at potlucks, used it to sweeten up our Thanksgiving table, and even brightened up a few Pinterest boards. It’s one of those dangerously easy desserts that delivers pure, nostalgic comfort with every bite. You know what? I wish I’d discovered this years ago, because it’s now a staple for family gatherings, gifting, and any time I want to feel that warm hug only pumpkin desserts can deliver. I’ve tested it more times than I care to admit (in the name of research, of course), and you’re going to want to bookmark this one for all your festive occasions!
Why You’ll Love This Recipe
Honestly, if you’re looking for a show-stopping dessert that’s as easy as it is impressive, this Pumpkin Lush Dessert recipe is going to be your new favorite. I’ve made it for everything from casual Sunday dinners to full-blown holiday feasts, and it’s always the first thing to disappear from the dessert table. Here’s why it stands out:
- Quick & Easy: Comes together in under an hour (plus chilling time), perfect for busy weeknights or spontaneous cravings.
- Simple Ingredients: No specialty stores required; you probably have most of these in your pantry already.
- Perfect for Festive Gatherings: Whether it’s Thanksgiving, Friendsgiving, or a cozy autumn potluck, this dessert brings the wow factor without fuss.
- Crowd-Pleaser: Kids, adults, and picky eaters alike rave about those fluffy, creamy layers and the festive pumpkin flavor.
- Unbelievably Delicious: The balance of creamy cheesecake, spiced pumpkin, and crunchy nut crust is pure comfort food—one bite and you’ll close your eyes in bliss.
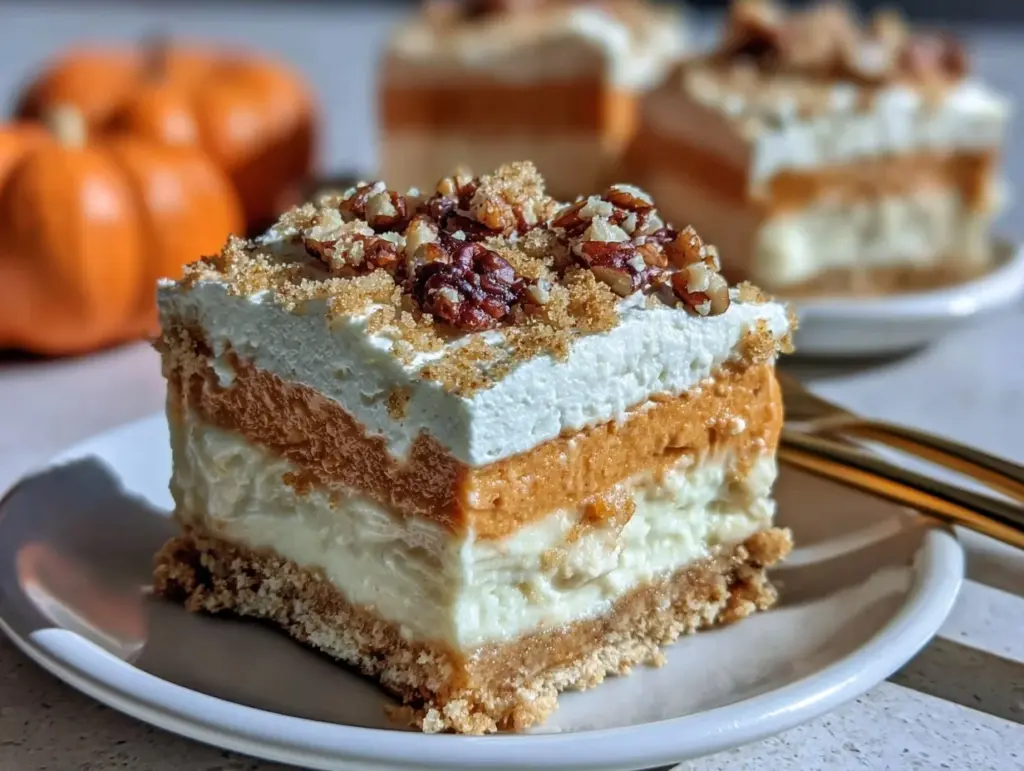
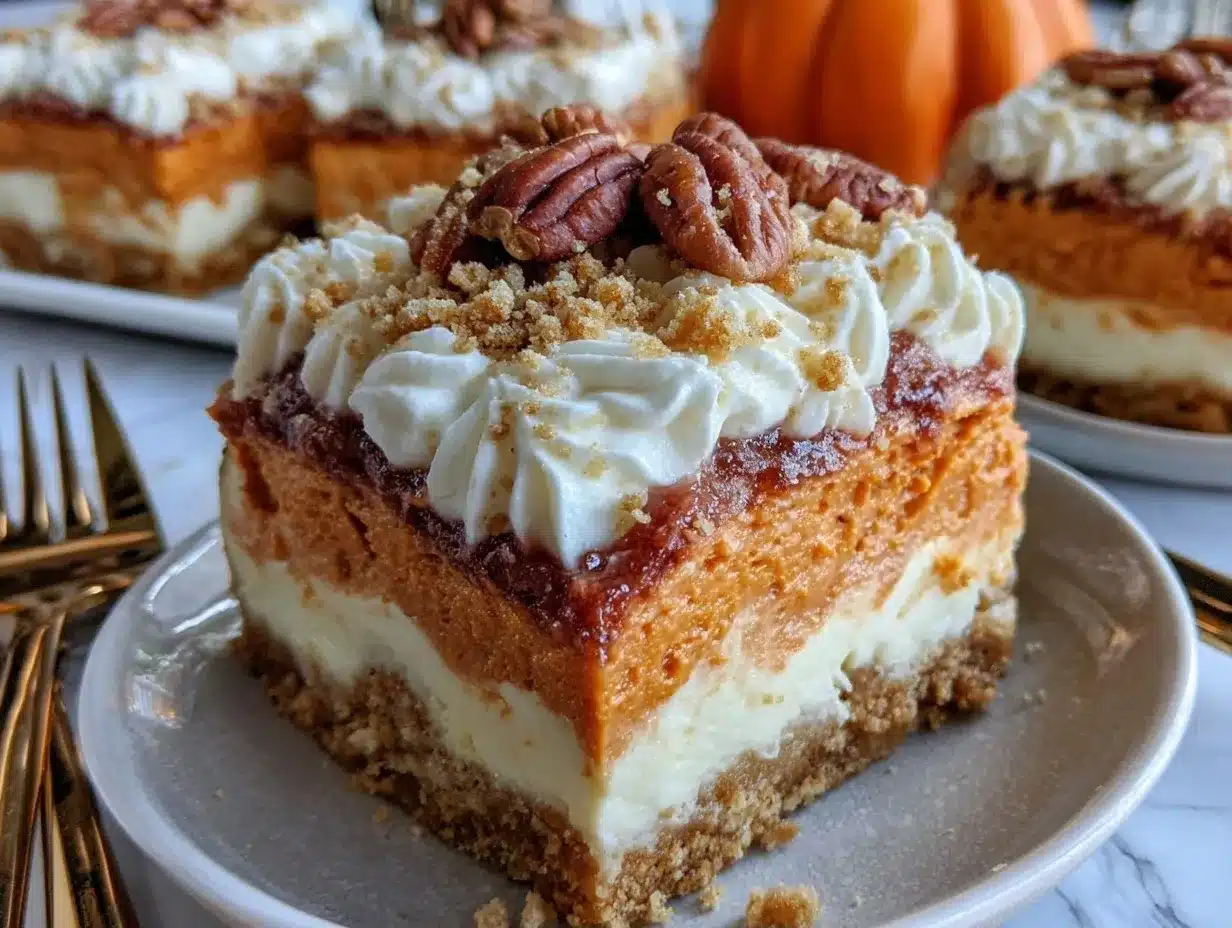
What makes this pumpkin lush dessert different is the way the layers come together—each one is distinct, yet they blend into a harmonious bite. I use real pumpkin puree (never the pie filling!), and a touch of extra spice to give it depth. The crust uses pecans for a richer, more festive flavor (feel free to swap with walnuts or skip nuts entirely if you prefer).
This recipe isn’t just another pumpkin dessert; it’s the one that makes people ask for seconds and then the recipe. It’s comfort food, but lighter and fluffier, with none of the heaviness you’d expect. I’ve tested shortcuts and flavor tweaks over the years, so you get the absolute best version. Whether you’re impressing guests or just treating yourself, this pumpkin lush dessert turns any meal into a celebration. It’s the kind of sweet treat you’ll find yourself craving all year round.
What Ingredients You Will Need
This pumpkin lush dessert uses a handful of simple, wholesome ingredients to deliver bold flavor and that signature fluffy texture—no fuss, no fancy shopping trips. Most of these are pantry staples, and you can easily make substitutions if needed. Here’s what you’ll need:
- For the Pecan Crust:
- 1 cup (120g) all-purpose flour (swap with gluten-free blend if desired)
- 1/2 cup (113g) unsalted butter, melted (adds richness)
- 1/2 cup (60g) chopped pecans (or walnuts; omit for nut-free)
- 2 tablespoons (25g) granulated sugar
- Pinch of salt
- For the Cream Cheese Layer:
- 8 ounces (225g) cream cheese, softened (I recommend Philadelphia for best texture)
- 1 cup (120g) powdered sugar
- 1 cup (240ml) whipped topping (or homemade whipped cream; use coconut whipped topping for dairy-free)
- 1/2 teaspoon vanilla extract
- For the Pumpkin Layer:
- 1 (15-ounce/425g) can pumpkin puree (not pumpkin pie filling)
- 1 (3.4-ounce/96g) package instant vanilla pudding mix
- 1 cup (240ml) cold milk (whole or 2%; or unsweetened almond milk for dairy-free)
- 2 teaspoons pumpkin pie spice (or 1 tsp cinnamon + 1/2 tsp nutmeg + 1/2 tsp ginger)
- 1/2 cup (120ml) whipped topping
- For the Festive Topping:
- 2 cups (480ml) whipped topping (for the very top)
- Extra chopped pecans, for garnish (optional but festive!)
- Pinch of cinnamon or pumpkin pie spice
- Optional: caramel drizzle, chocolate shavings, or colored sprinkles for extra wow
Ingredient tips: For best results, use pure pumpkin puree—Libby’s is my go-to. For whipped topping, I’ve had luck with both Cool Whip and homemade whipped cream (stiff peaks work best). If you’re going dairy-free, coconut-based toppings are a solid choice. Feel free to swap in graham cracker crumbs for the crust or use gluten-free flour as needed. In the summer, try adding a handful of fresh berries on top for a lighter twist!
Equipment Needed
You really don’t need much to make this pumpkin lush dessert, which is a big part of its charm. Here’s the basic equipment:
- 9×13-inch (23x33cm) baking dish or glass pan
- Mixing bowls (at least three; one for each layer)
- Hand mixer or stand mixer (a whisk and elbow grease work in a pinch, but a mixer makes it fluffier!)
- Spatula and wooden spoon
- Measuring cups and spoons (accuracy matters for those creamy layers)
- Plastic wrap or airtight lid (for chilling and storage)
If you don’t have a glass pan, any similarly sized metal or ceramic dish works. I’ve even made this in a deep pie dish for smaller gatherings. My favorite spatula is a flexible silicone one—it gets every last bit of creamy filling out. If you’re using a hand mixer, just make sure the beaters are clean between layers for best results. For budget-friendly options, most discount stores carry basic bakeware that works just fine. (Honestly, I’ve made this dessert in my oldest, slightly banged-up dish and it still turns out delicious.)
Preparation Method
- Prepare the Pecan Crust:
- Preheat your oven to 350°F (175°C).
- In a mixing bowl, combine 1 cup (120g) flour, 1/2 cup (60g) chopped pecans, 2 tablespoons (25g) granulated sugar, and a pinch of salt.
- Pour in 1/2 cup (113g) melted butter and mix until crumbly and well combined.
- Press the mixture evenly into the bottom of your 9×13-inch (23x33cm) baking dish. Aim for an even thickness—about 1/4-inch (0.6cm).
- Bake for 15-18 minutes, or until the crust is golden and fragrant. Let it cool completely (about 20 minutes). The crust should feel firm but not hard.
- Mix the Cream Cheese Layer:
- In a clean bowl, beat 8 ounces (225g) softened cream cheese until smooth and creamy—no lumps.
- Add 1 cup (120g) powdered sugar and beat until fluffy, about 2 minutes.
- Fold in 1 cup (240ml) whipped topping and 1/2 teaspoon vanilla extract. Mix gently until just combined.
- Spread this layer evenly over the cooled crust. Use a spatula for smoothness. If the cream cheese is too stiff, let it sit at room temperature for a few minutes.
- Prepare the Pumpkin Layer:
- In a third bowl, whisk together 1 (15-ounce/425g) can pumpkin puree, 1 (3.4-ounce/96g) package instant vanilla pudding mix, 1 cup (240ml) cold milk, and 2 teaspoons pumpkin pie spice.
- Mix until thick and creamy—about 2 minutes with a hand mixer or whisk.
- Fold in 1/2 cup (120ml) whipped topping until the mixture is fluffy and pale orange.
- Spread this layer gently over the cream cheese layer. Don’t rush—use gentle swipes to avoid mixing layers.
- Add the Festive Topping:
- Spread 2 cups (480ml) whipped topping evenly over the pumpkin layer. Swirl with a spatula for a pretty finish.
- Sprinkle with extra chopped pecans, a pinch of cinnamon or pumpkin pie spice. Add caramel drizzle or sprinkles if you want a Pinterest-ready look!
- Chill & Serve:
- Cover with plastic wrap or an airtight lid and refrigerate for at least 4 hours (overnight is even better).
- Slice into squares using a sharp knife. Wipe the knife between cuts for neat layers.
- Serve chilled and enjoy!
Preparation notes: If your crust crumbles when you slice, don’t stress—just scoop with a spatula, and it’ll taste amazing regardless. If layers smear, chill longer next time. For perfect layers, use a clean spatula for each.
Cooking Tips & Techniques
Here’s what I’ve learned after making this pumpkin lush dessert more times than I can count (and yes, a few flops along the way):
- Layering is key: Make sure each layer is cool before adding the next. Warm crust will melt the cream cheese layer.
- Don’t overmix: Especially with whipped topping—gentle folding keeps things fluffy. I once beat the whipped topping too much, and it went flat. Not my finest moment.
- Chilling matters: The longer you chill, the more defined the layers. Overnight is best for those picture-perfect Pinterest slices.
- Troubleshooting: If your pumpkin layer is runny, check your pudding mix—instant works best. If using homemade whipped cream, whip to stiff peaks for max fluff.
- Timing trick: Prep crust and cream cheese layer the night before, then finish with pumpkin and topping in the morning. It’s a lifesaver for busy holidays!
- Consistency tip: Use full-fat cream cheese and real pumpkin puree. Low-fat versions can water down the texture, making the layers less distinct.
One time I forgot to chill the cream cheese layer, and the whole dessert turned into a creamy mess—still delicious, but not exactly pretty. Since then, I always give myself extra time. Remember, a clean knife and a steady hand make for neat slices. If all else fails, just spoon it out—it tastes every bit as good!
Variations & Adaptations
One of my favorite things about this pumpkin lush dessert recipe is how flexible it is. Here are a few of the best twists I’ve tried (and a couple I plan to try soon):
- Gluten-Free: Use a 1:1 gluten-free flour blend for the crust, or substitute crushed gluten-free graham crackers. The texture stays lovely and light.
- Dairy-Free: Swap cream cheese with vegan cream cheese, and use coconut-based whipped topping. Almond milk works great for the pudding layer.
- Low-Sugar: Use sugar-free pudding mix and whipped topping. Reduce powdered sugar in the cream cheese layer or use a sugar substitute like stevia.
- Seasonal Swaps: In spring, substitute the pumpkin puree with pureed sweet potato or butternut squash. In summer, add fresh berries or a berry sauce on top.
- Flavor Boosts: Add a splash of maple syrup to the cream cheese layer for a deeper autumn flavor. Try a ginger snap crust instead of pecan for a spicy zing.
I once made this with walnuts in the crust and a sprinkle of mini chocolate chips on top—my kids went wild for it. If you’re serving someone with nut allergies, just use graham crumbs and skip the nuts entirely. For personal taste, I love a little extra cinnamon dusted on top for that bakery look. Mix and match ingredients to suit your crowd or whatever you’ve got handy.
Serving & Storage Suggestions
This pumpkin lush dessert is best served chilled, straight from the fridge. The layers are at their fluffiest when cold, and the flavors truly pop. For presentation, slice into neat squares and use a spatula to transfer to plates. Sprinkle with extra pecans and a pinch of spice for that Pinterest-worthy finish.
Pair it with hot coffee, chai tea, or even a crisp apple cider—those autumn flavors just sing together. If you’re serving a crowd, a scoop of vanilla ice cream on the side makes for an extra special treat.
To store, cover tightly with plastic wrap or an airtight lid. It keeps well in the refrigerator for up to 4 days. For longer storage, freeze individual squares on a lined tray, then wrap and store for up to a month. Thaw in the fridge overnight. To reheat (if you really want it warm), microwave individual slices for 10-15 seconds, but keep in mind the layers will soften. Honestly, it’s best enjoyed chilled—trust me, the flavors deepen and the texture stays dreamy.
Nutritional Information & Benefits
Each serving of pumpkin lush dessert (about 1/12th of the pan) contains approximately:
- Calories: 320
- Fat: 18g
- Carbohydrates: 36g
- Protein: 4g
- Sugar: 22g
Health benefits: Pumpkin is loaded with vitamin A, fiber, and antioxidants. The nuts add healthy fats and a bit of protein. If you use light whipped topping or sugar-free options, you can reduce calories and sugar further.
This recipe can be adapted for gluten-free or dairy-free diets as noted above. Contains nuts (pecans or walnuts) and dairy (cream cheese, milk, whipped topping)—so always check with guests for allergies. From a wellness perspective, I love that this dessert brings a bit of nutrition with its pumpkin base, making it a sweet treat I feel good about sharing.
Conclusion
So, why should you try this Fluffy Pumpkin Lush Dessert? It’s the kind of recipe that’s simple enough for a weeknight, but impressive enough for all your festive gatherings. Those creamy layers, nutty crust, and cozy pumpkin flavor are just pure autumn joy—honestly, it’s the dessert I turn to whenever I want comfort and a little celebration.
Feel free to tweak the layers, swap in your favorite spices, or experiment with different toppings. That’s the beauty of making it your own! I keep coming back to this recipe because it’s always a hit, and it makes every occasion feel a little more special.
If you make this, I’d love to hear your twists—share your photos, leave a comment, or tag me on social media. Let’s spread the pumpkin love! Trust me, bookmark this one—you’ll be making it again and again.
FAQs
Can I make pumpkin lush dessert ahead of time?
Absolutely! It actually tastes better when made a day in advance—just cover and chill overnight.
What if I don’t have pecans for the crust?
No problem—use walnuts or skip nuts entirely. Graham cracker crumbs also work well.
Can I freeze pumpkin lush dessert?
Yes, freeze individual squares on a tray, then wrap. Thaw in the fridge overnight before serving.
Is this recipe gluten-free?
It can be! Just use a gluten-free flour blend or gluten-free graham cracker crumbs for the crust.
Can I use homemade whipped cream instead of store-bought?
Definitely—just whip to stiff peaks for the fluffiest layers. Coconut whipped cream is great for dairy-free!
Pin This Recipe!
Pumpkin Lush Dessert Recipe: Easy Fluffy Layers for Festive Gatherings

This Pumpkin Lush Dessert features creamy layers of spiced pumpkin, fluffy whipped topping, and a crunchy pecan crust. It’s a crowd-pleasing, easy-to-make treat perfect for autumn gatherings and holiday celebrations.
- Prep Time: 20 minutes
- Cook Time: 18 minutes
- Total Time: 4 hours 38 minutes
- Yield: 12 servings 1x
- Category: Dessert
- Cuisine: American
Ingredients
- 1 cup all-purpose flour
- 1/2 cup unsalted butter, melted
- 1/2 cup chopped pecans (or walnuts; omit for nut-free)
- 2 tablespoons granulated sugar
- Pinch of salt
- 8 ounces cream cheese, softened
- 1 cup powdered sugar
- 1 cup whipped topping (or homemade whipped cream)
- 1/2 teaspoon vanilla extract
- 1 (15-ounce) can pumpkin puree (not pumpkin pie filling)
- 1 (3.4-ounce) package instant vanilla pudding mix
- 1 cup cold milk (whole or 2%; or unsweetened almond milk for dairy-free)
- 2 teaspoons pumpkin pie spice (or 1 tsp cinnamon + 1/2 tsp nutmeg + 1/2 tsp ginger)
- 1/2 cup whipped topping
- 2 cups whipped topping (for topping)
- Extra chopped pecans, for garnish (optional)
- Pinch of cinnamon or pumpkin pie spice
- Optional: caramel drizzle, chocolate shavings, or colored sprinkles for garnish
Instructions
- Preheat oven to 350°F (175°C).
- In a mixing bowl, combine flour, chopped pecans, granulated sugar, and a pinch of salt.
- Pour in melted butter and mix until crumbly and well combined.
- Press mixture evenly into the bottom of a 9×13-inch baking dish.
- Bake for 15-18 minutes, until golden and fragrant. Let cool completely (about 20 minutes).
- In a clean bowl, beat softened cream cheese until smooth.
- Add powdered sugar and beat until fluffy, about 2 minutes.
- Fold in whipped topping and vanilla extract until just combined.
- Spread cream cheese layer evenly over cooled crust.
- In a third bowl, whisk together pumpkin puree, instant vanilla pudding mix, cold milk, and pumpkin pie spice until thick and creamy (about 2 minutes).
- Fold in whipped topping until mixture is fluffy and pale orange.
- Spread pumpkin layer gently over cream cheese layer.
- Spread remaining whipped topping evenly over pumpkin layer. Swirl with a spatula for a pretty finish.
- Sprinkle with extra chopped pecans and a pinch of cinnamon or pumpkin pie spice. Add caramel drizzle or sprinkles if desired.
- Cover with plastic wrap or airtight lid and refrigerate for at least 4 hours (overnight is best).
- Slice into squares and serve chilled.
Notes
For best results, chill overnight for defined layers. Use full-fat cream cheese and real pumpkin puree for optimal texture. Substitute gluten-free flour or graham cracker crumbs for gluten-free adaptation. Coconut whipped topping and vegan cream cheese work for dairy-free. If crust crumbles, simply scoop with a spatula. Clean knife between cuts for neat slices.
Nutrition
- Serving Size: 1/12th of the pan
- Calories: 320
- Sugar: 22
- Sodium: 220
- Fat: 18
- Saturated Fat: 10
- Carbohydrates: 36
- Fiber: 2
- Protein: 4
Keywords: pumpkin lush, layered dessert, autumn dessert, Thanksgiving, potluck, pumpkin recipe, easy dessert, pecan crust, creamy pumpkin, holiday dessert


