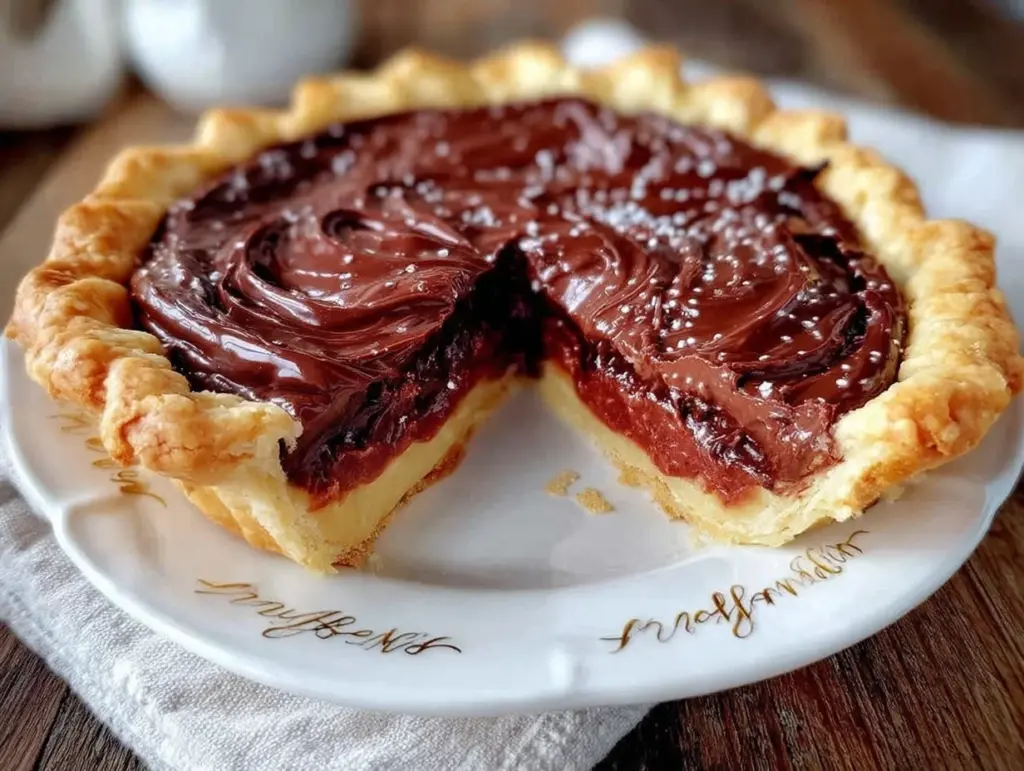
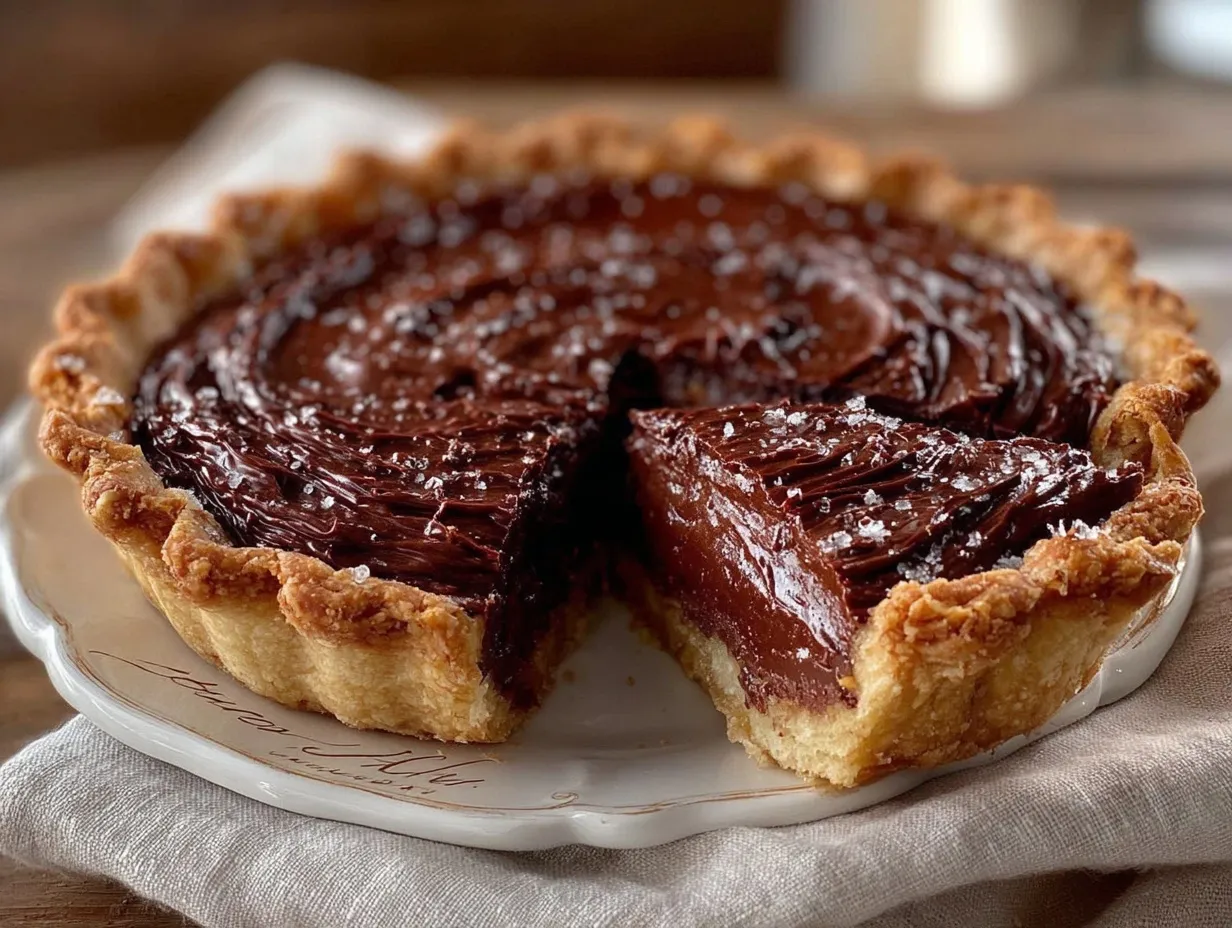
You know, there’s something downright magical about the aroma of rich cocoa and butter wafting through the kitchen—especially when you’re making Grandma’s Chocolate Pie with a flaky homemade crust. The first time I made this pie, I remember the way the chocolate filling bubbled gently on the stovetop, sending little puffs of steam that smelled like pure happiness. It’s the kind of moment where you pause, take a deep breath, and just smile because you know you’re onto something truly special.
When I was knee-high to a grasshopper, my grandma would let me help roll out pie dough on her old wooden table (it was always dusted with a bit too much flour, but hey, that’s half the fun). I can still hear her humming, the clatter of measuring cups, and the laughter that came when someone inevitably tried to swipe a finger full of chocolate filling before it even cooled. Honestly, if I’d stumbled onto this recipe years ago, I’d have saved myself a bunch of mediocre pies and sad crusts.
My family can’t resist sneaking slices off the cooling rack—my dad’s been caught more than once with chocolate on his chin! This pie’s become a staple for family gatherings, birthday surprises, and, let’s face it, late-night cravings. The way the crust shatters just a little under your fork, revealing that creamy, luscious chocolate—well, it’s dangerously easy to fall in love. If you want pure, nostalgic comfort (the kind that feels like a warm hug), this recipe is perfect for potlucks, sweet treats for your kids, or to brighten up your Pinterest dessert board.
Let’s just say, I’ve tested this recipe more times than I care to admit (“in the name of research, of course”). It’s now my go-to for gifting, cozy weekends, and those days when you just need something decadent. You’re going to want to bookmark this one—I promise you won’t regret it.
Why You’ll Love This Recipe
I’ve baked a lot of pies—some great, some not-so-great, and a few that never quite made it out of the pan. Grandma’s Chocolate Pie with Flaky Homemade Crust is one of those recipes that just works, every single time. It’s been tweaked, tasted, and approved by my picky eaters, my baking friends, and even my nutritionist cousin (who insisted I cut back on the sugar just a tad). Here’s why you’ll want this chocolate pie in your kitchen:
- Quick & Easy: Comes together in under 90 minutes, making it perfect for busy weeknights or last-minute celebrations.
- Simple Ingredients: No fancy grocery trips required—most items are pantry staples you probably already have.
- Perfect for Any Occasion: Whether it’s a cozy Sunday dinner, a holiday feast, or a casual potluck, this pie fits right in.
- Crowd-Pleaser: Kids, adults, and even the “I don’t like pie” folks can’t resist a slice (or two!).
- Unbelievably Delicious: The filling is silky-smooth and deeply chocolatey, while the crust flakes just enough to make you sigh with delight.
What makes this Grandma’s Chocolate Pie different? It’s all about the method—blending cocoa and eggs for a custardy, melt-in-your-mouth center, and using ice-cold butter for the crust so it bakes up impossibly flaky. I’ve tried store-bought crusts and fancy chocolate blends, but nothing beats this combo. You get that old-fashioned flavor with a modern touch (and zero fuss).
Honestly, this is the kind of comfort food that makes you close your eyes after the first bite. It’s rich, but never heavy—sweet, but not cloying. Plus, it’s forgiving. Mess up a step? The pie still tastes amazing. Serve it to impress guests, or just treat yourself on a random Tuesday. Either way, you’re in for a treat that’s both nostalgic and totally crave-worthy.
What Ingredients You Will Need
This recipe uses simple, wholesome ingredients to deliver bold chocolate flavor and a satisfying, flaky texture—without the fuss. Most of these are pantry staples, and I’ll let you in on a few tricks for substitutions if you need them. Here’s what you’ll need:
- For the Flaky Homemade Crust:
- 2 cups (250g) all-purpose flour (unbleached preferred for best texture)
- 1/2 teaspoon salt
- 3/4 cup (170g) unsalted butter, cold and cubed (I love Kerrygold for flavor)
- 1/4 cup (60ml) ice water (plus extra if needed)
- For the Chocolate Filling:
- 1 cup (200g) granulated sugar (adjust slightly for sweetness)
- 1/4 cup (30g) unsweetened cocoa powder (Dutch-process for deeper flavor, but regular works too)
- 1/4 cup (30g) cornstarch
- 1/4 teaspoon salt
- 3 large eggs (room temperature)
- 2 cups (480ml) whole milk (or 2% if preferred)
- 2 tablespoons (30g) unsalted butter
- 1 teaspoon pure vanilla extract (I use Nielsen-Massey for special occasions)
- Optional Toppings:
- Fresh whipped cream (homemade is best, trust me)
- Chocolate shavings or curls
- Toasted pecans or walnuts (if you like a little crunch)
If you’re short on ingredients, here are a few swaps that work in a pinch:
- Use salted butter and omit added salt for the crust.
- Almond or oat milk works for dairy-free folks (though the filling may set a bit softer).
- Arrowroot powder can sub in for cornstarch (same amount).
- Try coconut sugar instead of granulated for a lower glycemic option.
In summer, I sometimes swap out whipped cream for fresh berries—it’s a bright, tart contrast to the chocolate. For gluten-free, use a 1:1 GF flour blend; just keep an eye on the crust texture. No matter what, the heart of this pie stays the same: simple, honest, chocolatey goodness.
Equipment Needed
Making Grandma’s Chocolate Pie with a homemade crust doesn’t require fancy gadgets, just a few trusty tools. Here’s what I use:
- 9-inch (23cm) pie plate (glass or ceramic—metal tends to brown too fast for my liking)
- Rolling pin (a wine bottle works in a pinch, no shame in that!)
- Mixing bowls (one large for dough, one medium for filling)
- Fork or pastry cutter (for working butter into flour—if you don’t have a cutter, your fingers work great)
- Measuring cups and spoons
- Whisk (essential for a lump-free filling)
- Plastic wrap or wax paper (for chilling dough)
- Small saucepan (for cooking the chocolate filling)
- Baking weights or dried beans (for blind-baking the crust—totally optional, but helps prevent soggy bottoms)
I’ve used everything from an old glass pie plate to a thrifted rolling pin. If you don’t have pie weights, just line the crust with parchment and fill with beans. For maintenance, keep your rolling pin wiped clean and never soak wooden handles—trust me, I learned the hard way! Budget-friendly tools from the dollar store work fine; it’s the technique that counts.
Preparation Method
Let’s get baking! Here’s how to make Grandma’s Chocolate Pie with a flaky homemade crust, step by step:
- Make the Crust (Prep time: 20 minutes, Chill: 30 minutes)
- In a large bowl, whisk together 2 cups (250g) flour and 1/2 teaspoon salt.
- Add 3/4 cup (170g) cold, cubed butter. Cut it in with a pastry cutter or fork until the mixture looks like coarse crumbs—think pea-sized bits. (If your kitchen is warm, pop the bowl in the fridge between steps.)
- Drizzle in 1/4 cup (60ml) ice water, mixing gently with a fork. Add more water a tablespoon at a time if dough’s too dry—it should just hold together when pressed.
- Gather dough into a ball, flatten into a disk, and wrap in plastic. Chill at least 30 minutes (longer is fine—overnight works too).
- Roll & Bake the Crust (Prep: 10 minutes, Bake: 15 minutes)
- Preheat oven to 375°F (190°C).
- On a floured surface, roll dough into a 12-inch (30cm) circle. Transfer to your pie plate, gently pressing into corners. Trim excess, crimp edges as you like.
- Prick bottom with a fork. For extra insurance, line with parchment and fill with pie weights or beans.
- Bake 15 minutes or until edges are just golden. Remove weights, bake 5 more minutes. Cool completely.
- Prepare the Chocolate Filling (Prep: 10 minutes, Cook: 10 minutes, Cool: 30 minutes)
- In a medium saucepan, whisk together 1 cup (200g) sugar, 1/4 cup (30g) cocoa, 1/4 cup (30g) cornstarch, and 1/4 teaspoon salt.
- In a separate bowl, beat 3 eggs. Whisk in 2 cups (480ml) milk.
- Pour milk mixture into saucepan; whisk until smooth.
- Cook over medium heat, whisking constantly, until thick and glossy (about 8-10 minutes). You’ll know it’s ready when it coats the back of a spoon and smells like fudge.
- Remove from heat; stir in 2 tablespoons (30g) butter and 1 teaspoon vanilla. Filling will thicken as it cools.
- Assemble & Chill (Prep: 5 minutes, Chill: 2-3 hours)
- Pour warm chocolate filling into cooled pie crust. Smooth top with a spatula.
- Let cool to room temp, then refrigerate at least 2 hours (overnight is great if you can wait!).
- Serve
- Top slices with whipped cream, chocolate shavings, or nuts as desired. Serve chilled for best texture.
Troubleshooting: If your crust cracks, patch with a bit of extra dough before baking. For lumpy filling, strain through a fine sieve—no one will ever know! Don’t rush the chilling; it really makes the pie slice cleanly. My biggest tip? Keep everything cold, especially the butter and dough.
Cooking Tips & Techniques
After years of pie-making (and a few flops), I’ve picked up some tricks for perfect Grandma’s Chocolate Pie every time:
- Cold Butter is Key: Don’t let it soften too much—chilled butter gives that classic flake. I’ve tried shortcuts and, honestly, nothing beats patience here.
- Don’t Overwork the Dough: Mix just until it comes together. Overmixing makes the crust tough (learned that one the hard way!).
- Blind-Bake for Crispness: Weights help, but a fork-pricked bottom is usually enough if you’re short on supplies. Double-check for golden edges before adding filling.
- Constant Whisking: Chocolate filling can scorch quickly. I’ve scorched it once or twice—just keep moving that whisk and stay close.
- Egg Temperature Matters: Room temp eggs blend smoother into the custard. If you forget, set them in warm water for a few minutes.
- Chill, Don’t Rush: Letting the pie cool and set is crucial for clean slices and creamy texture.
- Multitasking: While the dough chills, prep the filling. It saves time and keeps things moving.
- Consistency: For extra-smooth filling, strain before pouring into the crust. Not mandatory, but it’s a restaurant-worthy trick.
Honestly, I’ve had pie crusts shrink, fillings separate, and toppings melt—so don’t worry if it’s not perfect. Each time, I learned a little more about timing and technique. Just keep at it, and you’ll have a pie worthy of grandma’s table.
Variations & Adaptations
Grandma’s Chocolate Pie is flexible—here are a few ways to make it your own:
- Gluten-Free: Replace the all-purpose flour with a 1:1 gluten-free blend. I’ve tried King Arthur’s—works well, just add a touch more ice water if dough feels crumbly.
- Dairy-Free: Swap out milk for almond or oat milk, and use plant-based butter in both crust and filling. The texture’s a bit softer, but the taste is still spot-on.
- Extra-Rich Chocolate: Use bittersweet cocoa or add 2 oz (60g) chopped dark chocolate to the filling for a fudgier vibe.
- Nutty Crunch: Stir in 1/2 cup (60g) chopped pecans or walnuts to the filling before pouring. My aunt swears by this twist!
- Seasonal Berry Topping: In spring and summer, top the pie with fresh raspberries or strawberries instead of whipped cream. The tartness cuts the chocolate beautifully.
- Mini Pies: Divide dough and filling into 4-6 mini pie tins for adorable, single-serving treats (great for parties).
I once tried a coconut crust variation, swapping half the flour for shredded coconut—it was a hit at a family picnic. If you have nut allergies, skip nuts entirely or use allergy-friendly toppings. For a lighter dessert, use low-fat milk and less sugar; flavor stays strong, just a tad less rich. Adapt as you like—after all, grandma’s recipes are meant to be shared and tweaked!
Serving & Storage Suggestions
This chocolate pie tastes best chilled, straight from the fridge. Slice with a sharp knife for those picture-perfect wedges you see on Pinterest (wipe the blade between cuts for clean edges). I love serving it with a generous dollop of whipped cream and a sprinkle of chocolate curls—looks fancy, but takes seconds.
For special occasions, garnish with fresh berries or toasted nuts. Pair with a hot cup of coffee or a tall glass of cold milk—trust me, both work wonders.
To store, cover leftovers tightly with plastic wrap and refrigerate for up to 4 days. The crust stays crisp, and the filling gets even silkier (if it lasts that long!). You can freeze slices for up to a month—just thaw in the fridge overnight. To reheat, microwave individual slices for 10-15 seconds if you want a slightly warm filling, but honestly, it’s best cold.
Flavors deepen over time, so don’t be afraid to make it a day ahead. The chocolate mellows, and the crust keeps its bite. It’s perfect for prepping before parties, holidays, or late-night chocolate cravings.
Nutritional Information & Benefits
Here’s a rough estimate for one slice (1/8 of the pie):
- Calories: ~350
- Fat: ~18g
- Carbohydrates: ~45g
- Protein: ~6g
The main health benefits come from the cocoa, which is a good source of antioxidants and magnesium. Using whole milk gives you calcium and protein, while eggs add a bit more protein and key vitamins. If you opt for nuts or berries on top, you’re adding healthy fats and fiber.
This recipe can easily be adapted for gluten-free or dairy-free diets (see variations above). Be aware: it contains eggs, dairy, and gluten (unless you tweak). My personal take? It’s a treat, but one with honest, wholesome ingredients—better than store-bought, and you know exactly what’s in it.
Conclusion
Grandma’s Chocolate Pie with Flaky Homemade Crust is more than just dessert—it’s a slice of pure nostalgia, comfort, and simple joy. It’s the kind of recipe you’ll reach for again and again, whether you’re baking for family, friends, or just yourself on a rainy afternoon.
Feel free to customize the filling, swap out toppings, or tweak the crust—make it yours, and don’t stress about perfection. I love this pie for its deep flavor, easy steps, and the way it brings everyone together (even if that means fighting over the last piece!).
If you try it, leave a comment below or tag me on Pinterest with your version. I’d love to hear your tweaks, tips, and taste-test stories. Go ahead—bake it, share it, and enjoy every chocolatey, flaky bite!
Frequently Asked Questions
Can I use store-bought pie crust instead of homemade?
Absolutely! If you’re short on time, a good-quality store-bought crust works. The homemade version is flakier and richer, but shortcuts are totally fine.
How do I keep my crust from getting soggy?
Blind-bake the crust first and cool it completely before adding the chocolate filling. Using pie weights or dried beans helps keep it crisp.
Can I make this pie ahead of time?
Yes! The pie sets beautifully in the fridge overnight. It’s actually easier to slice and serve the next day.
Is this recipe gluten-free?
The standard recipe isn’t, but you can substitute a 1:1 gluten-free flour blend for the crust. The filling is naturally gluten-free.
Can I freeze Grandma’s Chocolate Pie?
Definitely. Freeze slices wrapped tightly in plastic for up to a month. Thaw overnight in the fridge before serving.
Pin This Recipe!
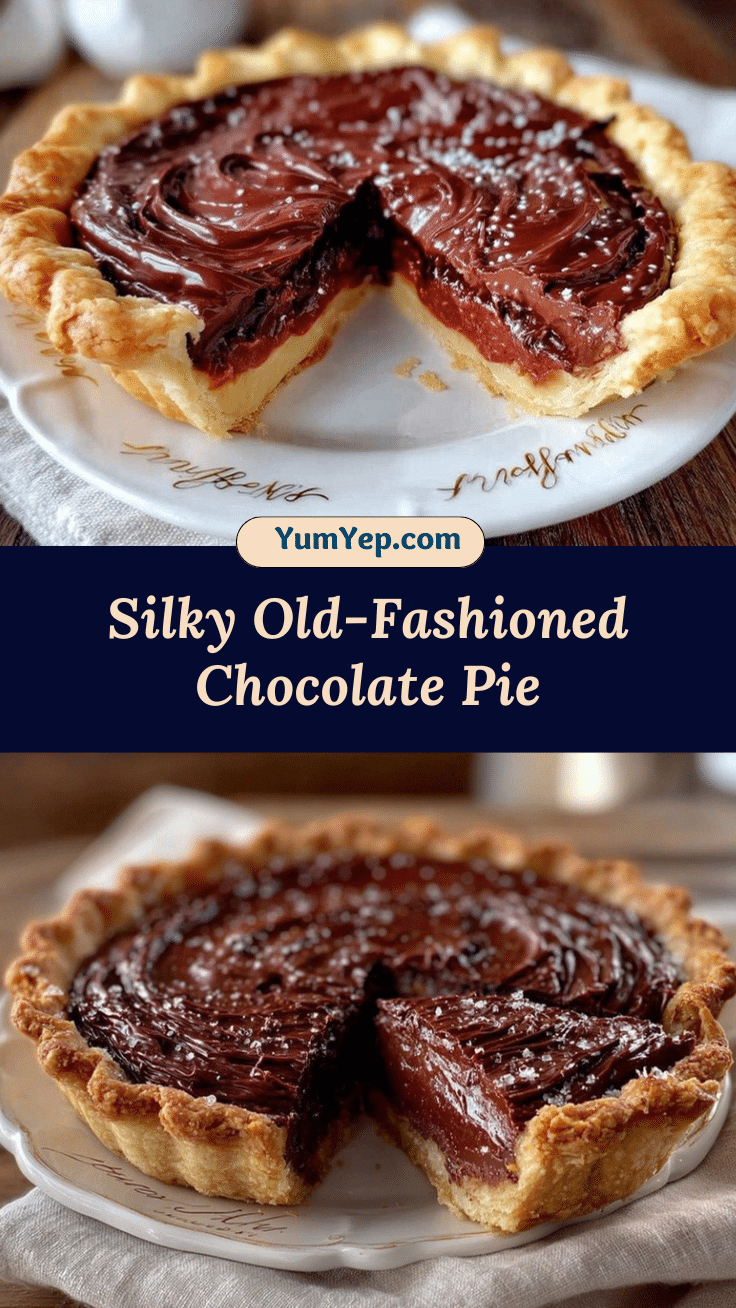
Grandma’s Chocolate Pie with Flaky Homemade Crust

This nostalgic chocolate pie features a silky-smooth, deeply chocolatey custard filling nestled in a homemade, buttery flaky crust. Perfect for family gatherings, potlucks, or a cozy night in, it’s a crowd-pleasing dessert that’s easy to make and even easier to love.
- Prep Time: 40 minutes
- Cook Time: 30 minutes
- Total Time: 2 hours 30 minutes
- Yield: 8 servings 1x
- Category: Dessert
- Cuisine: American
Ingredients
- 2 cups all-purpose flour (unbleached preferred)
- 1/2 teaspoon salt
- 3/4 cup unsalted butter, cold and cubed
- 1/4 cup ice water (plus extra if needed)
- 1 cup granulated sugar
- 1/4 cup unsweetened cocoa powder (Dutch-process or regular)
- 1/4 cup cornstarch
- 1/4 teaspoon salt
- 3 large eggs (room temperature)
- 2 cups whole milk (or 2%)
- 2 tablespoons unsalted butter
- 1 teaspoon pure vanilla extract
- Fresh whipped cream (optional, for topping)
- Chocolate shavings or curls (optional, for topping)
- Toasted pecans or walnuts (optional, for topping)
Instructions
- In a large bowl, whisk together flour and salt.
- Add cold, cubed butter and cut in with a pastry cutter or fork until mixture resembles coarse crumbs.
- Drizzle in ice water, mixing gently until dough just holds together. Add more water a tablespoon at a time if needed.
- Gather dough into a ball, flatten into a disk, wrap in plastic, and chill for at least 30 minutes.
- Preheat oven to 375°F (190°C).
- On a floured surface, roll dough into a 12-inch circle. Transfer to a 9-inch pie plate, trim excess, and crimp edges.
- Prick bottom with a fork. Line with parchment and fill with pie weights or beans if desired.
- Bake for 15 minutes or until edges are golden. Remove weights and bake 5 more minutes. Cool completely.
- In a medium saucepan, whisk together sugar, cocoa, cornstarch, and salt.
- In a separate bowl, beat eggs and whisk in milk.
- Pour milk mixture into saucepan and whisk until smooth.
- Cook over medium heat, whisking constantly, until thick and glossy (about 8-10 minutes).
- Remove from heat and stir in butter and vanilla. Let filling thicken as it cools.
- Pour warm chocolate filling into cooled pie crust and smooth the top.
- Let cool to room temperature, then refrigerate at least 2 hours (overnight is best).
- Top slices with whipped cream, chocolate shavings, or nuts as desired. Serve chilled.
Notes
Keep butter and dough cold for the flakiest crust. Blind-bake the crust to prevent sogginess. Constant whisking prevents scorching the chocolate filling. For gluten-free, use a 1:1 GF flour blend. Chill pie thoroughly for clean slices. Strain filling for extra-smooth texture if desired.
Nutrition
- Serving Size: 1 slice (1/8 of pie)
- Calories: 350
- Sugar: 28
- Sodium: 220
- Fat: 18
- Saturated Fat: 11
- Carbohydrates: 45
- Fiber: 2
- Protein: 6
Keywords: chocolate pie, homemade pie crust, grandma's recipe, comfort food, easy dessert, flaky crust, custard pie, family recipe, potluck dessert, nostalgic dessert


