
Introduction
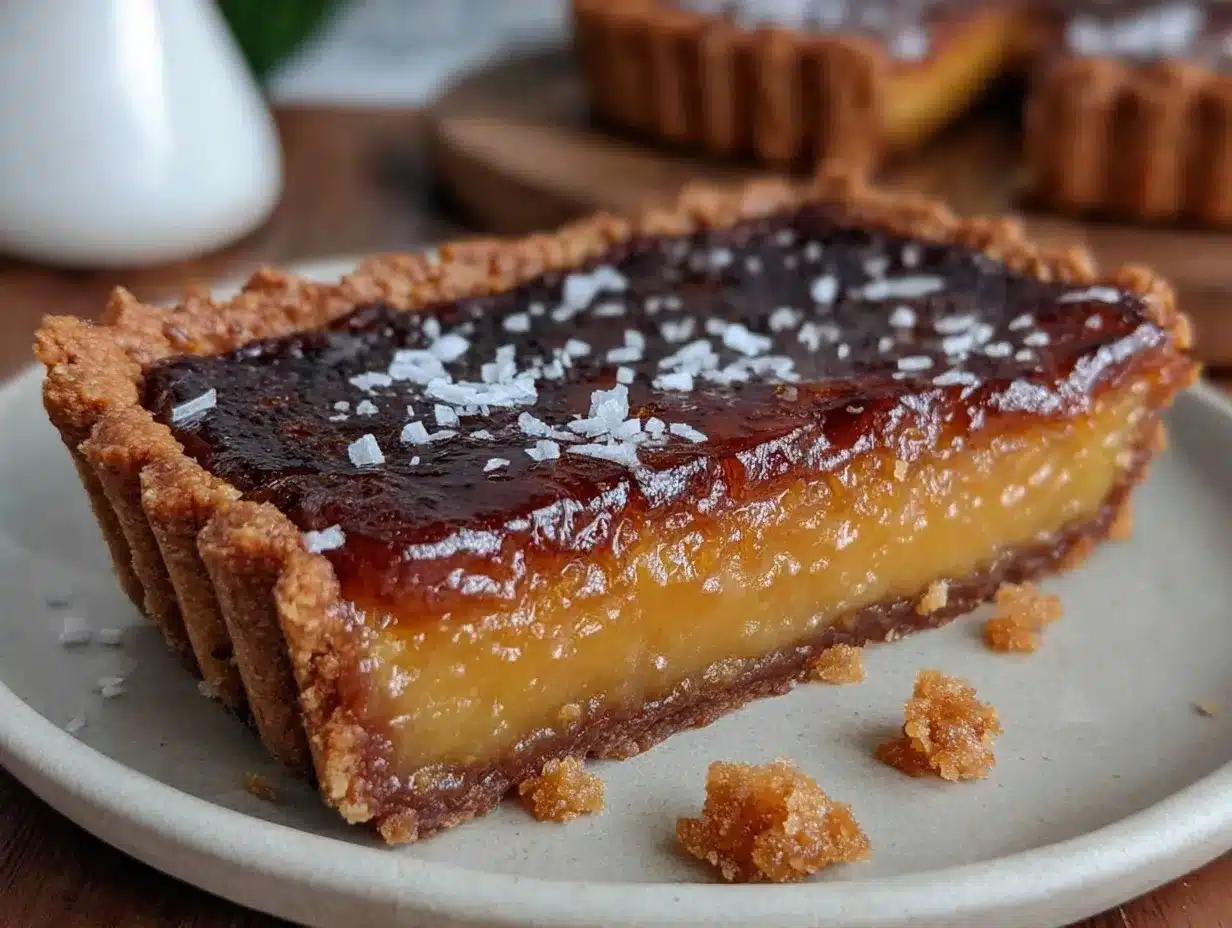
Let me tell you, the aroma of burnt honey bubbling away on my stovetop is one of those scents that stops you in your tracks. It’s deep, almost smoky, with a caramel undertone that’s both nostalgic and totally irresistible. When I pull this Burnt Honey Pie out of the oven, the golden, caramelized crust looks like a thing of beauty—almost too good to eat (but, let’s be honest, that’s never stopped me). The glossy filling catches the light just so, begging for you to slice in and taste that silky, sweet magic.
The first time I made this pie, I was on a mission to recreate a dessert I’d tasted at a tiny bakery tucked away in the city. I was instantly hooked by that combination of dark honey richness and buttery crunch. It was the kind of moment where you pause, take a deep breath, and just smile because you know you’re onto something truly special. My grandma used to say that anything made with honey is a gift from the bees, and this recipe feels like a tribute to those old-school, comforting flavors—plus a little bit of pie-making adventure!
Honestly, I wish I’d discovered this burnt honey technique years ago. When I was knee-high to a grasshopper, we’d use honey for everything, but I never thought of letting it get dark and caramelized. Now, it’s a staple for family gatherings and the kind of treat that disappears from the cooling rack before it’s even cooled. My family can’t stop sneaking extra slices (and I can’t really blame them). The pie is dangerously easy, yet provides that pure, nostalgic comfort—perfect for potlucks, gifting, or just brightening up your Pinterest board with something special.
You know what? I’ve tested this recipe more times than I can count (in the name of research, of course), and it’s become a beloved go-to for every celebration and cozy night in. It feels like a warm hug, and you’re going to want to bookmark this one.
Why You’ll Love This Burnt Honey Pie Recipe
If you’ve ever craved a dessert that’s both stunning and simple, this burnt honey pie is exactly what you need. I’ve baked a lot of pies over the years, but none have struck that perfect balance between rustic charm and showstopper status quite like this one.
- Quick & Easy: Comes together in under 90 minutes, making it perfect for busy weeknights or last-minute cravings.
- Simple Ingredients: No fancy grocery trips needed; you probably have everything right in your kitchen.
- Perfect for Any Occasion: Whether it’s cozy Sunday dinners, holiday gatherings, or just a sweet treat for your kids, this pie fits right in.
- Crowd-Pleaser: Always gets rave reviews from kids and adults alike. Trust me, people will ask for seconds.
- Unbelievably Delicious: The caramelized crust and glossy honey filling are pure comfort food, elevated by a unique burnt honey twist.
What sets this burnt honey pie apart? The secret is all in the honey—it’s cooked until it’s just shy of bitter, unlocking a new depth of flavor that plain honey never delivers. The crust is crisp and golden, thanks to a little extra sugar sprinkled before baking. I’ve experimented with different honeys (local wildflower is my favorite), and even tried blending in a dash of flaky salt for contrast. This isn’t just another pie—it’s my best version, tested and tweaked until every bite feels right.
Honestly, this recipe is the kind that makes you close your eyes after the first bite. It’s comfort food reimagined: faster, with a rich, soulful twist, and still totally satisfying. No more fussy techniques or complicated fillings—just the kind of pie that turns a simple meal into something memorable. It’s my go-to when I want to impress guests but keep things stress-free, and the glossy filling always earns a few “oohs” and “aahs” at the table.
What Ingredients You Will Need
Burnt honey pie relies on a handful of wholesome ingredients to deliver bold flavor and that luscious texture, without any fuss. Most of these are pantry staples, and there’s plenty of room for easy substitutions if needed. Here’s what you’ll need:
- For the Caramelized Crust:
- 1 1/4 cups (155g) all-purpose flour
- 1/2 cup (115g) unsalted butter, cold and diced (adds richness)
- 1/4 cup (50g) granulated sugar (for a crisp, caramelized edge)
- 1/4 tsp salt
- 3-4 tbsp (40-55ml) ice-cold water
- For the Burnt Honey Filling:
- 1/2 cup (170g) raw or wildflower honey (the star of the show)
- 1/2 cup (100g) granulated sugar
- 1/2 cup (120ml) heavy cream (for a silky texture)
- 1/4 cup (60g) unsalted butter, melted
- 2 large eggs, room temperature
- 1/2 tsp pure vanilla extract (optional, adds warmth)
- Pinch of salt (balances sweetness)
- For the Glossy Top:
- 1 tbsp honey, warmed (for glazing)
I recommend using local honey if you can—Wildflower or Clover varieties offer bold flavors. If you need a gluten-free crust, swap the all-purpose flour with almond flour and add a pinch of xanthan gum for binding. For dairy-free, use coconut cream instead of heavy cream and plant-based butter. Honestly, this recipe is pretty forgiving—if you’re out of vanilla, just skip it!
In summer, you can drizzle the finished pie with fresh berries or swap the cream for crème fraîche for a tangy twist. The ingredients come together easily, and there’s no need for anything fancy—just quality basics. For the best results, use eggs at room temperature so the filling sets smoothly, and don’t skimp on the salt; it really makes the honey flavor pop.
You’ll find the crust is simple yet sturdy enough to hold up to the glossy, almost custard-like filling. If you’re feeling adventurous, a dash of cinnamon or orange zest in the filling adds a nice hint of complexity. Just be sure your honey is genuine—some supermarket brands are suspiciously bland. Local beekeepers are my secret weapon for unforgettable flavor.
Equipment Needed
Here’s the gear I use every time I whip up this burnt honey pie. You don’t need anything fancy, and I’ve got suggestions if you’re missing a key piece!
- 9-inch (23cm) pie pan (ceramic or glass works best for even baking)
- Medium saucepan (for caramelizing honey)
- Mixing bowls (one for crust, one for filling)
- Whisk (helps keep the filling glossy and lump-free)
- Pastry cutter or fork (for blending crust ingredients)
- Rolling pin (or use a clean wine bottle—works in a pinch!)
- Measuring cups and spoons (accuracy matters for pie crusts)
- Fine mesh strainer (optional, for smoothing the filling)
- Parchment paper (for rolling and transferring the crust)
- Cooling rack (helps the pie set up and prevents soggy bottoms)
If you don’t have a pie pan, a cake pan or even a cast iron skillet will do (just check for doneness a little earlier). I’ve made this with just a fork and a bowl before, so don’t stress if you lack specialized tools. For the saucepan, make sure it’s heavy-bottomed to prevent burning the honey too quickly. If you’re using a rolling pin, dust it with flour to keep the crust from sticking. And for clean-up, parchment paper is your best friend!
I always keep my pie pans in good shape by hand washing with warm water and avoiding harsh abrasives. If you’re on a budget, a glass pie dish from the supermarket works perfectly. No need for high-end gear—just reliable basics.
Preparation Method
Ready to bake? Here’s my step-by-step guide for a perfect burnt honey pie, complete with exact measurements and plenty of tips to keep things smooth.
- Make the Crust: In a mixing bowl, combine 1 1/4 cups (155g) flour, 1/4 cup (50g) sugar, and 1/4 tsp salt. Add 1/2 cup (115g) cold butter and use a pastry cutter or fork to blend until the mixture looks like coarse crumbs. Slowly add 3-4 tbsp (40-55ml) ice water, mixing just until the dough comes together. If it feels dry, add water a teaspoon at a time.
- Chill & Roll Out: Shape dough into a disk, wrap in plastic, and chill for 30 minutes. Preheat oven to 350°F (175°C). On a floured surface (or between parchment sheets), roll dough to about 1/8-inch (3mm) thickness. Gently transfer to your pie pan, pressing in and trimming edges. Prick the bottom with a fork.
- Blind Bake: Line the crust with parchment and fill with pie weights or dried beans. Bake for 15 minutes until just set. Remove weights and parchment, bake another 5 minutes to lightly brown. Set aside.
- Prepare Burnt Honey: In a medium saucepan, heat 1/2 cup (170g) honey over medium heat until it bubbles and darkens (about 3-5 minutes). You want a deep amber color, just shy of burning. Watch closely—honey goes from perfect to burnt in seconds! Remove from heat and let cool slightly.
- Mix Filling: In a bowl, whisk together 1/2 cup (100g) sugar, 1/2 cup (120ml) cream, 1/4 cup (60g) melted butter, 2 eggs, and a pinch of salt. Slowly whisk in the cooled burnt honey and 1/2 tsp vanilla if using. The mixture should be glossy and smooth.
- Fill and Bake: Pour filling into the baked crust. Bake at 350°F (175°C) for 30-35 minutes, until the center is just set but still a bit wobbly. The top should look glossy and slightly puffed.
- Glaze and Cool: While still warm, brush the top with 1 tbsp warmed honey for extra shine. Cool on a rack for at least 1 hour before slicing (the filling firms up as it cools).
- Serve: Slice and enjoy! If the filling cracks a bit, don’t worry—it’s all part of the pie’s rustic charm.
Troubleshooting: If your crust shrinks, make sure the dough is chilled and avoid stretching it as you transfer. If the filling bubbles too much, lower your oven temp by 10°F. If you notice the edges browning too quickly, cover with foil halfway through baking.
Efficiency tip: Prep the crust a day ahead and store in the fridge. That way, you can whip up the filling and bake in no time. And don’t skip the cooling step—a warm pie is tasty, but the flavors deepen as it rests.
Cooking Tips & Techniques
Burnt honey pie might seem fancy, but with a few tricks, you’ll get consistent, glossy results every single time. I’ve learned these the hard way!
- Caramelizing Honey: Patience is key. Use medium heat and stir constantly. Honey foams up fast—if it smells burnt, pull it off immediately! I once scorched a batch and nearly filled the kitchen with smoke (not fun!).
- Crust Consistency: Cold butter is non-negotiable. If your kitchen is warm, chill the flour and bowl first. Overworking the dough leads to a tough crust—just blend until it’s shaggy and crumbly.
- Glossy Filling: Whisk eggs gently to avoid air bubbles. For extra-smooth texture, strain the filling before pouring into the crust.
- Baking Time: Ovens vary, so start checking at 25 minutes. The center should jiggle slightly. If you overbake, the filling turns grainy instead of creamy.
- Multitasking: Prep your crust while the honey is caramelizing—just keep an eye on that saucepan! I set a timer and do a little kitchen dance between steps.
- Perfect Shine: The honey glaze makes the pie sparkle. Warm it gently and brush it on as soon as the pie comes out of the oven.
If you’re new to pie-making, don’t worry about perfection. Rustic edges are charming, and a cracked filling just shows it’s homemade. I’ve had pies bubble over or brown unevenly—just cover with whipped cream or berries if you want to hide the evidence. Consistency comes with practice, so don’t be afraid to tweak the recipe to fit your oven or taste.
Variations & Adaptations
Burnt honey pie is endlessly adaptable—here are a few ways to switch things up or make it work for different diets and tastes:
- Gluten-Free Crust: Swap the all-purpose flour for almond flour, add a pinch of xanthan gum, and use a little less water. The result is tender and nutty!
- Dairy-Free Filling: Substitute heavy cream with full-fat coconut milk and use plant-based butter. The flavor is slightly tropical and just as rich.
- Seasonal Twist: In autumn, sprinkle the filling with a pinch of cinnamon or nutmeg before baking. During summer, top with fresh berries or stone fruit.
- Citrus Variation: Add 1 tsp orange zest to the filling for a bright, fragrant note.
- Nutty Option: Scatter toasted pecans or walnuts over the crust before pouring in the filling.
If you need to avoid eggs, use a mixture of 2 tbsp cornstarch and 1/4 cup water as a binder. For extra flavor, swap the vanilla for almond extract or mix in a spoonful of tahini for earthiness.
Personally, I love adding a handful of toasted hazelnuts to the crust for crunch. I’ve even made mini pies in muffin tins for parties—they’re adorable and easy to serve. Just reduce the baking time by half and watch for that glossy top!
Serving & Storage Suggestions
Burnt honey pie is best served at room temperature, when the filling is set and glossy. Slice with a sharp knife for clean edges, and wipe the blade between cuts for those perfect Pinterest-worthy slices.
- Presentation: Garnish each slice with a dollop of whipped cream, a drizzle of extra honey, or a sprinkle of flaky sea salt. Fresh berries or mint leaves make it festive.
- Pairings: Serve alongside strong coffee, Earl Grey tea, or a light dessert wine. For brunch, it pairs beautifully with fruit salads or soft cheeses.
- Storage: Cover leftovers tightly and refrigerate for up to 4 days. The flavors deepen overnight—sometimes I think it’s even better on day two!
- Freezing: Wrap tightly in plastic and foil; freeze for up to 2 months. Thaw in the fridge and bring to room temp before serving.
- Reheating: Warm slices in a low oven (300°F/150°C) for 10 minutes. Avoid microwaving; it can make the filling rubbery.
If you want to make the pie ahead, bake and glaze as directed, then refrigerate. The glossy filling holds up beautifully and the crust stays crisp. It’s the kind of dessert you can make the day before a party and not worry about last-minute prep. Over time, the honey flavor intensifies, making each bite even more delicious.
Nutritional Information & Benefits
Each slice of burnt honey pie (1/8th of the pie) provides approximately:
- Calories: 320
- Fat: 18g
- Carbs: 38g
- Protein: 4g
- Sugar: 24g
Honey is naturally rich in antioxidants and minerals, and when caramelized, it develops complex flavors without the need for artificial sweeteners. Butter and eggs contribute healthy fats and protein, while the simple crust keeps things light and satisfying.
This recipe can be made gluten-free or dairy-free with easy swaps, so it works for many diets. Just watch out for common allergens like eggs and dairy in the classic version. As someone who cares about wholesome eating, I love that burnt honey pie offers sweet satisfaction without a mile-long ingredient list. It’s real food, real flavor, and pure joy.
Conclusion
Burnt honey pie is one of those recipes that feels like a little miracle every time it comes out of the oven. It’s simple, stunning, and always a hit. The caramelized crust, rich glossy filling, and deep honey flavor make it a must-try for anyone who loves nostalgic comfort desserts with a twist.
Don’t be shy about customizing this recipe to suit your pantry or cravings. Swap the flour, change the filling, or add your favorite toppings—it’s flexible and forgiving. For me, it’s the go-to pie for every season, every celebration, and every cozy afternoon.
If you end up loving this burnt honey pie as much as I do, please leave a comment, share your version, or tag me in your Pinterest posts! I’d love to hear about your twists, your family’s reactions, and any new tricks you discover. Happy baking, and may your kitchen always smell like caramelized honey and good memories!
FAQs
Can I use store-bought honey for burnt honey pie?
Yes! Store-bought honey works fine, but local varieties (like wildflower or clover) give a deeper flavor. Just avoid blended or overly processed honeys, as they can taste bland.
What if my honey burns too quickly?
If the honey smells burnt or turns very dark, take it off the heat immediately. Use a lower heat next time and stir constantly. Slightly burnt is good—fully burnt is bitter.
Can I make burnt honey pie ahead of time?
Absolutely. You can bake the pie a day in advance and store it covered in the fridge. The flavors actually deepen and the filling sets beautifully overnight.
Is burnt honey pie suitable for gluten-free diets?
Yes! Use almond flour and a pinch of xanthan gum for the crust. The filling is naturally gluten-free, so it’s easy to adapt.
How do I prevent my crust from getting soggy?
Blind bake the crust before adding the filling, and cool it slightly. This keeps the bottom crisp even after the filling is added. If you’re worried, sprinkle a little flour or ground nuts on the crust before pouring in the filling.
Pin This Recipe!
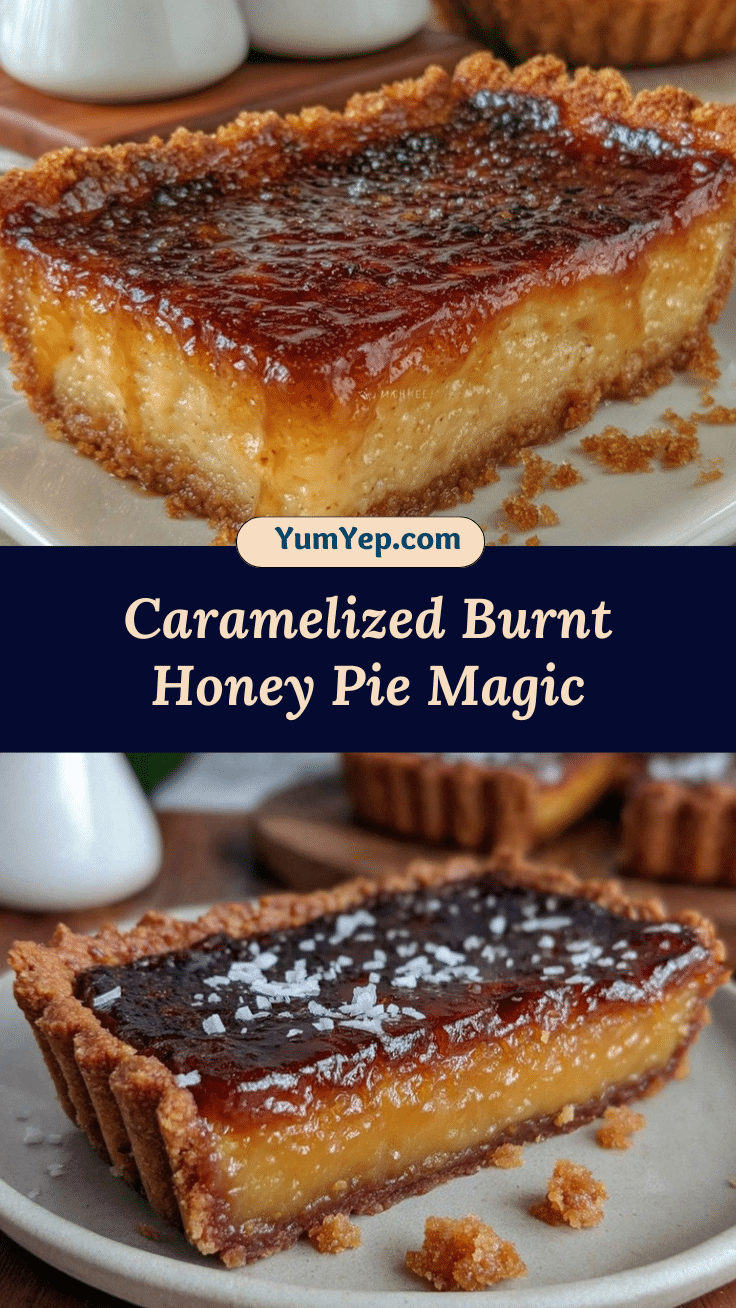
Burnt Honey Pie

Burnt Honey Pie features a caramelized, crisp crust and a glossy, silky honey filling with deep, smoky undertones. This nostalgic comfort dessert is easy to make and perfect for any occasion, offering a unique twist on classic pie flavors.
- Prep Time: 30 minutes
- Cook Time: 45 minutes
- Total Time: 1 hour 15 minutes
- Yield: 8 servings 1x
- Category: Dessert
- Cuisine: American
Ingredients
- 1 1/4 cups all-purpose flour
- 1/2 cup unsalted butter, cold and diced
- 1/4 cup granulated sugar
- 1/4 teaspoon salt
- 3–4 tablespoons ice-cold water
- 1/2 cup raw or wildflower honey
- 1/2 cup granulated sugar
- 1/2 cup heavy cream
- 1/4 cup unsalted butter, melted
- 2 large eggs, room temperature
- 1/2 teaspoon pure vanilla extract (optional)
- Pinch of salt
- 1 tablespoon honey, warmed (for glazing)
Instructions
- In a mixing bowl, combine flour, sugar, and salt. Add cold butter and blend with a pastry cutter or fork until the mixture resembles coarse crumbs.
- Slowly add ice water, mixing just until the dough comes together. If dry, add water a teaspoon at a time.
- Shape dough into a disk, wrap in plastic, and chill for 30 minutes. Preheat oven to 350°F (175°C). Roll dough to 1/8-inch thickness and transfer to a 9-inch pie pan. Prick the bottom with a fork.
- Line crust with parchment and fill with pie weights or dried beans. Bake for 15 minutes. Remove weights and parchment, bake another 5 minutes until lightly browned. Set aside.
- In a medium saucepan, heat honey over medium heat until it bubbles and darkens (about 3-5 minutes) to a deep amber color. Remove from heat and let cool slightly.
- In a bowl, whisk together sugar, cream, melted butter, eggs, and a pinch of salt. Slowly whisk in cooled burnt honey and vanilla extract if using. Mix until glossy and smooth.
- Pour filling into baked crust. Bake at 350°F (175°C) for 30-35 minutes, until the center is just set but still a bit wobbly.
- While warm, brush the top with warmed honey for extra shine. Cool on a rack for at least 1 hour before slicing.
- Slice and serve. Enjoy!
Notes
For gluten-free, substitute almond flour and add a pinch of xanthan gum. For dairy-free, use coconut cream and plant-based butter. Blind baking the crust prevents sogginess. Use local honey for best flavor. The pie can be made ahead and refrigerated; flavors deepen overnight. Add cinnamon, orange zest, or nuts for variations. If the filling cracks, it’s part of the rustic charm.
Nutrition
- Serving Size: 1 slice (1/8th of pi
- Calories: 320
- Sugar: 24
- Sodium: 120
- Fat: 18
- Saturated Fat: 11
- Carbohydrates: 38
- Protein: 4
Keywords: burnt honey pie, caramelized honey, honey dessert, pie recipe, easy pie, comfort food, glossy filling, homemade pie, honey pie, nostalgic dessert


