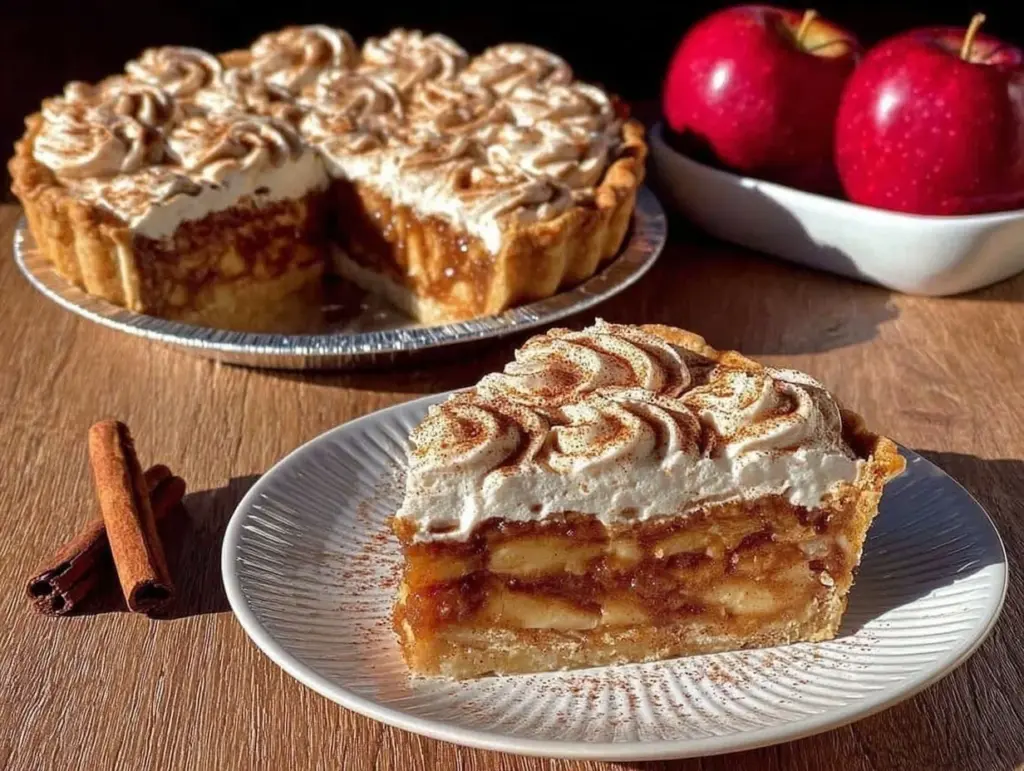
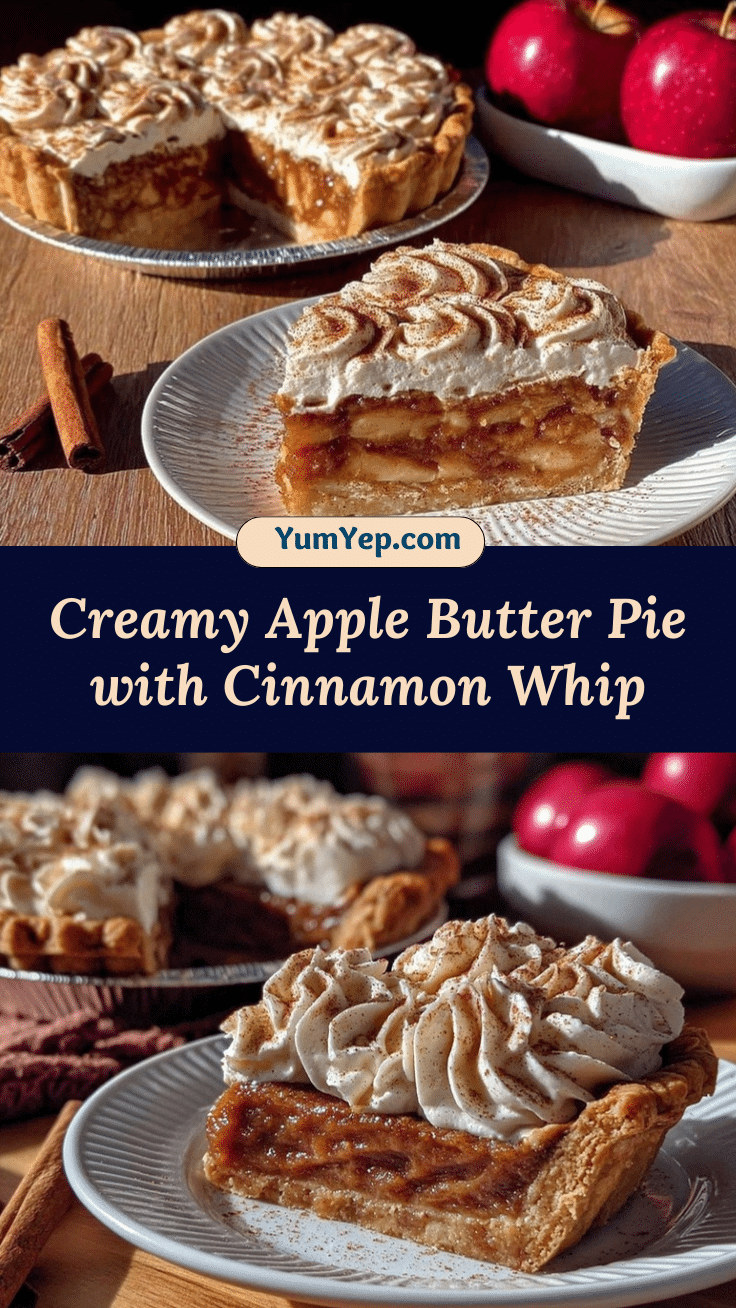
Imagine this: the rich scent of cinnamon, nutmeg, and slow-cooked apples swirling through your kitchen, all wrapped up in a buttery golden crust. The first time I pulled a Creamy Apple Butter Pie from my oven, the aroma hit me like a wave of cozy nostalgia. It was the kind of moment where you pause, take a deep breath, and just smile because you know you’re onto something truly special. The filling—so smooth, warm, and gently spiced—looked almost too perfect to slice. I remember standing there, fork in hand, thinking, “Why didn’t I discover this little slice of heaven years ago?”
Back when I was knee-high to a grasshopper, my grandma used to make old-fashioned apple butter on lazy autumn weekends. She’d let it bubble away on the stovetop for hours, then spoon it over everything from toast to pancakes. Years later, I found myself trying to recreate her magic, only this time I wanted a holiday fruit pie that could steal the show at Thanksgiving (or, honestly, any cold-weather gathering). Let’s face it—apple pie is a classic, but there’s something about apple butter that brings pure, nostalgic comfort.
When I finally shared my Creamy Apple Butter Pie with my family, they couldn’t stop sneaking slivers off the cooling rack (and I really can’t blame them). My oldest said it tasted “like autumn in every bite,” while my youngest declared it better than pumpkin pie (high praise in our house). It’s now become a staple at our family gatherings, and I’ve tested it more times than I care to admit—all in the name of research, of course. Whether you’re looking to brighten up your Pinterest board, wow your holiday guests, or just treat yourself to something dangerously easy, you’re going to want to bookmark this one. This pie feels like a warm hug, and I guarantee it’ll become your new go-to for comfort and celebration.
Why You’ll Love This Creamy Apple Butter Pie Recipe
Honestly, after years of testing fruit pies, I can say this Creamy Apple Butter Pie stands out for more reasons than I can count. I’ve made it for potlucks, baked it for brunch, and even gifted slices to neighbors. Here’s why you’ll love it:
- Quick & Easy: Comes together in under an hour, making it perfect for busy holiday schedules or last-minute dessert emergencies.
- Simple Ingredients: No fancy grocery trips required—you probably have everything you need in your pantry right now.
- Perfect for Holidays: Ideal for Thanksgiving, Christmas, or any festive family dinner where you want a fruit pie that stands out.
- Crowd-Pleaser: Kids gobble it up, adults always ask for the recipe (no leftovers guaranteed).
- Unbelievably Delicious: The texture is creamy, almost custard-like, but with that unmistakable tangy apple and deep spice flavor.
What makes it different? For starters, blending apple butter with cream cheese delivers an ultra-smooth filling—way silkier than your average fruit pie. A dash of cinnamon and nutmeg adds warmth, while the cinnamon whipped cream on top ties everything together. I’ve tried other versions, but none have that perfect balance of sweet and spice. It’s comfort food that won’t weigh you down—lighter, faster, and honestly, just plain better.
If you’re after a dessert that hits all the right notes—easy, comforting, and beautifully festive—this Creamy Apple Butter Pie is it. Whether you’re impressing guests or treating yourself, this recipe is the kind that makes you close your eyes after that first bite and savor the moment. It’s not just another holiday fruit pie; it’s the one you’ll crave all year.
What Ingredients You Will Need
This Creamy Apple Butter Pie recipe uses simple, wholesome ingredients to deliver bold flavor and a satisfying texture—without the fuss. Most are pantry staples, and a few easy swaps keep things flexible for different diets and seasons.
- For the Pie Filling:
- 1 cup (250 g) apple butter (homemade or store-bought; I like Musselman’s for a deep flavor)
- 8 oz (225 g) cream cheese, softened (full-fat for the creamiest texture)
- 2/3 cup (130 g) granulated sugar (you can use coconut sugar for a deeper caramel note)
- 2 large eggs, room temperature
- 1/2 cup (120 ml) heavy cream
- 1 tsp vanilla extract (real vanilla makes a difference)
- 1 tsp ground cinnamon
- 1/4 tsp ground nutmeg
- 1/4 tsp salt
- For the Pie Crust:
- 1 9-inch (23 cm) unbaked pie crust (homemade or store-bought; I use Trader Joe’s for a quick fix)
- For the Cinnamon Whipped Cream:
- 1 cup (240 ml) heavy whipping cream, cold
- 2 tbsp (15 g) powdered sugar (or maple syrup for a twist)
- 1/2 tsp ground cinnamon
- 1/2 tsp vanilla extract
Ingredient Tips & Substitutions:
- If you need gluten-free, use a certified gluten-free pie crust. Bob’s Red Mill makes a good one.
- Dairy-free? Swap cream cheese with plant-based cream cheese and use coconut cream for the whipped topping.
- Apple butter varies by brand—some are sweeter, some spicier. Taste and adjust sugar if needed.
- Want it less sweet? Reduce the sugar in the filling by 2-3 tablespoons.
- For a nutty spin, stir 1/4 cup (30 g) finely chopped pecans into the filling before baking.
- For summer, swap in peach butter or pear butter instead of apple butter!
These are ingredients I trust and use in my own kitchen. Pick your favorites, and don’t stress about perfection—the pie is forgiving, and honestly, that’s half the charm.
Equipment Needed
- 9-inch (23 cm) pie pan (glass or metal both work; glass lets you check the crust browning)
- Mixing bowls (one large, one medium)
- Electric mixer or stand mixer (hand whisk works in a pinch, but electric gives the creamiest results)
- Rubber spatula (helps scrape every last bit of filling)
- Measuring cups and spoons (for accuracy—especially with spices and sugar)
- Wire cooling rack (pie needs to cool before slicing)
If you don’t have a pie pan, a cake pan with tall sides will work (just watch the baking time). I’ve used a hand whisk before, but trust me—an electric mixer makes the filling silky smooth. For whipped cream, a chilled metal bowl and beaters speed things up, but a regular bowl is fine (just takes a bit longer!).
Pie pans are easy to maintain—just soak in warm, soapy water after baking. If you’re on a budget, grocery store pie tins work perfectly (and make gifting a breeze). Use what you have—this recipe doesn’t judge.
Preparation Method
- Preheat your oven: Set to 350°F (175°C). Position a rack in the middle.
- Prepare the pie crust: Roll out your 9-inch (23 cm) pie crust and fit it into your pie pan. Crimp the edges. Prick the bottom a few times with a fork (prevents soggy bottoms). If using a store-bought crust, just unwrap and place in pan.
- Make the creamy filling: In a large mixing bowl, beat the softened cream cheese with an electric mixer until smooth and fluffy—about 2 minutes. Add granulated sugar and beat again until combined. Scrape down the bowl as needed.
- Add eggs: Crack in the eggs, one at a time, beating well after each. The mixture should look pale and creamy.
- Mix in apple butter: Add the apple butter, heavy cream, vanilla extract, cinnamon, nutmeg, and salt. Beat until fully combined and smooth—about 1 minute. The filling will be thick but pourable, with a warm autumn scent.
- Pour and smooth: Pour the apple butter filling into the prepared pie crust. Use a spatula to smooth the top. If you see bubbles, tap the pan gently on the counter.
- Bake: Place the pie on the middle rack and bake for 35-40 minutes. The edges should look set, but the center will still jiggle slightly (like cheesecake). If the crust browns too quickly, cover the edges with foil.
- Cool: Remove the pie from the oven and place on a wire rack. Let cool completely—about 2 hours. This helps the filling firm up.
- Make cinnamon whipped cream: In a chilled medium bowl, whip the heavy cream with powdered sugar, cinnamon, and vanilla until soft peaks form (about 2-3 minutes with an electric mixer, longer by hand). Taste and adjust cinnamon if needed.
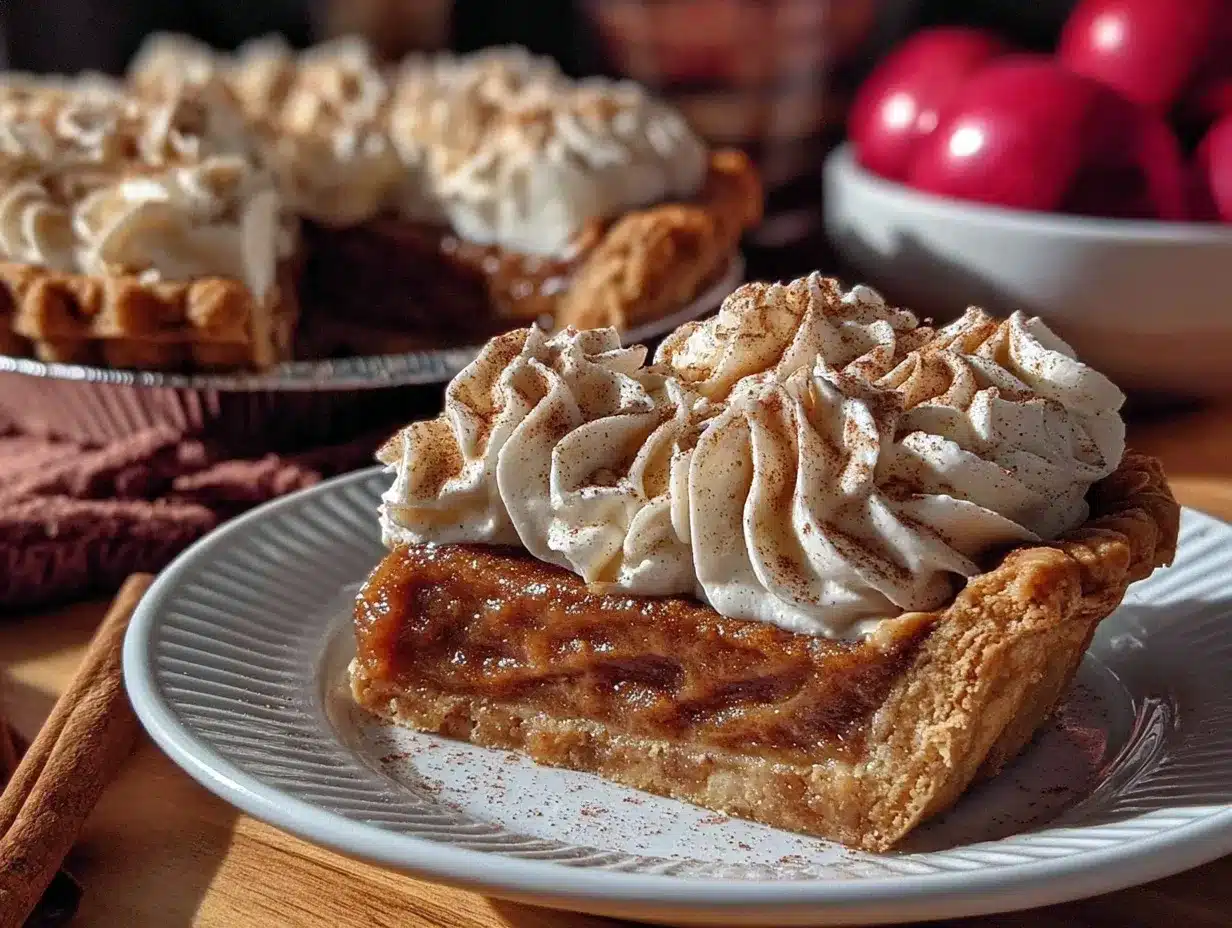
- Serve: Dollop cinnamon whipped cream on cooled pie slices, or pipe for a fancy look. Sprinkle with extra cinnamon or nutmeg if desired.
Troubleshooting Tips: If the filling cracks as it cools, don’t worry—it’ll taste great. If the center seems too runny after cooling, chill the pie in the fridge for another hour. For a firmer crust, blind bake for 10 minutes before adding the filling.
Personal Note: I always start the whipped cream while the pie cools—it makes the waiting a little easier! And if you’re in a rush, you can chill the pie faster in the fridge (just cover loosely).
Cooking Tips & Techniques
- Room Temperature Ingredients: Start with softened cream cheese and room temperature eggs for a lump-free filling. Cold ingredients just don’t mix as smoothly.
- Blind Baking (Optional): If you love a super-crisp crust, blind bake the pie crust for 10 minutes at 350°F (175°C) before pouring in the filling. Line with parchment and use pie weights or beans.
- Mixing Method: Don’t overmix the filling after adding eggs—just blend until smooth. Overmixing can cause cracks as the pie cools.
- Baking Time: Watch closely in the last 5 minutes. The center should jiggle slightly but not look soupy. If it’s overbaked, the filling gets dry.
- Cooling: Let the pie cool fully before slicing. I learned the hard way—if you rush it, the filling won’t set and slices will slump. Patience pays off.
- Whipped Cream: Chill your bowl and beaters for the fluffiest topping. Warm equipment can turn it soupy.
- Personal Failures: The first time I made this, I baked it too long and the top cracked. Now I check after 35 minutes and pull it out as soon as the edges set. Small cracks? Just cover with whipped cream—no one will know!
- Multitasking: While the pie bakes, prep your whipped cream and set your table. It’s a time-saver for busy holidays.
- Consistency: Always use full-fat cream cheese—low-fat varieties make the filling watery. And measure apple butter carefully; too much makes it runny.
These tricks are learned from trial and error, trust me. The goal is a pie that’s creamy, flavorful, and beautiful every time.
Variations & Adaptations
- Gluten-Free Version: Use a gluten-free pie crust. I’ve tried King Arthur’s mix and it works beautifully—still golden and flaky.
- Dairy-Free Twist: Substitute plant-based cream cheese and coconut cream for dairy ingredients. The flavor is a little lighter, with a gentle coconut undertone.
- Fall Spice Boost: Add 1/4 tsp ground cloves or allspice to the filling for a deeper, spicier kick. Perfect if you love bold flavors.
- Fruit Butter Swap: Try peach butter or pear butter instead of apple butter for a spring or summer version. Adjust spices to match the fruit’s flavor.
- Nutty Crunch: Stir 1/4 cup (30 g) toasted pecans or walnuts into the filling or sprinkle on top before serving.
For cooking methods, you can bake this pie in a tart pan for thinner slices and a fancier look. If you’re serving a crowd, double the recipe and bake in a 9×13-inch (23×33 cm) pan for easy squares.
Allergy adaptations: Use nut-free crusts and toppings if needed. I once made this with sunflower seed butter for a friend with nut allergies, and it was surprisingly tasty!
My favorite personal variation is tossing in a handful of dried cranberries for a pop of color and tartness—it’s festive and bright for holiday tables.
Serving & Storage Suggestions
Serve Creamy Apple Butter Pie at room temperature or slightly chilled—either way, the filling stays creamy and the flavors shine. For presentation, pipe cinnamon whipped cream rosettes along the edge, or simply dollop big spoonfuls on each slice. Dust with extra cinnamon or nutmeg for a pretty finish.
This pie pairs beautifully with a mug of hot spiced cider, black tea, or a scoop of vanilla ice cream. It’s also fantastic alongside roasted turkey or ham at holiday dinners.
Storage: Cover leftovers tightly with plastic wrap or foil. Keep in the fridge for up to 4 days—flavors deepen as it chills. For longer storage, freeze individual slices wrapped in wax paper and placed in a zip-top bag. Thaw overnight in the fridge and serve cold or at room temp.
Reheating: You can gently rewarm slices in the microwave for 15-20 seconds, but whipped cream is best added fresh. I’ve found pie flavors mellow and meld after a day or two—sometimes, it’s even tastier on day two!
Nutritional Information & Benefits
Each slice of Creamy Apple Butter Pie (1/8 of a 9-inch pie) has approximately:
- Calories: 310
- Fat: 17g
- Carbohydrates: 35g
- Protein: 4g
- Sugar: 24g
Key health benefits come from the apples (fiber, vitamin C) and cinnamon (antioxidants, blood sugar support). Using apple butter adds more fruit than traditional pie fillings, and you can reduce sugar for a lighter version.
This recipe is naturally vegetarian, and easily adapted for gluten-free or dairy-free diets. Potential allergens include wheat (crust), dairy (cream cheese, whipped cream), and eggs. Always check labels for store-bought items.
From a wellness perspective, I like that this pie satisfies dessert cravings with real fruit and warm spices—no need for artificial flavors or colors. It’s a treat, but one that feels good in every bite.
Conclusion
If you’re searching for a holiday fruit pie that’s creamy, comforting, and packed with real apple flavor, this Creamy Apple Butter Pie with Cinnamon Whipped Cream is a must-try. It’s easy enough for weeknight baking, but special enough for festive celebrations. I love how simple ingredients come together for a pie that feels both nostalgic and new.
Customize to your taste—swap pie crusts, play with spices, or add your favorite toppings. That’s the beauty of homemade pie: it’s yours! Personally, I’ll keep making this one for family gatherings and cozy nights in. It brings people together and always gets requests for seconds.
Let me know in the comments if you try it, and share your own adaptations! Pin, share, or save for your next holiday—this pie deserves a spot on your table. Wishing you warmth, sweetness, and plenty of delicious moments ahead!
FAQs About Creamy Apple Butter Pie
Can I make Creamy Apple Butter Pie ahead of time?
Absolutely! Bake the pie a day in advance, store covered in the fridge, and add whipped cream just before serving. The flavor actually improves as it chills.
What if I don’t have apple butter?
You can substitute pear or peach butter, or make a quick homemade apple butter by simmering apples, sugar, and spices until thick and jammy. Adjust sugar to taste.
Is this pie gluten-free?
Only if you use a gluten-free pie crust. The filling itself is gluten-free, so just swap the crust and you’re all set.
Can I use a frozen pie crust?
Yes! Thaw according to package instructions, fit it into your pan, and proceed as directed. It’s a great time-saver and works just as well.
How do I prevent the pie from cracking?
Bake until the edges are set but the center still jiggles slightly. Cool the pie gradually—don’t rush it. If it cracks, just cover with whipped cream. No one will notice!
Pin This Recipe!
Creamy Apple Butter Pie

This Creamy Apple Butter Pie features a silky apple butter and cream cheese filling, baked in a buttery crust and topped with cinnamon whipped cream. It’s an easy, comforting holiday dessert that brings nostalgic autumn flavors to your table.
- Prep Time: 15 minutes
- Cook Time: 40 minutes
- Total Time: 2 hours 55 minutes
- Yield: 8 servings 1x
- Category: Dessert
- Cuisine: American
Ingredients
- 1 cup apple butter (homemade or store-bought)
- 8 oz cream cheese, softened
- 2/3 cup granulated sugar
- 2 large eggs, room temperature
- 1/2 cup heavy cream
- 1 tsp vanilla extract
- 1 tsp ground cinnamon
- 1/4 tsp ground nutmeg
- 1/4 tsp salt
- 1 9-inch unbaked pie crust (homemade or store-bought)
- 1 cup heavy whipping cream, cold
- 2 tbsp powdered sugar
- 1/2 tsp ground cinnamon
- 1/2 tsp vanilla extract
Instructions
- Preheat your oven to 350°F (175°C) and position a rack in the middle.
- Roll out your 9-inch pie crust and fit it into your pie pan. Crimp the edges and prick the bottom a few times with a fork.
- In a large mixing bowl, beat the softened cream cheese with an electric mixer until smooth and fluffy, about 2 minutes.
- Add granulated sugar and beat again until combined, scraping down the bowl as needed.
- Add eggs one at a time, beating well after each addition until the mixture is pale and creamy.
- Mix in apple butter, heavy cream, vanilla extract, cinnamon, nutmeg, and salt. Beat until fully combined and smooth, about 1 minute.
- Pour the apple butter filling into the prepared pie crust and smooth the top. Tap the pan gently to release bubbles.
- Bake on the middle rack for 35-40 minutes, until the edges are set but the center still jiggles slightly. Cover crust edges with foil if browning too quickly.
- Remove from oven and cool completely on a wire rack, about 2 hours.
- In a chilled medium bowl, whip heavy cream with powdered sugar, cinnamon, and vanilla until soft peaks form (2-3 minutes with an electric mixer).
- Serve pie slices topped with cinnamon whipped cream. Sprinkle with extra cinnamon or nutmeg if desired.
Notes
For gluten-free, use a certified gluten-free pie crust. For dairy-free, substitute plant-based cream cheese and coconut cream. Blind baking the crust for 10 minutes before filling yields a crisper base. Let the pie cool fully before slicing for best texture. If cracks appear, cover with whipped cream. Pie flavors deepen after chilling overnight.
Nutrition
- Serving Size: 1 slice (1/8 of 9-in
- Calories: 310
- Sugar: 24
- Sodium: 220
- Fat: 17
- Saturated Fat: 10
- Carbohydrates: 35
- Fiber: 1
- Protein: 4
Keywords: apple butter pie, holiday dessert, creamy pie, cinnamon whipped cream, Thanksgiving pie, fruit pie, easy pie recipe, autumn dessert


