Let me just say—when the aroma of bubbling cinnamon apples starts drifting from my oven, everyone in my house comes running. We’re talking about that sweet-tart scent, buttery oats, and the kind of warmth that makes you want to wrap yourself in a blanket and watch the leaves fall. The first time I made this apple crisp dessert recipe, I remember feeling absolutely giddy as I pulled it out of the oven. The oat topping was golden and impossibly crunchy, and underneath, the apples were so tender they practically melted in my mouth. It was the kind of moment where you pause, take a deep breath, and just smile because you know you’re onto something truly special.
This recipe isn’t just another apple crisp—it’s my go-to, the one I reach for every time fall rolls in or when I need a bit of comfort food magic. Growing up, my grandma used to make apple crisp every September. Back then, I was knee-high to a grasshopper, and I’d sit at the kitchen table, stealing little bites of the oat topping before it went into the oven. Years ago, I tried to recreate her version after a rainy weekend spent apple picking. Let’s face it, nothing ever tasted quite right—until I finally stumbled on this combination of Granny Smiths and Honeycrisps, plus my secret weapon: a touch of brown sugar and extra cinnamon in the oat topping.
Honestly, my family can’t keep their hands off this apple crisp. I’ll make a batch for dessert, and somehow half of it disappears before dinner (I can’t really blame them). It’s perfect for potlucks, sweet treats for your kids, or just to brighten up your Pinterest board. If you love recipes that bring people together and feel like a warm hug, you’re going to want to bookmark this one. And yes, I’ve tested it more times than I care to admit—in the name of research, of course! Now, it’s a staple for family gatherings, gifting, and those chilly nights when nothing beats old-fashioned apple comfort.
Why You’ll Love This Apple Crisp Dessert Recipe
After dozens of recipe trials (and a couple of spectacular kitchen messes), I can say this apple crisp dessert recipe is a keeper. Here’s why you’ll reach for it again and again—and why it’s become a family legend in my kitchen:
- Quick & Easy: You can pull this together in under 20 minutes, and it bakes in less than an hour. Perfect for busy weeknights or those last-minute sweet cravings.
- Simple Ingredients: Nothing fancy here—you probably have everything you need in your pantry right now. Apples, oats, flour, sugar, cinnamon, and butter.
- Perfect for Fall Gatherings: It’s a must for potlucks, cozy dinners, holiday mornings, or just a chilly afternoon treat.
- Crowd-Pleaser: Kids love it, adults secretly sneak extra helpings, and it gets rave reviews every time.
- Unbelievably Delicious: The apples are perfectly tender and tangy, and the oat topping is crunchy in all the right ways. Honestly, it’s pure, nostalgic comfort.
What makes this apple crisp dessert stand out? For starters, I use a blend of apples—Granny Smith for tartness and Honeycrisp for sweetness. That mix gives the filling a balanced flavor that doesn’t turn mushy. The oat topping is extra thick, with a touch of brown sugar and cinnamon that makes every bite sing. I also toss the apples with a splash of lemon juice and vanilla for brightness. Unlike other recipes, this one has just the right crumble-to-fruit ratio (because, you know, nobody wants skimpy topping).
This isn’t just another apple crisp. It’s the one you’ll want to make when you need comfort, when you want to impress guests without the stress, or when you just want a little moment of happiness at the end of a long day. Trust me, after the first bite, you’ll see why I keep coming back to this recipe. It’s comfort food made easier, faster, and honestly, more delicious than you remember.
What Ingredients You Will Need
This apple crisp dessert recipe uses simple, wholesome ingredients to deliver bold flavor and that crave-worthy crunchy oat topping—no complicated steps, no fussy extras. Most are pantry staples, and if you’ve got apples on hand, you’re halfway there.
- For the Filling:
- 6 medium apples (about 900g), peeled, cored, and sliced thin (I recommend using a mix of Granny Smith and Honeycrisp for best flavor)
- 2 tablespoons (25g) granulated sugar (adds a little sweetness without overpowering the apples)
- 2 tablespoons (15g) all-purpose flour (helps thicken the filling)
- 1 teaspoon ground cinnamon (for that classic cozy flavor)
- 1/4 teaspoon ground nutmeg (optional, for extra warmth)
- 2 teaspoons fresh lemon juice (brightens up the apples and keeps them from browning)
- 1 teaspoon vanilla extract (boosts the aroma and adds depth)
- For the Crunchy Oat Topping:
- 3/4 cup (75g) old-fashioned rolled oats (not instant, for the best crunch)
- 3/4 cup (95g) all-purpose flour (or use almond flour for a gluten-free option)
- 1/2 cup (105g) packed brown sugar (light or dark, whichever you prefer)
- 1/4 cup (50g) granulated sugar (balances the brown sugar’s molasses notes)
- 1 teaspoon ground cinnamon (can’t have too much!)
- 1/4 teaspoon salt (just a pinch to bring out the flavors)
- 1/2 cup (115g) unsalted butter, cold and diced (makes the topping extra crunchy and delicious)
- Optional Add-Ins:
- 1/2 cup (60g) chopped walnuts or pecans (for extra crunch)
- 1/2 cup (80g) dried cranberries or raisins (adds a sweet-tart twist)
- 1 tablespoon (10g) ground flaxseed (boosts fiber—no one will notice!)
If you need substitutions, swap the flour for a gluten-free blend or almond flour. Use coconut oil instead of butter for a dairy-free version. For apples, use what’s in season—Pink Lady, Fuji, or Braeburn work well. I personally love Bob’s Red Mill oats for their texture, and Kerrygold butter makes the topping taste extra rich. In summer, you can swap in fresh peaches or berries instead of apples for a fun twist. Just keep the ratios the same, and you’ll be all set!
Equipment Needed
You don’t need any fancy gadgets to make this apple crisp dessert recipe—just a few basics and maybe one or two helpful extras. Here’s what I use for best results:
- 9×13-inch (23x33cm) baking dish (glass, ceramic, or metal all work—ceramic bakes a bit more evenly in my experience)
- Large mixing bowl (for tossing apples and mixing topping)
- Medium mixing bowl (for preparing the oat topping)
- Sharp paring knife (for peeling, coring, and slicing apples)
- Apple corer (optional, but honestly makes life easier)
- Vegetable peeler
- Measuring cups and spoons (I use both US and metric for accuracy)
- Pastry cutter or clean hands (to mix the butter into the oat topping—forks work in a pinch too)
- Rubber spatula or wooden spoon
If you don’t have a pastry cutter, just use your fingers or two butter knives and cut the butter into the oat mixture. For budget-friendly options, you can find sturdy baking dishes at most supermarkets or secondhand shops. I’ve used metal pans before, but I find glass and ceramic keep the edges from browning too quickly. Just wash your tools right after using—the oat topping sticks if you let it dry!
Preparation Method
- Preheat Oven: Set your oven to 350°F (175°C). Grease your 9×13-inch (23x33cm) baking dish lightly with butter or nonstick spray.
- Prepare Apples: Peel, core, and slice 6 medium apples (about 900g) into 1/4-inch (0.5cm) thick slices. Place them in your large bowl. If you’re using a mix of apples, cut them all to the same thickness for even baking.
- Toss Filling: To the apples, add 2 tablespoons (25g) granulated sugar, 2 tablespoons (15g) flour, 1 teaspoon cinnamon, 1/4 teaspoon nutmeg (if using), 2 teaspoons lemon juice, and 1 teaspoon vanilla extract. Toss everything until the apples are evenly coated and glossy. If the apples look dry, add an extra splash of lemon juice.
- Layer Apples: Pour the apple mixture into your prepared baking dish. Spread it out so the slices are evenly distributed.
- Make Oat Topping: In a medium bowl, combine 3/4 cup (75g) oats, 3/4 cup (95g) flour, 1/2 cup (105g) brown sugar, 1/4 cup (50g) granulated sugar, 1 teaspoon cinnamon, and 1/4 teaspoon salt. Mix well with a fork.
- Cut in Butter: Add 1/2 cup (115g) cold, diced butter to the oat mixture. Use a pastry cutter, fork, or your hands to work the butter into the dry ingredients until the mixture looks crumbly and starts forming pea-sized clusters. (If you see some larger butter bits, that’s okay—it adds extra crunch!)
- Add Optional Mix-Ins: Stir in 1/2 cup (60g) chopped nuts, dried fruit, or ground flaxseed if you like. (I usually add walnuts for extra crunch.)
- Top the Apples: Sprinkle the oat topping evenly over the apples. Try not to pack it down—leave some little peaks and valleys for better texture.
- Bake: Place the dish on the center rack and bake for 45–55 minutes, until the topping is deep golden brown and the filling is bubbling up at the edges. If the topping browns too quickly, cover loosely with foil about 30 minutes in.
- Cool Slightly: Remove from oven and let cool for 15–20 minutes. The filling will thicken up as it sits, and the topping gets even crunchier.
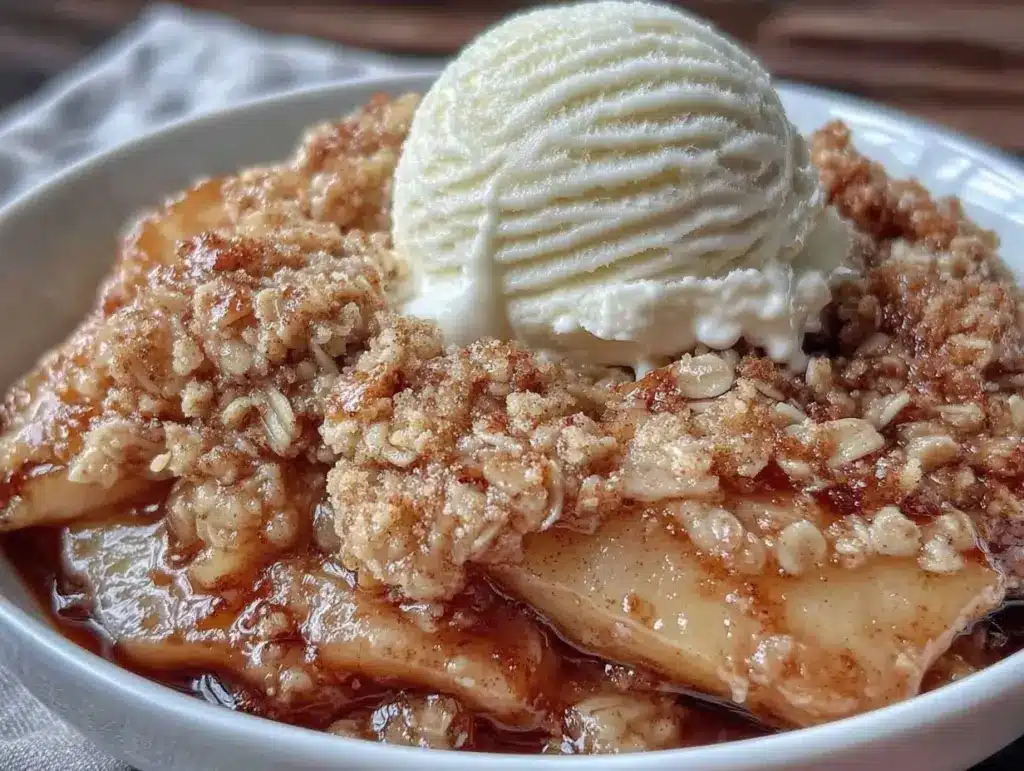
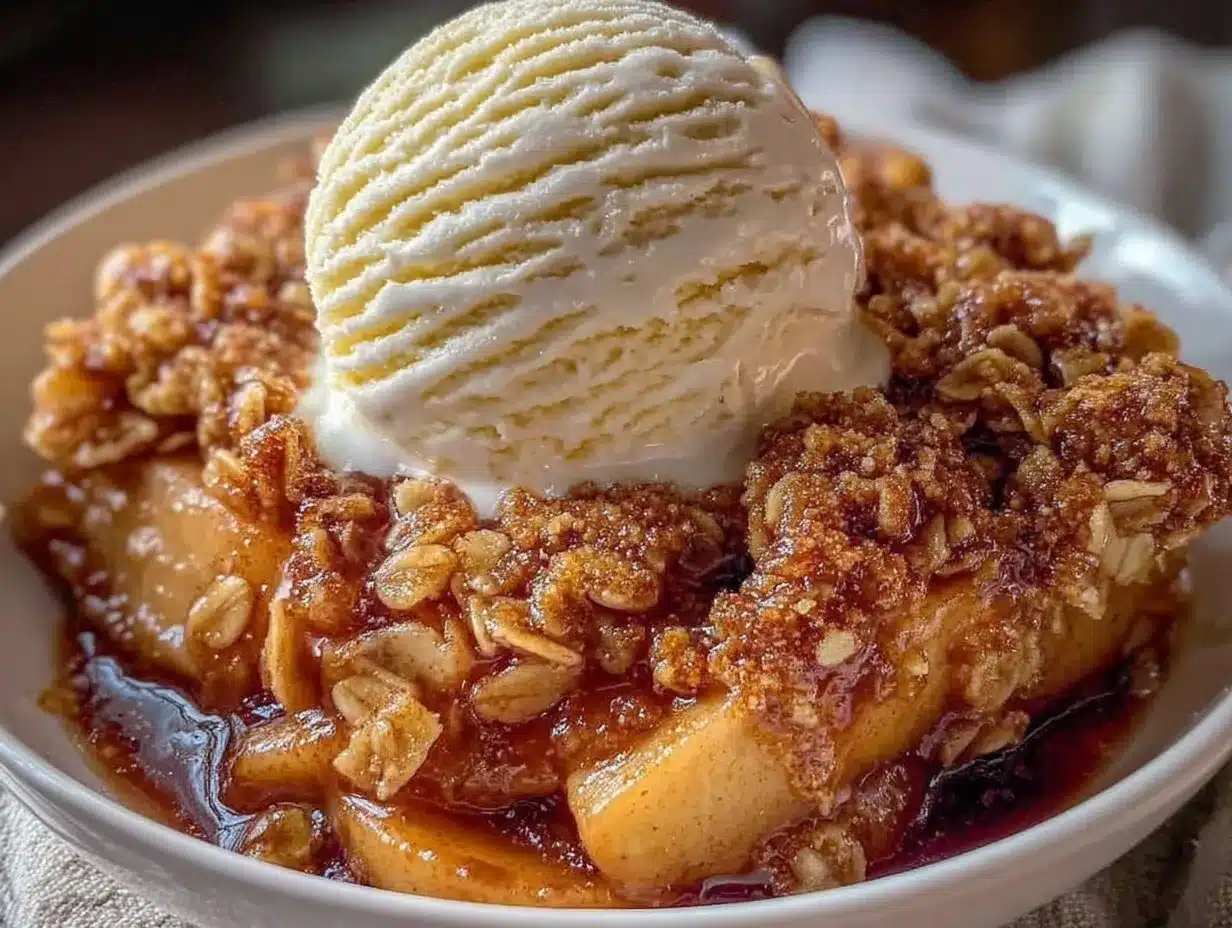
- Serve: Spoon into bowls and enjoy warm, preferably with a scoop of vanilla ice cream or a dollop of whipped cream. (Honestly, it’s just as good cold for breakfast the next morning—don’t judge!)
Troubleshooting: If your apples stay firm, bake another 5–10 minutes. If the topping is soggy, check your measurements—too little flour or too much butter can do it. If you want extra crunch, broil for 2–3 minutes at the end (watch closely!).
Personal Tips: Slice apples evenly for the best texture. Mix the topping just until crumbly—overmixing makes it dense. And if you’re making this ahead, reheat in the oven for 10 minutes to crisp up the oats again.
Cooking Tips & Techniques
After baking more apple crisps than I can count (and burning a few oat toppings along the way), I’ve picked up a few tricks for perfect results every time:
- Apple Choice: Mixing tart and sweet apples gives the filling complexity and keeps it from tasting flat. I’ve tried all tart apples—too sour! All sweet—too mushy. So, go for a blend.
- Topping Consistency: Keep your butter cold and dice it small. Warm butter melts too fast and makes the topping greasy instead of crunchy.
- Layering: Don’t press the topping down—leave it loose and lumpy. It bakes up with better texture.
- Common Mistakes: Overbaking dries out the apples, and underbaking leaves them firm. Check the edges for bubbling and the center for softness before pulling from the oven.
- Personal Failures: Once, I forgot the flour in the filling, and the apples turned soupy (learned my lesson!). Another time, I used instant oats—big mistake, topping was mushy.
- Timing: Prep your apples while the oven preheats, and mix the topping as the apples rest. Makes everything go faster.
- Multitasking: If you’re making dinner, bake the crisp alongside a roast or casserole. The oven’s already hot, and you get dessert with zero extra effort.
- Consistency: Measure your ingredients for the topping—eyeballing it sometimes works, but trust me, using a scale gets you the same crunchy results every time.
These little tips make a big difference. Honestly, after a few tries, you’ll find your rhythm and start tweaking it to your own taste. Apple crisp is meant to be easy and forgiving—so don’t stress if it’s not perfect the first time!
Variations & Adaptations
One of my favorite things about this apple crisp dessert recipe is how flexible it is. If you like to experiment (or have dietary needs), here are some fun twists I’ve tried over the years:
- Gluten-Free: Swap the flour with almond flour or a 1:1 gluten-free blend. Use certified gluten-free oats—no one will know the difference.
- Dairy-Free: Use coconut oil or vegan margarine instead of butter. The topping turns out just as crisp (maybe a little extra coconut flavor, which I love).
- Nut-Free: Skip the nuts, or swap in sunflower seeds for crunch.
- Seasonal Fruit: In summer, use peaches, plums, or berries instead of apples. I did a blueberry crisp last July—huge hit with my family.
- Flavor Boosts: Add orange zest to the filling for brightness, or stir in cardamom with the cinnamon for a little twist.
- Low-Sugar: Reduce the sugar in the filling and topping by half if your apples are sweet. It’s still delicious!
One personal favorite: I like to add a handful of chopped crystallized ginger to the oat topping for a bit of spicy warmth. Feel free to customize based on what’s in your pantry and your own taste. That’s the beauty of this recipe—you can make it your own, and it’ll still turn out cozy and delicious every time.
Serving & Storage Suggestions
This apple crisp dessert recipe is best served warm, right out of the oven. I like to scoop generous portions into bowls and top with vanilla ice cream—the contrast of cold ice cream and hot crisp is unbeatable. For a lighter option, whipped cream or Greek yogurt works too.
If you’re serving guests, sprinkle a little extra cinnamon or powdered sugar on top for a pretty finish. Pair with hot coffee, cider, or chai tea for the ultimate fall dessert experience. For brunch, serve alongside scrambled eggs or savory breakfast casseroles to balance things out.
To store leftovers, cover the baking dish tightly and refrigerate for up to 4 days. The oat topping will soften a bit, but you can re-crisp it by reheating in a 350°F (175°C) oven for 10 minutes. This crisp also freezes well—wrap tightly in foil and freeze for up to 2 months. Thaw overnight in the fridge and reheat gently. The flavors actually deepen after a day, making each bite even cozier!
Nutritional Information & Benefits
Here’s an estimate per serving (based on 8 servings):
- Calories: ~285
- Fat: 10g
- Carbs: 46g
- Fiber: 5g
- Protein: 3g
Apples are high in fiber and vitamin C, plus antioxidants for overall wellness. Oats boost heart health and keep you feeling full. If you use almond flour, you’ll add healthy fats and a touch more protein. This recipe can be made gluten-free or dairy-free, with simple swaps. Allergens: Contains wheat and dairy (unless adapted). Honestly, I love knowing I’m getting a bit of nutrition with my dessert—makes that second helping feel totally justified!
Conclusion
Whether you’re craving a nostalgic dessert or just want something cozy for a chilly night, this apple crisp dessert recipe is worth every bite. It’s easy, comforting, and endlessly adaptable—perfect for customizing to suit your tastes or what you have on hand.
I adore this recipe because it reminds me of family, fall afternoons, and those moments when you just need something sweet and warm. Don’t be afraid to play with the ingredients, swap in your favorite fruits, or add spices to make it your own. If you give it a try, I’d love to hear how you adapted it—leave a comment, share your photos, or let me know your favorite twist.
Here’s to cozy kitchen moments, crunchy oat toppings, and desserts that never go out of style. You’re going to love this one—promise!
Frequently Asked Questions
Can I use different types of apples in this apple crisp dessert recipe?
Absolutely! A mix of tart and sweet apples like Granny Smith and Honeycrisp works best, but Pink Lady, Fuji, or Braeburn are delicious too. Just keep the slices the same thickness for even baking.
How do I make the oat topping extra crunchy?
Use cold, diced butter and old-fashioned rolled oats. Don’t overmix—leave some bigger crumbs in the topping. If you want more crunch, broil for 2–3 minutes at the end, watching closely.
Can I make this recipe gluten-free?
Yes! Swap the all-purpose flour for almond flour or a gluten-free blend, and use certified gluten-free oats. The texture stays perfectly crispy.
What’s the best way to store leftovers?
Cover the baking dish and refrigerate for up to 4 days. Reheat in the oven for 10 minutes to bring back the crunch. You can also freeze leftovers for up to 2 months—just thaw overnight and reheat gently.
Can I prepare this apple crisp ahead of time?
You sure can! Assemble the crisp up to a day ahead, refrigerate, then bake when you’re ready. Or bake, cool, and reheat in the oven before serving—just don’t skip that last step for a crunchy topping!
Pin This Recipe!

Apple Crisp Dessert Recipe: Easy Homemade Oat Topping for Cozy Fall

This easy apple crisp dessert features a crunchy oat topping and tender apples, making it the perfect cozy treat for fall gatherings or comforting weeknight desserts. With simple pantry ingredients and adaptable options, it’s a crowd-pleaser that brings warmth and nostalgia to every bite.
- Prep Time: 20 minutes
- Cook Time: 45–55 minutes
- Total Time: 65–75 minutes
- Yield: 8 servings 1x
- Category: Dessert
- Cuisine: American
Ingredients
- 6 medium apples (about 2 pounds), peeled, cored, and sliced thin (Granny Smith and Honeycrisp recommended)
- 2 tablespoons granulated sugar
- 2 tablespoons all-purpose flour
- 1 teaspoon ground cinnamon
- 1/4 teaspoon ground nutmeg (optional)
- 2 teaspoons fresh lemon juice
- 1 teaspoon vanilla extract
- 3/4 cup old-fashioned rolled oats
- 3/4 cup all-purpose flour (or almond flour for gluten-free)
- 1/2 cup packed brown sugar
- 1/4 cup granulated sugar
- 1 teaspoon ground cinnamon
- 1/4 teaspoon salt
- 1/2 cup unsalted butter, cold and diced
- Optional: 1/2 cup chopped walnuts or pecans
- Optional: 1/2 cup dried cranberries or raisins
- Optional: 1 tablespoon ground flaxseed
Instructions
- Preheat oven to 350°F (175°C). Lightly grease a 9×13-inch baking dish with butter or nonstick spray.
- Peel, core, and slice apples into 1/4-inch thick slices. Place in a large mixing bowl.
- Add granulated sugar, flour, cinnamon, nutmeg (if using), lemon juice, and vanilla extract to apples. Toss until evenly coated.
- Spread apple mixture evenly in the prepared baking dish.
- In a medium bowl, combine oats, flour, brown sugar, granulated sugar, cinnamon, and salt. Mix well.
- Add cold, diced butter to the oat mixture. Cut in butter using a pastry cutter, fork, or hands until crumbly and pea-sized clusters form.
- Stir in optional mix-ins (nuts, dried fruit, flaxseed) if desired.
- Sprinkle oat topping evenly over apples, leaving it loose for texture.
- Bake on center rack for 45–55 minutes, until topping is golden brown and filling is bubbling. Cover loosely with foil if topping browns too quickly.
- Remove from oven and let cool for 15–20 minutes before serving.
- Serve warm with vanilla ice cream, whipped cream, or Greek yogurt.
Notes
For best results, use a mix of tart and sweet apples. Keep butter cold for a crunchy topping. Almond flour and gluten-free oats make this recipe gluten-free. Coconut oil or vegan margarine can be used for dairy-free. Slice apples evenly for even baking. Reheat leftovers in the oven to re-crisp topping. Add nuts, dried fruit, or spices for variations.
Nutrition
- Serving Size: 1/8 of recipe (about
- Calories: 285
- Sugar: 27
- Sodium: 90
- Fat: 10
- Saturated Fat: 6
- Carbohydrates: 46
- Fiber: 5
- Protein: 3
Keywords: apple crisp, fall dessert, oat topping, easy apple crisp, homemade apple crisp, comfort food, gluten-free option, dairy-free option, apple dessert, family recipe


