Introduction
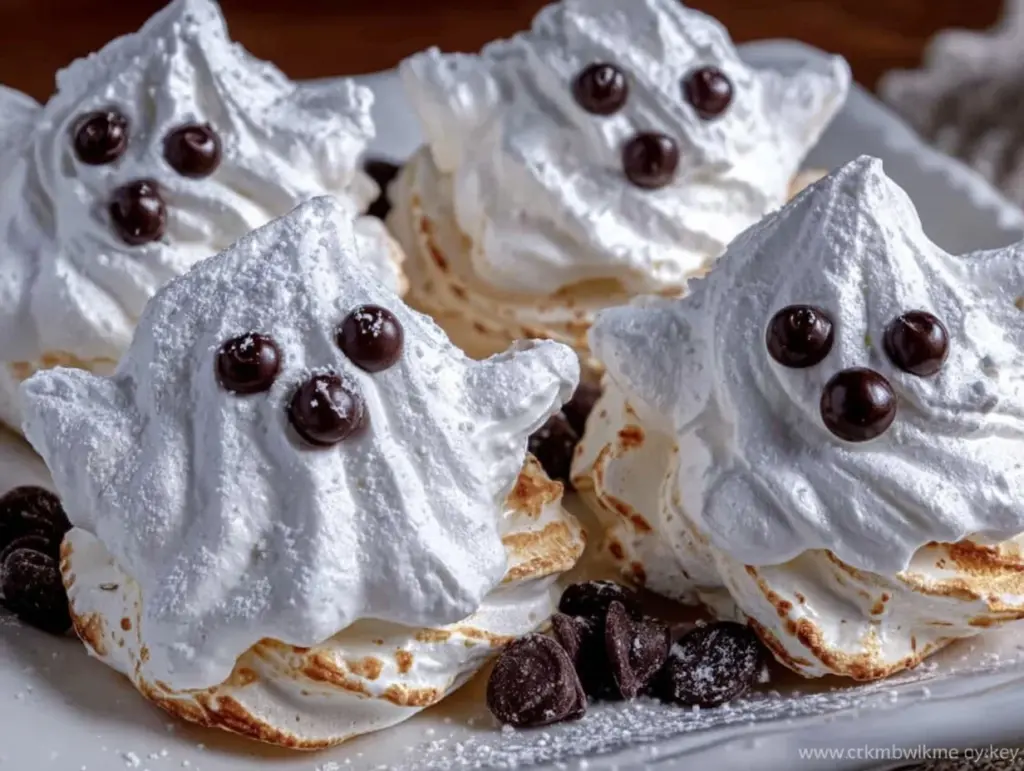
Let me tell you, when the scent of sugar and vanilla starts swirling around my kitchen and the oven glows with anticipation, it’s a sure sign that Halloween magic is in the air. The first time I whipped up these Fluffy Ghost Meringue Cookies, I couldn’t believe how adorable (and tasty) they turned out—like little clouds with cheeky faces, just begging to be snuck off the tray. You know that moment when you’re elbow-deep in egg whites and somehow, the kitchen feels like a laboratory of fun? That was me, grinning like a kid and watching those ghosts puff up in the oven.
Honestly, I stumbled upon the idea one rainy October afternoon, determined to make something memorable for my daughter’s class party. My grandma always said, “Halloween’s not Halloween without a little kitchen mischief,” and these cookies remind me of her playful spirit. I remember being knee-high to a grasshopper, sneaking spoonfuls of meringue from her mixing bowl when she wasn’t looking. That nostalgia hits hard every time I pipe out a batch of these ghostly treats.
My family couldn’t stop sneaking them off the cooling rack (and I can’t really blame them). There’s just something about their fluffy texture and crisp shell that makes everyone light up—kids, teens, even the “I’m not into sweets” crowd. Perfect for potlucks, class parties, or to brighten up your Pinterest Halloween board, Fluffy Ghost Meringue Cookies are dangerously easy, all about pure, festive comfort. I’ve tested this recipe more times than I care to admit (in the name of research, of course), and now it’s become a staple for gifting, gathering, and good old-fashioned spooky fun. If you’re craving a treat that feels like a warm, sugary hug, you’re going to want to bookmark this one!
Why You’ll Love This Recipe
If you’ve ever tried to make meringue cookies, you know they can be just a little finicky—trust me, I’ve had my fair share of flat ghosts and sticky blobs. But this recipe for Fluffy Ghost Meringue Cookies is my tried-and-true, foolproof method. Years of baking (and a couple of professional pastry classes) led me to this point: a Halloween treat that’s not just cute, but reliably delicious every time. Here’s why you’ll absolutely love making these:
- Quick & Easy: Comes together in under an hour, so you can whip up a batch even on a busy school night.
- Simple Ingredients: No fancy grocery trips—just eggs, sugar, and a splash of vanilla. Chances are, you’ve got everything you need right now.
- Perfect for Parties: These ghost cookies are a hit at Halloween gatherings, potlucks, and anywhere people want to snack and smile.
- Crowd-Pleaser: Kids love their silly faces, and adults appreciate the light, sweet crunch. They’re even gluten-free, so more folks can enjoy.
- Unbelievably Delicious: Crisp on the outside, marshmallowy on the inside—each bite is pure, nostalgic comfort.
What makes these Fluffy Ghost Meringue Cookies stand out? It’s the technique—whipping those egg whites to sturdy peaks, adding sugar gradually for glossy perfection, and piping with just the right touch. Honestly, the difference is night and day versus other recipes I’ve tried. No chewy centers or gritty sugar here! And let’s face it, the best part is customizing each ghost’s expression—they’re never quite the same, which makes every batch a little surprise.
This recipe isn’t just good—it’s the kind that makes you close your eyes and grin at the first bite. It’s comfort food for Halloween, with a lighter twist and a dash of fun. Whether you’re impressing guests, making memories with your kids, or just sneaking a midnight snack, these meringue ghosts turn simple moments into something memorable. You’ll want to make them again and again—promise!
What Ingredients You Will Need
These Fluffy Ghost Meringue Cookies call for a handful of pantry staples, making them the perfect treat when you want to satisfy a sweet tooth without fuss. Each ingredient plays a key role in creating the signature fluffy texture and crisp shell. Here’s what you’ll need:
- Egg Whites (4 large eggs, room temperature) – The backbone of any meringue. Room temp egg whites whip up with more volume and stability. I always use fresh eggs for the best results.
- Granulated Sugar (1 cup / 200g) – Sweetens the meringue and helps create that glossy, sturdy texture. I use C&H or Domino, but any fine white sugar works well.
- Cream of Tartar (1/2 teaspoon) – This little helper stabilizes the egg whites, making fluffy peaks less likely to collapse. It’s the secret to meringue success (unless you’re out, then a squeeze of lemon juice works in a pinch).
- Vanilla Extract (1 teaspoon) – Adds warmth and depth to the flavor. Nielsen-Massey is my go-to, but use what you love.
- Mini Chocolate Chips – For the ghost faces. You’ll need about 1/3 cup (60g). I like Ghirardelli, but any mini chips will do.
- Black Writing Gel or Melted Chocolate – Optional, for more detailed facial expressions. Wilton’s black gel is easy to use, or melt a handful of chips and pipe with a toothpick.
Ingredient Selection Tips:
– Use superfine sugar if you want extra smooth meringue.
– For a dairy-free version, all ingredients are naturally free of dairy.
– If you need to avoid eggs, aquafaba (the liquid from canned chickpeas) can be substituted—about 3 tablespoons per egg white, though results may vary.
Substitutions:
– Cream of tartar can be swapped for 1 teaspoon lemon juice or white vinegar.
– Vanilla extract can be replaced with almond or peppermint for a fun twist.
– For faces, you can use edible candy eyes or tiny dots of colored icing instead of chocolate chips.
In summer, I’ve swapped out vanilla for orange extract (just 1/2 teaspoon) for a citrusy ghost. These ingredients are friendly to most dietary restrictions, and you can always get creative with the faces and flavors. That’s the beauty of meringue—there’s plenty of room to make it your own!
Equipment Needed
Here’s the lineup of tools you’ll need for your Fluffy Ghost Meringue Cookies:
- Electric Mixer (stand or handheld) – Whipping egg whites by hand is possible, but honestly, it’s a workout. My old KitchenAid stand mixer has been a lifesaver for batches big and small.
- Mixing Bowl – Metal or glass works best for meringue, as plastic can hold onto grease (which is a meringue killer). I’ve used everything from thrift store bowls to my trusty Pyrex.
- Piping Bag – For those classic ghost shapes. If you don’t have one, a gallon zip-top bag with the corner snipped off works just fine.
- Baking Sheet – Lined with parchment paper. Silicone mats are okay too, but I find parchment is best for easy lifting.
- Rubber Spatula – Helps scrape every bit of meringue into the piping bag.
- Toothpicks or Small Brushes – For adding facial details if you’re feeling creative.
- Mini Offset Spatula (optional) – Handy for lifting cookies off the tray once baked.
Don’t sweat it if you don’t have specialty tools—improvising works. Just make sure everything is squeaky clean and dry; even a hint of oil can cause meringue to flop. I give my mixing bowl a quick wipe with vinegar before starting, just to be safe. As for budget, most of these tools are kitchen staples, and you can easily get by with basics.
Preparation Method
-
Preheat & Prep:
Preheat your oven to 225°F (110°C). Line a large baking sheet with parchment paper. If you want perfectly shaped ghosts, draw little ovals on the underside of the parchment for guides (optional, but fun for kids!). -
Clean Your Tools:
Wipe your mixing bowl and beaters with a little vinegar or lemon juice to remove any grease. Dry thoroughly—this one step can save your meringue from disaster! -
Separate the Eggs:
Carefully separate 4 large eggs, placing the whites in your mixing bowl. Make sure no yolk sneaks in (even a drop will ruin the fluffiness). Let the whites sit at room temperature for 10-15 minutes. -
Whip the Egg Whites:
Using your electric mixer on medium speed, beat the egg whites until foamy (about 1 minute). Sprinkle in the cream of tartar. Continue beating until soft peaks form—whites should mound gently but not hold a stiff point just yet. -
Add Sugar Gradually:
Turn mixer to high. Add 1 cup (200g) granulated sugar, one tablespoon at a time. This slow addition helps dissolve sugar for glossy meringue. Beat for 6-8 minutes, until stiff, shiny peaks form. The mixture should be thick enough to hold its shape. If sugar is grainy, keep beating! -
Flavor It Up:
Beat in 1 teaspoon vanilla extract until just combined. Don’t overmix at this stage—just enough for flavor. -
Pipe the Ghosts:
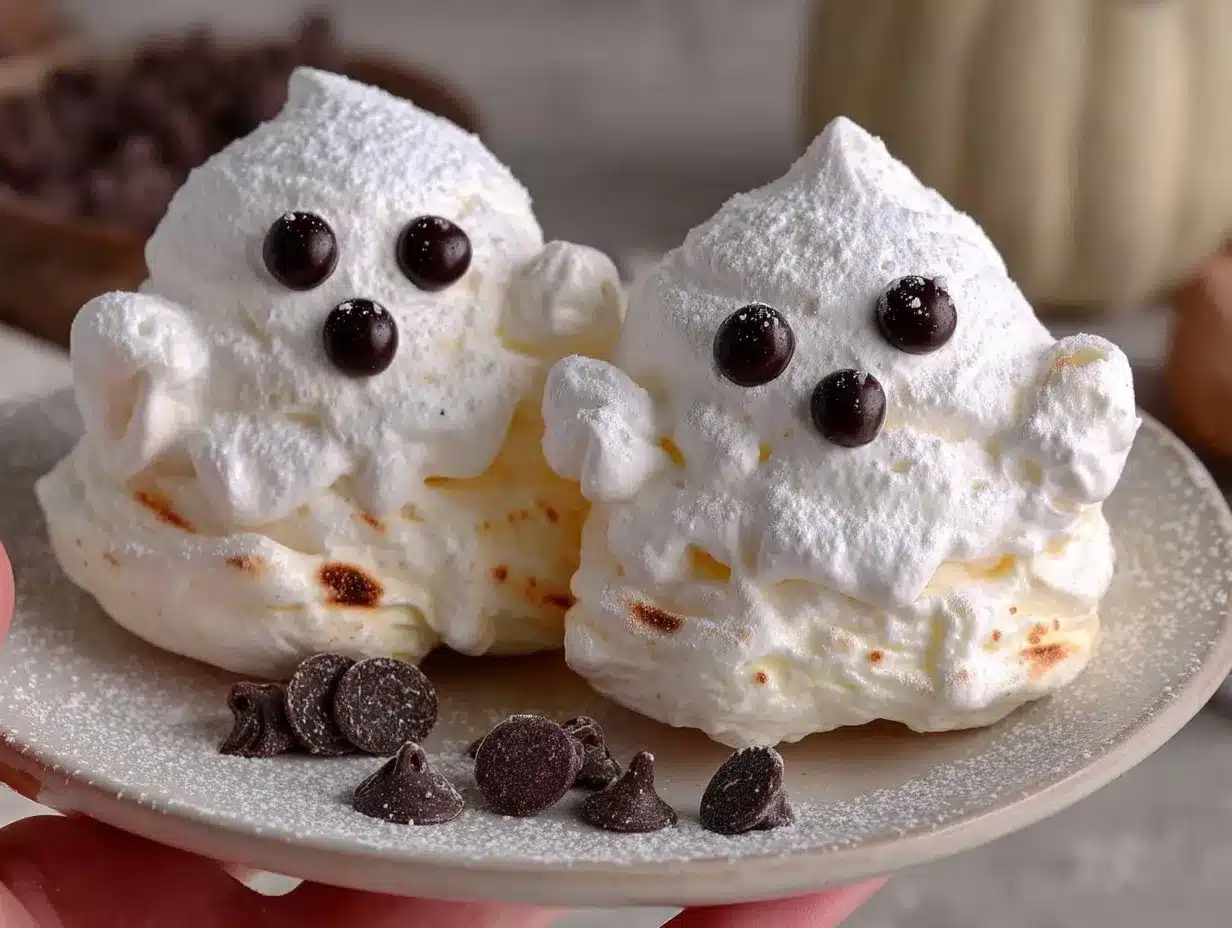
Transfer meringue to a piping bag fitted with a large round tip (or use a zip-top bag and snip a 1/2-inch opening). Pipe 2- to 3-inch tall ghost shapes onto the prepared baking sheet. For the classic look, make a big body and a smaller head on top. Leave an inch between each ghost. -
Add Faces:
Gently press mini chocolate chips into the meringue for eyes. Use a toothpick dipped in black gel or melted chocolate for mouths or extra details. Get creative—each ghost has its own personality! -
Bake Low & Slow:
Bake in preheated oven for 60-75 minutes, until dry to the touch but still pale in color. If they start to brown, lower the oven a bit. Meringue hates humidity—if it’s a rainy day, add an extra 10 minutes. -
Cool Completely:
Turn off the oven, crack the door open, and let cookies cool inside for 30 minutes. This helps prevent cracks and keeps ghosts fluffy.
Prep Notes:
– If your ghosts “weep” or get sticky, humidity is likely the culprit—try baking on a clear, dry day.
– If meringue is grainy or deflates, check for any trace of yolk or grease.
Personal Tip: I usually set my timer for 60 minutes, then check every 5 minutes. Once they feel dry and easily lift from the paper, they’re ready. Don’t rush the cooling—this step makes all the difference!
Cooking Tips & Techniques
Making Fluffy Ghost Meringue Cookies can seem intimidating if you’ve ever had a batch flop (ask me about the time I forgot to clean my mixing bowl—yikes). But with a few kitchen-tested tricks, you’ll be piping perfect ghosts in no time.
- Temperature is Key: Always use room temperature egg whites. Cold eggs whip less easily and can lead to flat ghosts. I leave mine out for at least 30 minutes while prepping everything else.
- Spotless Equipment: Any grease (on bowls, beaters, or hands) will sabotage meringue. I’ve learned to wipe everything down with vinegar—just in case.
- Patience with Sugar: Add sugar slowly. Dumping it in all at once causes grainy meringue. Trust me, I’ve tried to rush it and regretted the sticky mess!
- Piping Practice: If you’re new to piping, practice a few shapes on the parchment before going all-in. You’ll find your groove quickly.
- Humidity Woes: Meringue hates moisture. On rainy days, I close windows and even run a dehumidifier if I’m determined to bake. If the cookies are sticky after baking, you can pop them back in the oven for 10 minutes.
- Multitasking: While the cookies bake, I prep decorations or start a pot of tea. Just don’t wander too far—meringue can go from perfect to brown in a flash!
Consistency is all about the little things—clean tools, room temp eggs, and gentle hands. If your ghosts collapse, don’t worry. They’ll still taste great! And if you end up with a few “monster blobs,” just call them Halloween mutants and roll with it. That’s part of the fun.
Variations & Adaptations
One of my favorite things about Fluffy Ghost Meringue Cookies is how easy it is to switch things up. Here are a few ways you can make this recipe your own:
- Dietary Variation: Swap the eggs for aquafaba (chickpea brine) to make vegan ghosts. Use the same whipping method—just expect a slightly softer texture.
- Seasonal Flavor Twist: Add 1/2 teaspoon peppermint or orange extract instead of vanilla for a fresh spin. I’ve even tried cinnamon for a cozy fall vibe.
- Chocolate Ghosts: Sift in 2 tablespoons cocoa powder with the sugar for chocolate meringue ghosts. They’re rich and just as spooky!
- Cooking Method: If you don’t have a piping bag, spoon dollops onto the tray for “blobby ghosts”—kids love these! You can also pipe mini ghosts for snack-size treats.
- Allergen Substitutions: Use allergy-friendly chocolate chips or colored icing instead of regular chocolate for faces.
Personally, my favorite twist is peppermint ghosts—so fresh and unexpected for Halloween. And if you want to really wow your guests, try dipping the ghost bottoms in melted chocolate after baking. The possibilities are endless, so don’t be afraid to get creative!
Serving & Storage Suggestions
Serve Fluffy Ghost Meringue Cookies at room temperature for the best texture—crisp shell and soft inside. I love arranging them on a black platter with sprinkles for extra Halloween flair. They’re perfect alongside hot cocoa, cider, or even a chilly glass of milk.
If you’re hosting a party, pair these cookies with a bowl of fresh fruit or popcorn for a balanced snack spread. They also make adorable cupcake toppers—just sit one ghost atop a swirl of buttercream!
Storage Tips:
– Store cookies in an airtight container at room temperature for up to 5 days. If humidity is high, add a sheet of parchment between layers to prevent sticking.
– For longer storage, freeze cookies in a single layer, then transfer to a freezer-safe bag. Thaw at room temperature before serving.
Reheating:
– If cookies lose crispness, pop them in a 200°F (93°C) oven for 10 minutes to refresh.
Flavor Note: Meringue cookies taste sweetest the day after baking—something about the sugar settling makes them even better. So if you’re planning ahead, bake a batch the night before!
Nutritional Information & Benefits
Each Fluffy Ghost Meringue Cookie (about 1 serving) contains roughly:
- Calories: 22
- Fat: 0g
- Carbohydrates: 5g
- Protein: 0.5g
- Sugar: 5g
Meringue cookies are naturally low in fat and gluten-free, making them a lighter option for holiday snacking. They’re also dairy-free, so folks with milk allergies can join the fun. The egg whites provide a little protein, though these are mostly a sweet treat.
Watch out for the sugar content if you’re watching carbs, and remember that chocolate chips may contain milk (use allergy-friendly brands if needed). From a wellness perspective, I love that these cookies let you indulge in festive fun without feeling weighed down—a sweet lift for the holiday season!
Conclusion
Fluffy Ghost Meringue Cookies are more than just a Halloween treat—they’re a little burst of joy for spooky season, bringing smiles to every table. Whether you’re a seasoned baker or just testing your kitchen skills, this recipe is worth trying for the nostalgia, the fun, and the irresistible flavor.
Customize your ghosts, tweak the flavors, and let your creativity run wild. That’s what makes baking for Halloween so special—you get to make memories while sneaking a few sweet bites. I love this recipe because it’s always a hit, no matter who’s eating, and it turns simple ingredients into something magical.
So, go ahead—whip up a batch, share your ghost creations in the comments, and let me know how you made them your own! And if you’ve got a favorite meringue cookie trick, pass it along. Happy haunting and happy baking!
Frequently Asked Questions
Can I make Fluffy Ghost Meringue Cookies ahead of time?
Yes! They keep well in an airtight container for up to 5 days, making them perfect for prepping before a big party.
Why won’t my meringue whip up fluffy?
Most likely, there’s a trace of grease in your bowl or a bit of yolk in the whites. Make sure everything is squeaky clean and egg whites are at room temperature.
Can I make these cookies without cream of tartar?
Absolutely. Swap with 1 teaspoon lemon juice or white vinegar for similar stabilizing effects.
How do I keep my meringue cookies from getting sticky?
Bake on a dry day if you can, and store cookies in a sealed container with parchment between layers. If they get sticky, a quick stint in a low oven will refresh them.
Can I color the ghosts or add different flavors?
Definitely! Add a few drops of gel food coloring or swap out vanilla for peppermint, orange, or almond extract. Just don’t overmix after adding color or flavor.
Pin This Recipe!
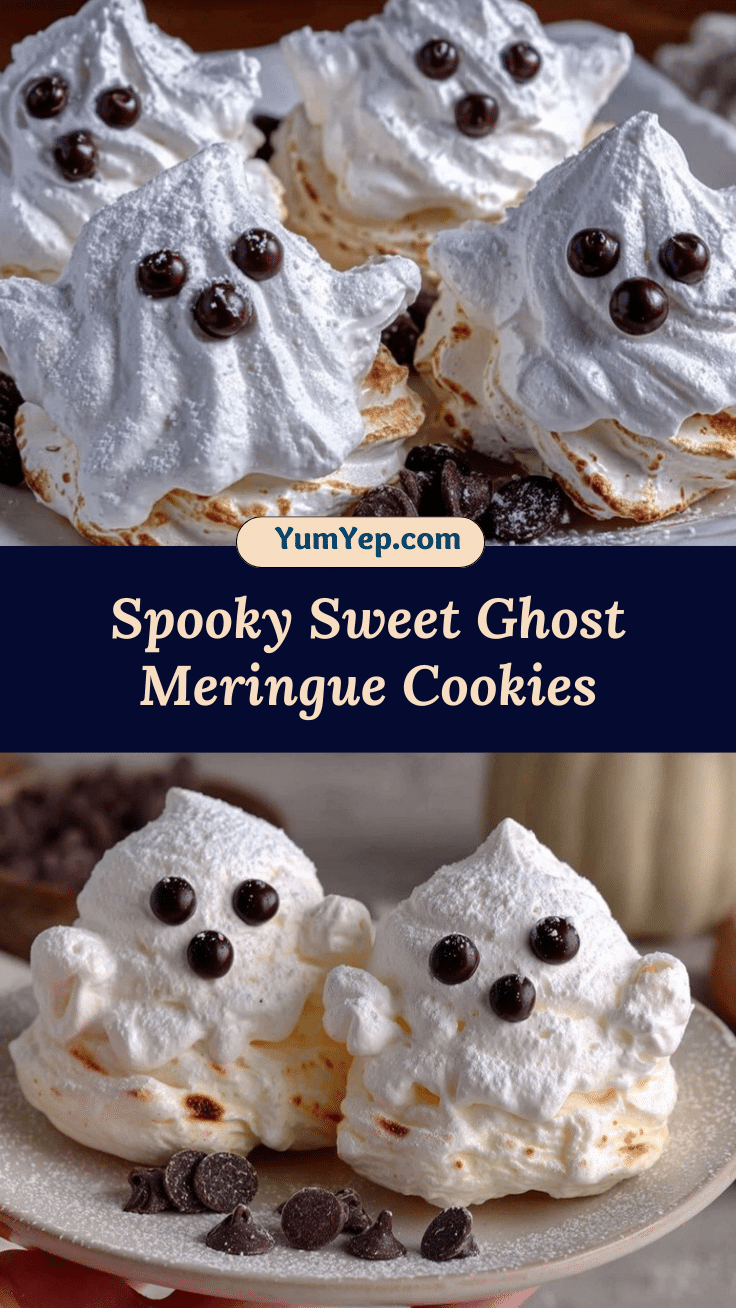
Fluffy Ghost Meringue Cookies

These Fluffy Ghost Meringue Cookies are crisp on the outside, marshmallowy on the inside, and irresistibly cute for Halloween. They’re easy to make, gluten-free, and perfect for parties or festive snacking.
- Prep Time: 15 minutes
- Cook Time: 75 minutes
- Total Time: 1 hour 30 minutes
- Yield: 24 cookies 1x
- Category: Dessert
- Cuisine: American
Ingredients
- 4 large egg whites, room temperature
- 1 cup granulated sugar (200g)
- 1/2 teaspoon cream of tartar
- 1 teaspoon vanilla extract
- 1/3 cup mini chocolate chips (60g), for faces
- Black writing gel or melted chocolate, optional for facial details
Instructions
- Preheat oven to 225°F (110°C). Line a large baking sheet with parchment paper. Optionally, draw ovals on the underside of the parchment for ghost guides.
- Wipe mixing bowl and beaters with vinegar or lemon juice to remove grease. Dry thoroughly.
- Carefully separate 4 large eggs, placing whites in the mixing bowl. Ensure no yolk is present. Let whites sit at room temperature for 10-15 minutes.
- Using an electric mixer on medium speed, beat egg whites until foamy (about 1 minute). Sprinkle in cream of tartar. Continue beating until soft peaks form.
- Turn mixer to high. Add granulated sugar, one tablespoon at a time, beating for 6-8 minutes until stiff, shiny peaks form and mixture is thick.
- Beat in vanilla extract until just combined.
- Transfer meringue to a piping bag fitted with a large round tip (or use a zip-top bag with a 1/2-inch opening). Pipe 2- to 3-inch tall ghost shapes onto the prepared baking sheet, leaving an inch between each.
- Gently press mini chocolate chips into meringue for eyes. Use toothpick dipped in black gel or melted chocolate for mouths or extra details.
- Bake in preheated oven for 60-75 minutes, until dry to the touch but still pale. If cookies start to brown, lower oven temperature.
- Turn off oven, crack door open, and let cookies cool inside for 30 minutes.
Notes
For best results, use room temperature egg whites and spotless equipment. Bake on a dry day to avoid sticky cookies. Store in an airtight container for up to 5 days. For vegan adaptation, substitute aquafaba for egg whites. Customize faces with candy eyes or colored icing. If cookies lose crispness, refresh in a 200°F oven for 10 minutes.
Nutrition
- Serving Size: 1 cookie
- Calories: 22
- Sugar: 5
- Sodium: 10
- Carbohydrates: 5
- Protein: 0.5
Keywords: meringue cookies, Halloween, ghost cookies, gluten-free, party treats, easy dessert, egg whites, dairy-free, festive baking


