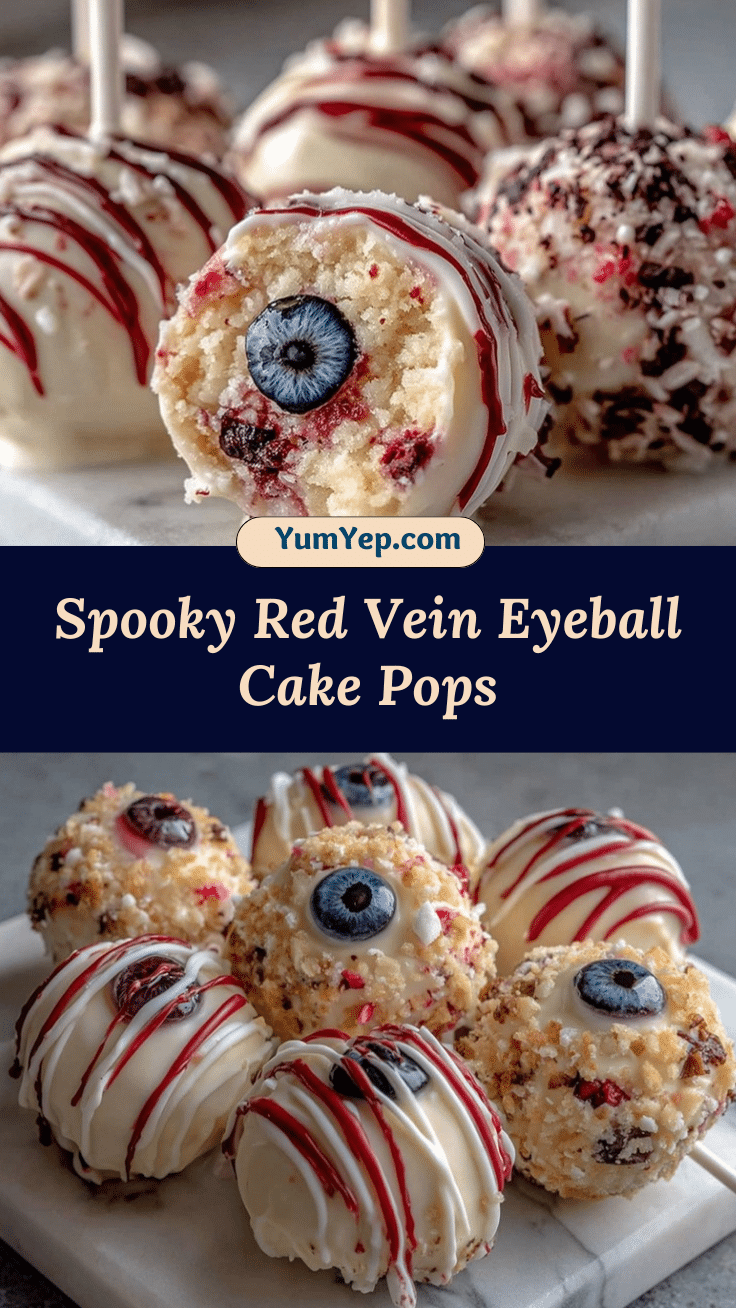
Let me set the scene: it’s late October, the air’s got that crisp, spooky vibe, and the scent of vanilla cake wafts from my kitchen like a siren’s call. The first time I made these eyeball cake pops with realistic red veins for Halloween, I couldn’t help but pause and admire the little monsters lined up on my counter—each one staring right back at me. It’s the kind of moment where you stop, take a deep breath, and smile because you know you’re onto something truly special (and maybe a little creepy)!
I grew up in a family where Halloween was basically a sport. My grandma used to say, “If you’re not making something that gives people a good scare, you’re just baking.” Years ago, when I was knee-high to a grasshopper, I’d watch her transform the plainest cupcakes into ghastly treats that had our neighbors talking for weeks. These eyeball cake pops became my own twist on her tradition—a little bit of nostalgia, a lot of fun, and honestly, dangerously easy to whip up.
The first time I brought these to a Halloween party, my family couldn’t stop sneaking them off the display tray (I caught my cousin eating one behind the fridge, no joke). Kids giggled. Adults snapped photos for their Pinterest boards. People just love the mix of spooky and sweet, and you know what? They’re perfect for classroom parties, neighbor gifts, or just for a cozy movie night when you want to scare up some smiles.
I’ve tested these eyeball cake pops more times than I can count—in the name of research, of course—until they became a staple for our haunted house gatherings and treat bags. If you’re after a recipe that feels like a warm hug wrapped in Halloween spirit, you’re going to want to bookmark this one. Trust me, these cake pops are so much more than just a treat—they’re pure, nostalgic comfort with a wicked twist!
Why You’ll Love This Recipe
Let’s face it: Halloween treats can get messy, complicated, or (worst of all) bland. But these perfect eyeball cake pops with realistic red veins are the kind of recipe that makes you close your eyes after the first bite and think, “Now that’s how spooky should taste.” I’ve made hundreds of cake pops over the years—so you know I’m bringing my best tricks to the table here.
- Quick & Easy: Comes together in under 90 minutes, so you can whip up a batch even on a busy weeknight or right before a party.
- Simple Ingredients: No wild grocery trips needed; odds are you’ve got cake mix, frosting, and chocolate in your pantry already.
- Perfect for Halloween Parties: Whether it’s a potluck, classroom celebration, or a Pinterest-worthy dessert table, these cake pops steal the show.
- Crowd-Pleaser: Kids love the spooky eyeballs (and the sweet taste), adults can’t help but admire the realistic red veins.
- Unbelievably Delicious: Soft cake centers, creamy frosting, and snappy white chocolate coating with a burst of vanilla flavor—comfort food with a ghoulish grin!
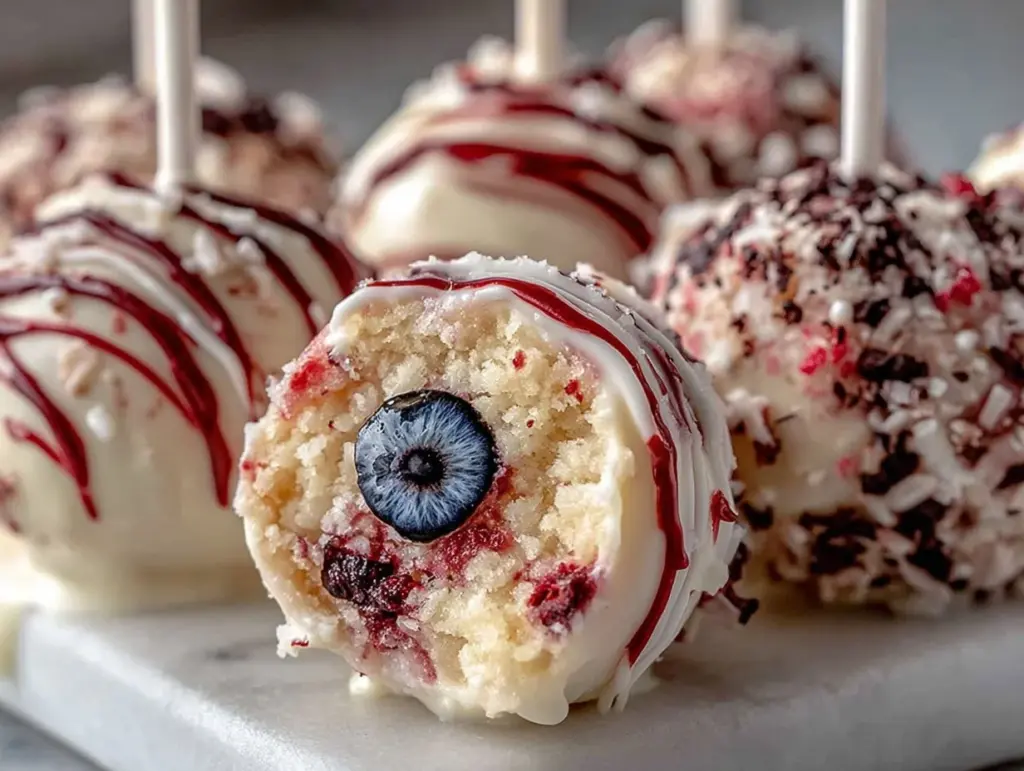
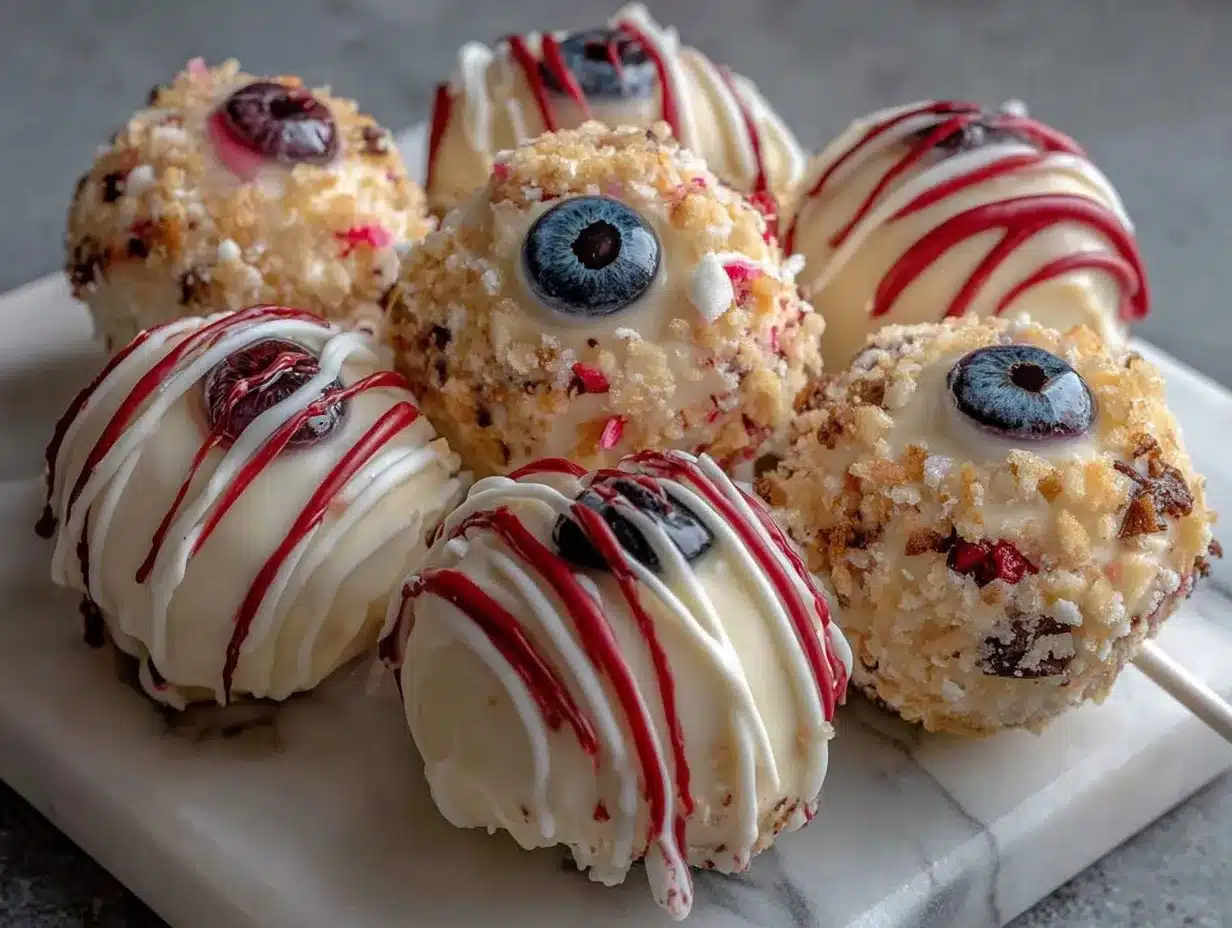
What sets my perfect eyeball cake pops apart? I use a special technique for the veins (a simple edible gel, but painted on with a toothpick for those ultra-realistic squiggles). The eyes themselves pop with color thanks to high-quality candy melts and a dab of edible black gel for the pupils. No more lumpy cake balls or cracked coatings—just smooth, round, creepy eyeballs every time!
Honestly, it’s the combination of ease and wow-factor that makes this recipe a winner. It’s comfort food reimagined for Halloween—faster, spookier, but still packed with all the soul-soothing, sweet satisfaction you want. Whether you’re impressing guests without breaking a sweat or turning a regular party into something memorable, these eyeball cake pops are your ticket to Halloween glory!
What Ingredients You Will Need
This recipe uses simple, reliable ingredients to deliver bold flavor and irresistible texture—plus a few easy-to-find items for that realistic eyeball look. Most of these are pantry staples, but you can swap things around if you need. Here’s what you’ll need:
- For the Cake Pops:
- 1 box vanilla cake mix (or chocolate for a darker “eyeball” interior)
- Ingredients required for cake mix (usually eggs, oil, water—check your box)
- 1 cup (240g) vanilla frosting (homemade or store-bought; I love Betty Crocker for smoothness)
- For the Coating & Decoration:
- 12 oz (340g) white candy melts (Wilton or Ghirardelli work best for a nice, opaque finish)
- Red edible food gel (for the veins; Chefmaster or Americolor are my go-tos)
- Blue, green, or brown colored candy melts (for the iris—choose your favorite “eye” color)
- Black edible gel (for the pupil; you can use a black decorating pen too)
- 1-2 tbsp (15-30ml) vegetable oil or shortening (to thin candy melts, if needed)
- 24 cake pop sticks (standard size)
- Optional Add-ons:
- Sprinkles (for a glittery effect)
- Edible shimmer dust (for extra “eyeball” shine)
If you need a gluten-free option, swap the cake mix for your favorite GF blend (King Arthur’s is great). Dairy-free? Use coconut oil and a vegan frosting. For a red velvet “bloodshot” effect, just use red velvet cake mix. In summer, you can even add a drop of lemon extract for a zingy flavor—but for classic Halloween, vanilla or chocolate is perfect.
I always recommend using firm, not runny, frosting for shaping—otherwise the cake balls can get mushy. If you want your eyeball cake pops to stay round, chill them in the fridge before dipping. Trust me, a little patience here makes all the difference!
Equipment Needed
To whip up these perfect eyeball cake pops with realistic red veins, you don’t need a full bakery setup—just a handful of reliable kitchen tools. Here’s what I reach for every time:
- Mixing bowls (one large for cake, one small for melting candy)
- Hand mixer or stand mixer (makes cake crumbling a breeze—but a fork works in a pinch)
- Baking sheet (for cooling and setting cake pops)
- Wax paper or parchment paper (keeps things tidy and non-stick)
- Cake pop sticks (standard size, but lollipop sticks work too)
- Microwave-safe bowl (for melting candy melts)
- Toothpicks (for drawing the red veins)
- Small paintbrush (optional—for more detailed veins, use a dedicated food brush)
- Styrofoam block or cake pop stand (for upright drying)
Honestly, I’ve used everything from an old mug to prop up my cake pops to a fancy acrylic stand (Amazon has budget-friendly options). If you’re missing a mixer, just crumble the cake by hand—messy, but effective! For maintenance, wipe down your cake pop sticks before reusing (if they’re reusable), and don’t forget to line your sheet pan—trust me, cleanup is way easier.
Preparation Method
- Bake the Cake: Preheat your oven to 350°F (175°C). Prepare the box cake mix according to package instructions (usually 3 eggs, 1/2 cup oil, and 1 cup water—double-check your brand). Pour into a greased 9×13-inch pan and bake for 25-30 minutes, or until a toothpick comes out clean. Cool completely (about 30 minutes).
- Crumb and Mix: Crumble cooled cake into a large bowl—use your hands or a mixer. Add 1 cup (240g) vanilla frosting and mix until a smooth dough forms. If the mix feels too dry, add another tablespoon of frosting; too wet, add a bit more cake crumbs.
- Shape the Cake Balls: Scoop out tablespoon-sized portions and roll into smooth balls (about 1.25-inch diameter). You should get about 24 cake balls. Place on a lined baking sheet and chill in the fridge for 30 minutes (this helps them hold their shape).
- Insert Cake Pop Sticks: Melt 2 oz (60g) white candy melts in a microwave-safe bowl (30 second bursts, stirring between). Dip the tip of each stick into the melted candy, then insert halfway into a cake ball (this “glues” stick to cake pop). Chill for 10 minutes.
- Coat the Cake Pops: Melt remaining white candy melts with 1-2 tbsp (15-30ml) vegetable oil or shortening (for a smooth, thin consistency). Dip each cake pop into the melted coating, turning to coat evenly. Gently tap off excess. Place upright in a styrofoam block to set (about 10 minutes).
- Add the Iris and Pupil: Melt colored candy melts (blue, green, or brown) and let cool slightly. Use a toothpick or small spoon to dab a circle on each cake pop for the iris. Let set. Add a dot of black edible gel or decorating pen in the center for the pupil.
- Draw the Red Veins: Using a toothpick dipped in red edible gel, draw squiggly lines radiating from the iris outward. For extra realism, vary thickness and direction—look at a photo for inspiration. If using a brush, keep strokes light for wispy veins.
- Set and Serve: Allow all decorations to set completely (about 20 minutes). Your perfect eyeball cake pops are ready to haunt your Halloween table!
If your candy melts seize up, add a few drops of oil and stir. If cake balls crack, they might be too cold—let them sit a few minutes before dipping. For perfect results, work in small batches and keep unused cake balls chilled.
Cooking Tips & Techniques
When it comes to cake pops, consistency is king—honestly, I’ve learned this the hard way. Here are my top tips for nailing those perfect eyeball cake pops with realistic red veins every single time:
- Temperature is Everything: Chill cake balls before dipping, but not so cold that the coating cracks. Fifteen to twenty minutes in the fridge works best.
- Thin the Candy Melts: If your coating is too thick, add vegetable oil or shortening in small increments. Stir well—lumpy coating equals lumpy eyeballs!
- Work in Batches: Only bring out 5-6 cake balls at a time for dipping. This keeps the rest from getting too soft while you work.
- Use Toothpicks for Veins: Toothpicks give you control for those squiggly red lines. I’ve tried brushes, but sometimes they go too thick or fuzzy.
- Practice Makes Perfect: My first batch had eyes that looked more monster than human—don’t stress, just keep practicing your vein technique. Sometimes “imperfect” is spookier!
- Don’t Rush Drying: Let each layer set before adding the next. Rushing leads to smudges, trust me.
Timing is key—if you multitask (like melting candy while chilling cake balls), everything moves smoother. If you’re making a large batch, set up an assembly line: shaping, dipping, decorating. And if disaster strikes (cracked coating, sliding sticks), just cover with more “veins”—nobody will know!
Variations & Adaptations
Halloween is all about creativity, so don’t be afraid to put your own spin on these perfect eyeball cake pops!
- Gluten-Free: Use a gluten-free cake mix and frosting. King Arthur’s vanilla cake mix is fluffy and holds together well.
- Dairy-Free: Swap out regular frosting for coconut or almond-based, and use dairy-free chocolate for coating.
- Flavor Variations: Try red velvet for a truly “bloody” look, or chocolate cake for a richer taste. Lemon cake adds a zesty twist that surprised my friends at last year’s party!
- Cooking Method: No oven? Use store-bought cake or leftover cupcakes—just crumble and mix with frosting as usual.
- Allergen Substitutions: For nut allergies, double-check all candy melts and decorations. If you need soy-free options, look for specialty brands (Enjoy Life is great).
- Personal Twist: Last Halloween, I added edible glitter dust to the iris for a magical, “enchanted” eyeball effect—huge hit with the kids!
Customize iris colors to match your theme (blue for “zombie,” green for “witch,” brown for “werewolf”), and don’t be afraid to go wild with the red veins—every eyeball is unique!
Serving & Storage Suggestions
Serve your perfect eyeball cake pops at room temperature for the best texture—they hold up well to a party buffet or a kid’s treat bag. I love presenting them upright in a styrofoam block or cake pop stand, so the “eyes” stare out at your guests (creepy but fun!).
- Presentation: Arrange on a platter lined with Halloween napkins, or stick into a carved pumpkin for a ghoulish centerpiece.
- Complementary Dishes: Pair with Halloween punch, ghost sugar cookies, or a big bowl of popcorn for movie night.
- Storage: Store cake pops in an airtight container at room temperature for up to 3 days. For longer storage, refrigerate for up to a week—just let them come back to room temp before serving.
- Freezing: Freeze uncoated cake balls for up to 2 months. Thaw overnight, then dip and decorate as usual.
- Reheating: No need to reheat, but if pops get too firm from the fridge, let them sit out for 15 minutes before serving.
- Flavor Development: Honestly, the flavors settle and meld a bit after a day—so they’re just as tasty (maybe even better) the next day.
For gifting, wrap individually in cellophane bags tied with orange ribbon—spooky, stylish, and practical!
Nutritional Information & Benefits
Each perfect eyeball cake pop contains approximately 120-150 calories, 6g fat, 18g carbohydrates, and 1g protein. These are estimates, depending on your cake and frosting choice.
Key ingredients like vanilla cake and white chocolate provide quick energy (hello, party fuel!), while swapping in gluten-free or dairy-free options makes them accessible to more guests. If you use dark chocolate for the coating, you’ll get a little boost of antioxidants, too.
Potential allergens include wheat, dairy, eggs, and soy (depending on candy melt brands). Always check labels and adapt as needed. My personal wellness perspective? Moderation is key—Halloween is for fun, and these cake pops are a treat that brings smiles without going overboard.
Conclusion
These perfect eyeball cake pops for Halloween are more than just a recipe—they’re a ticket to spooky fun, creative decorating, and plenty of smiles. The realistic red veins and candy eyes make them stand out on any party table, and honestly, they’re dangerously easy to make (so you might want to double your batch).
Feel free to customize the flavors, colors, and decorations to suit your own family traditions or theme parties. Whether you’re a beginner baker or a seasoned Halloween enthusiast, this recipe is one you’ll reach for year after year.
Personally, I love how these cake pops spark conversation and laughter—plus, they’re the perfect excuse to get a little messy in the kitchen. If you give them a try, leave a comment below, share your wildest eyeball designs, or tag me in your Pinterest posts! Wishing you a cozy, creepy, and sweet Halloween—may your treats be as hauntingly good as your tricks!
FAQs
How do I get my cake pops perfectly round?
Chill your cake balls before dipping—about 30 minutes in the fridge helps them hold their shape. If they’re cracking, let them warm up for a few minutes before coating.
Can I make eyeball cake pops ahead of time?
Absolutely! You can prepare and decorate them up to three days in advance. Store in an airtight container at room temp or in the fridge, and let them sit out before serving.
What’s the best way to draw realistic red veins?
Use a toothpick dipped in red edible gel—draw thin, squiggly lines radiating from the iris outward. Vary thickness and direction for a more lifelike look.
Can I use homemade cake and frosting?
Yes! Homemade cake and frosting work just as well. Make sure your frosting is thick enough to bind the cake crumbs—otherwise, add a bit more cake.
Are there allergy-friendly options for this recipe?
Definitely. Use gluten-free cake mix and dairy-free frosting/chocolate for common allergies. Always check your candy melt and decoration ingredients for potential allergens.
Pin This Recipe!
Perfect Eyeball Cake Pops for Halloween – Easy Realistic Red Veins Recipe

These spooky eyeball cake pops feature soft vanilla cake centers, creamy frosting, and a snappy white chocolate coating with realistic red veins—perfect for Halloween parties, treat bags, or a fun family baking night.
- Prep Time: 30 minutes
- Cook Time: 30 minutes
- Total Time: 90 minutes
- Yield: 24 cake pops 1x
- Category: Dessert
- Cuisine: American
Ingredients
- 1 box vanilla cake mix (or chocolate for a darker interior)
- Ingredients required for cake mix (usually 3 eggs, 1/2 cup oil, 1 cup water)
- 1 cup (240g) vanilla frosting (homemade or store-bought)
- 12 oz (340g) white candy melts
- Red edible food gel
- Blue, green, or brown colored candy melts (for iris)
- Black edible gel (for pupil) or black decorating pen
- 1–2 tbsp (15-30ml) vegetable oil or shortening (to thin candy melts, if needed)
- 24 cake pop sticks
- Sprinkles (optional)
- Edible shimmer dust (optional)
Instructions
- Preheat oven to 350°F (175°C). Prepare cake mix according to package instructions (typically 3 eggs, 1/2 cup oil, 1 cup water). Pour into a greased 9×13-inch pan and bake for 25-30 minutes, or until a toothpick comes out clean. Cool completely (about 30 minutes).
- Crumble cooled cake into a large bowl using hands or mixer. Add 1 cup vanilla frosting and mix until a smooth dough forms. Adjust consistency with more frosting or cake crumbs if needed.
- Scoop tablespoon-sized portions and roll into smooth balls (about 1.25-inch diameter). Place on a lined baking sheet and chill in the fridge for 30 minutes.
- Melt 2 oz white candy melts in a microwave-safe bowl (30 second bursts, stirring between). Dip the tip of each cake pop stick into melted candy, then insert halfway into each cake ball. Chill for 10 minutes.
- Melt remaining white candy melts with 1-2 tbsp vegetable oil or shortening for a smooth consistency. Dip each cake pop into the melted coating, turning to coat evenly. Tap off excess and place upright in a styrofoam block to set (about 10 minutes).
- Melt colored candy melts (blue, green, or brown) and let cool slightly. Use a toothpick or small spoon to dab a circle on each cake pop for the iris. Let set. Add a dot of black edible gel or decorating pen in the center for the pupil.
- Using a toothpick dipped in red edible gel, draw squiggly lines radiating from the iris outward for veins. Vary thickness and direction for realism.
- Allow all decorations to set completely (about 20 minutes). Serve and enjoy!
Notes
Chill cake balls before dipping for best shape. Thin candy melts with oil or shortening for a smooth coating. Work in small batches and keep unused cake balls chilled. Use toothpicks for detailed veins. Customize iris colors and add shimmer dust or sprinkles for extra flair. Store in an airtight container at room temperature for up to 3 days, or refrigerate for up to a week.
Nutrition
- Serving Size: 1 cake pop
- Calories: 135
- Sugar: 13
- Sodium: 90
- Fat: 6
- Saturated Fat: 3
- Carbohydrates: 18
- Protein: 1
Keywords: Halloween, cake pops, eyeball, spooky treats, party dessert, kid-friendly, easy recipe, realistic veins, vanilla cake, white chocolate


