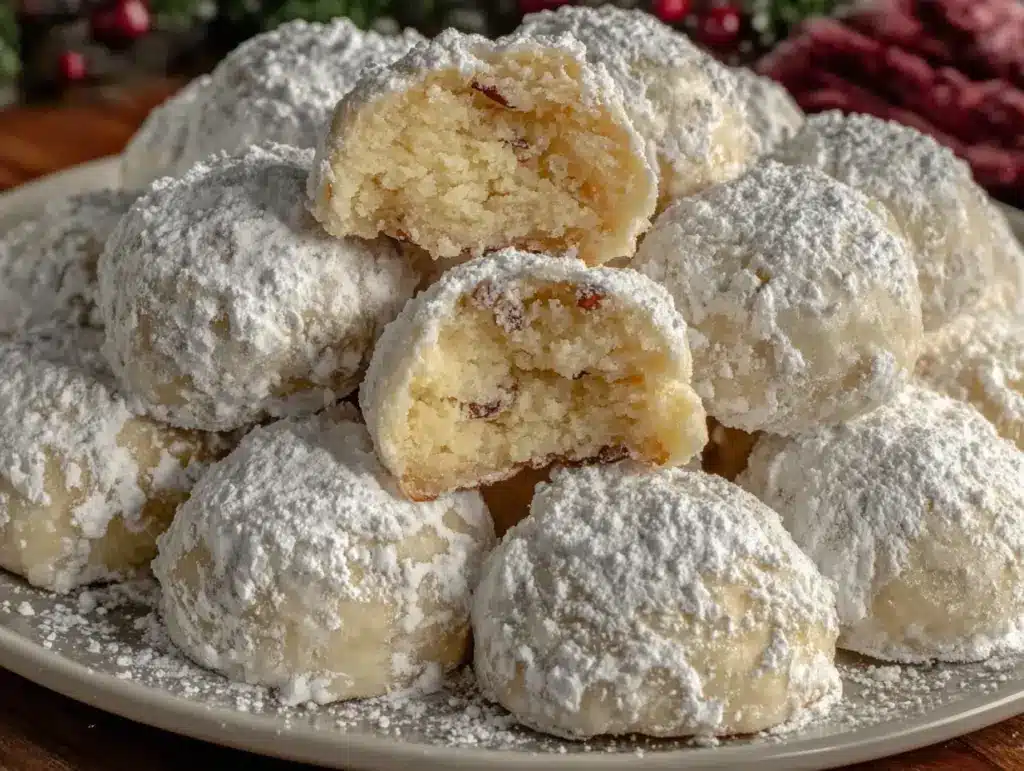
Let me paint you a picture—the kitchen alive with the scent of toasted nuts, warm butter, and sweet vanilla. The first time I pulled a tray of these snowball cookies (Russian tea cakes) from my oven, I swear the whole house just stopped. The buttery aroma wrapping around every corner, the powdered sugar dusting the air like fresh-fallen snow—honestly, it’s the kind of moment you pause, take a deep breath, and just smile because you know you’re onto something truly special.
Growing up, these cookies were a holiday must in our family (I mean, when I was knee-high to a grasshopper, I’d sneak them straight off Grandma’s cooling rack!). There’s something about biting into that tender, melt-in-your-mouth center and feeling the fine sugar coating dissolve on your tongue—it’s pure, nostalgic comfort. I stumbled upon the idea of making them myself one snowy weekend, trying to recreate the same happiness of those childhood holidays. Let’s face it, I wish I’d discovered how dangerously easy these are to bake years ago!
My family’s reaction? Well, let’s just say these snowball cookies never last more than a day. My kids hover by the kitchen, waiting for that first batch, and my husband always manages to “sample” more than his fair share. Whether it’s for Christmas cookie platters, gifting to neighbors, or just a sweet treat for chilly afternoons, these cookies are a proven hit. You know what, they even brighten up your Pinterest boards with their powdery white perfection!
I’ve tested this snowball cookies recipe more times than I can count (all in the name of research, of course). Now, it’s become a staple for family gatherings and cozy winter nights—seriously, feels like a warm hug with every bite. If you’re searching for the best Russian tea cakes out there, you’re going to want to bookmark this one and make it your new holiday favorite!
Why You’ll Love This Snowball Cookies Recipe
Honestly, there’s a reason these snowball cookies (Russian tea cakes) are a holiday classic in so many kitchens. After baking batches year after year, I can tell you this recipe is a keeper. Here’s what makes it stand out from the crowd:
- Quick & Easy: Comes together in under 30 minutes (no chilling required!), perfect for those last-minute cookie cravings or impromptu holiday parties.
- Simple Ingredients: No fancy grocery runs—just classic pantry staples like butter, flour, powdered sugar, and nuts. You probably already have everything right at home.
- Perfect for the Holidays: These cookies look like little snowballs, making them the ideal addition to any Christmas cookie tray, holiday brunch, or New Year’s Eve dessert table.
- Crowd-Pleaser: Kids, adults, picky eaters—everyone loves them! They’re nutty, sweet, and impossibly tender (my family can’t get enough).
- Unbelievably Delicious: The texture is buttery and crumbly, with a delicate melt-in-your-mouth finish. Each bite is pure comfort food, no matter the season.
What makes these snowball cookies different? It’s all about the technique—creaming the butter until it’s extra fluffy, using finely chopped nuts for an even texture, and rolling them twice in powdered sugar for that perfect snowy finish. I’ve tried dozens of recipes, but this one delivers the most tender, flavorful cookie every time.
This recipe isn’t just good—it’s the kind that makes you close your eyes after the first bite, savoring the nostalgia. It’s comfort food reimagined: still packed with all the buttery goodness, but quick enough for a busy weekday. Whether you’re looking to impress guests without breaking a sweat or just want a cozy treat for yourself, these Russian tea cakes deliver every single time. Go ahead, make them your new holiday tradition!
What Ingredients You Will Need
This snowball cookies recipe uses simple, wholesome ingredients to deliver bold flavor and that signature crumbly, tender texture with zero fuss. Most are pantry staples, and you can easily swap a few things to suit your taste or dietary needs.
- For the Dough:
- 1 cup (226g) unsalted butter, softened (key for that melt-in-your-mouth crumb)
- 1/2 cup (60g) powdered sugar (plus more for rolling; gives that snowy finish)
- 1 teaspoon pure vanilla extract (I love Nielsen-Massey for rich flavor)
- 1/4 teaspoon salt (balances the sweetness)
- 2 1/4 cups (270g) all-purpose flour (King Arthur works great for consistent results)
- 3/4 cup (85g) finely chopped pecans or walnuts (toasted for extra flavor—use a mini chopper if you have one)
- For Rolling:
- 1 cup (120g) powdered sugar (for that classic snowy coating)
- Ingredient Tips:
- Butter: Make sure it’s truly softened for easy mixing. If you forget to leave it out, a few seconds in the microwave (low power!) works in a pinch.
- Nuts: Choose fresh, unsalted nuts—pecans for a sweet, buttery flavor or walnuts for a slightly earthier taste. Toast them lightly for extra depth.
- Vanilla: Real vanilla makes a difference. If you’re feeling fancy, use vanilla bean paste for an even richer aroma.
- Flour: All-purpose is classic, but you can swap with a gluten-free blend like Bob’s Red Mill 1-to-1 Baking Flour for allergy-friendly cookies.
- Substitutions:
- Dairy-free? Use a plant-based butter substitute—Earth Balance works well.
- No nuts? Try sunflower seeds or leave them out entirely (the cookies will be a little less crumbly, but still tasty).
- Low-sugar? Use a powdered sugar substitute like Swerve for rolling (though flavor will change a bit).
Honestly, these snowball cookies are flexible. You can experiment with different nuts, swap in orange or almond extract, or toss in a handful of mini chocolate chips for a twist. The best part is how forgiving this dough is—just mix, scoop, and bake. No stress, no fancy techniques, just perfect cookies every time.
Equipment Needed
You don’t need anything fancy for snowball cookies—just a few baking basics and a bit of elbow grease! Here’s what I use:
- Mixing bowls: One large (for the dough), one medium (for nuts), and a small one for powdered sugar rolling.
- Hand mixer or stand mixer: Makes creaming the butter a breeze. If you’re old-school, a sturdy wooden spoon works too (though you’ll get a little workout!).
- Baking sheet: Standard rimmed sheet lined with parchment paper for easy lift-off and less mess.
- Cookie scoop or tablespoon: For evenly-sized cookies (I use a #60 scoop for perfect rounds).
- Wire cooling rack: To cool cookies quickly and evenly.
- Mini chopper or food processor: For finely chopping nuts (a sharp knife will do, but it takes patience).
If you don’t have a mixer, just beat the butter and sugar extra well by hand. Parchment paper is optional but makes cleanup easier (my grandma always used wax paper, and it worked fine!). For budget-friendly options, dollar store spatulas and bowls do the job just as well—no need for gourmet gadgets here.
One tip: keep your cookie scoop clean between batches for perfect rounds. And make sure your cooling rack is clean and dry—powdered sugar sticks to everything!
Preparation Method

Ready to bake up a batch of the easiest, most tender snowball cookies ever? Follow these step-by-step instructions and you’ll have a trayful in no time!
- Preheat your oven: Set to 350°F (175°C). Line a baking sheet with parchment paper. (Tip: oven temperature matters! Too hot and the cookies can spread.)
- Toast the nuts (optional): Spread pecans or walnuts on a baking sheet and roast for 5-7 minutes until fragrant. Cool, then chop finely. (This deepens flavor—don’t skip if you have time.)
- Cream the butter and sugar: In a large bowl, beat 1 cup (226g) softened unsalted butter and 1/2 cup (60g) powdered sugar until light and fluffy (about 2-3 minutes with a mixer, 4-5 minutes by hand). The mixture should be pale and soft.
- Add vanilla and salt: Beat in 1 teaspoon vanilla extract and 1/4 teaspoon salt. Mix until combined.
- Combine flour and nuts: In a separate bowl, whisk together 2 1/4 cups (270g) all-purpose flour and 3/4 cup (85g) finely chopped nuts. Gradually add to the butter mixture, mixing on low speed or gently by hand until a soft, crumbly dough forms. (Don’t overmix—just blend until combined.)
- Shape the dough: Scoop dough by tablespoon (or use a #60 cookie scoop) and roll into balls, about 1 inch (2.5 cm) diameter. Place them 1 inch apart on your prepared baking sheet. (If dough is sticky, chill for 10 minutes.)
- Bake: Bake at 350°F (175°C) for 12-14 minutes, or until the bottoms are lightly golden and tops are set. The cookies won’t brown much on top—watch the edges for color.
- Cool slightly: Let cookies cool on the baking sheet for 3-5 minutes. They’ll be fragile when hot!
- First sugar roll: While still warm (but not hot), gently roll each cookie in powdered sugar (about 1 cup/120g in a bowl). Place on a wire rack to finish cooling.
- Second sugar roll: Once cooled completely, roll cookies again in powdered sugar for that thick, snowy coating.
Prep time: 15 minutes. Bake time: 12-14 minutes per batch. Makes about 36 cookies (depending on scoop size).
Notes: If cookies crack when rolling, let them cool a minute longer. If dough feels too dry, add 1 teaspoon milk. For perfect rounds, roll between your palms with gentle pressure. Don’t worry if the sugar coating isn’t flawless—imperfections mean homemade!
Efficiency tip: Toast nuts while prepping your other ingredients to save time. Double the recipe for gifting—these freeze beautifully!
Cooking Tips & Techniques
Here’s where all those years of cookie-baking come in handy! These snowball cookies may be simple, but a few pro tips (and some lessons learned the hard way) make all the difference.
- Room Temperature Butter: Always start with softened butter—cold butter doesn’t cream well and can lead to dense cookies. If you’re impatient (like I am sometimes), microwave your butter for 10 seconds at half power.
- Finely Chopped Nuts: The finer the chop, the more tender the cookie. Big nut chunks can make the dough crumbly and hard to shape. Invest in a mini chopper or pulse in a food processor for best results.
- Don’t Overmix: Mix just until the flour and nuts disappear into the dough. Overmixing leads to tough cookies (trust me, I’ve made that mistake more than once!).
- Double Sugar Rolling: Rolling warm cookies first helps the sugar stick, while the second roll gives that bakery-style snowy look. If you forget the first roll, don’t panic—just roll twice when cool.
- Baking Sheet Placement: Bake one tray at a time in the center of the oven. If you bake two trays, swap their positions halfway for even cooking.
- Cookie Size Consistency: Use a cookie scoop for uniform shapes—this helps them bake evenly and look pretty on platters.
- Troubleshooting: If cookies flatten, your butter was too soft. If they’re crumbly, add a touch more butter or milk next time.
I’ve had batches come out too dry (forgot to measure flour carefully) and some spread too much (butter was partially melted). Now, I measure everything and let my butter sit out just until soft. Multitasking tip: prep the sugar bowls and cooling rack while cookies bake. That way, you’re ready for rolling as soon as they come out!
For perfect snowball cookies every time, stick to these tips—and don’t worry about a little powdered sugar mess. That’s part of the fun!
Variations & Adaptations
One of the best things about snowball cookies (Russian tea cakes) is how easy they are to customize. Whether you’re baking for dietary needs or just want a flavor twist, here are my favorite ways to switch things up:
- Gluten-Free Option: Swap all-purpose flour for a 1-to-1 gluten-free baking blend. The texture stays tender, and no one will notice the difference!
- Nut-Free Version: Omit the nuts and add 2 tablespoons extra flour for structure. Or use finely chopped sunflower seeds or pumpkin seeds for a similar crunch without allergens.
- Chocolate Chip Snowballs: Stir in 1/2 cup mini chocolate chips along with the nuts (or instead of nuts) for a kid-friendly twist. My youngest loves them this way!
- Seasonal Flavors: Mix in 1/2 teaspoon cinnamon or orange zest for a holiday vibe. Almond extract is great for a wedding cookie style.
- Dairy-Free Adaptation: Use plant-based butter and double-check your powdered sugar is vegan-friendly. The cookies stay rich and tender!
- Baking Method: Try air fryer snowball cookies—bake at 320°F (160°C) for 8-10 minutes. They come out just as tender!
I’ve experimented with pistachios and dried cranberries, swapped extracts, and even made matcha snowballs for a fun green twist. The dough is forgiving, so don’t be afraid to get creative. Just keep the base ratio of butter, sugar, and flour, and you’ll be golden.
Personal favorite? Orange zest and pecans—tastes like Christmas morning to me!
Serving & Storage Suggestions
Snowball cookies are best served at room temperature, piled high on a festive plate or tucked into cute gift boxes for friends and family. Their powdery white finish makes them a centerpiece on any holiday table!
- Presentation: Stack cookies on a cake stand with a sprig of rosemary or cranberries for a Pinterest-worthy look. Or pack them in cellophane bags with a ribbon for homemade gifts.
- Pairings: These cookies go perfectly with a mug of hot cocoa, spiced tea, or coffee. Add them to your holiday brunch spread alongside fruit and savory bites.
- Storage: Store cookies in an airtight container at room temperature for up to 1 week. They actually get more tender after a day or two!
- Freezing: Freeze in a single layer, then transfer to a zip-top bag. Thaw at room temp, then roll in extra powdered sugar before serving.
- Reheating: If you like them slightly warm, microwave for 5-10 seconds. The flavor intensifies as they sit—so don’t worry if you’re making them ahead of time.
One tip: separate layers with wax paper to keep the sugar coating pristine. These cookies travel well, making them ideal for cookie swaps and care packages. Let the flavors mellow for a day—trust me, they’re even better on day two!
Nutritional Information & Benefits
Here’s what you can expect per snowball cookie (about 1-inch diameter):
- Calories: ~90
- Fat: 6g
- Carbs: 8g
- Sugar: 4g
- Protein: 1g
Key health benefits? Pecans and walnuts add heart-healthy fats, fiber, and a bit of protein. If you use gluten-free flour, these cookies are celiac-friendly. Dairy-free versions are easy with plant-based butter.
Potential allergens include dairy, nuts, and gluten (unless using substitutions above). Always check your powdered sugar if managing allergies—some brands add cornstarch.
From a wellness perspective, these cookies are a sweet treat, but their short ingredient list means no hidden preservatives or additives. Enjoy a couple with your favorite warm drink—sometimes comfort food is the best kind of self-care!
Conclusion
When it comes to holiday baking, these easy snowball cookies (Russian tea cakes) are hands-down my go-to. They’re buttery, tender, and impossibly cute—just the way I remember from childhood. Whether you’re a seasoned home baker or trying these for the first time, you’ll love how simple and satisfying the process is.
Customize them to suit your taste—swap nuts, add flavors, or make them allergy-friendly. There’s no wrong way to make them your own. That’s what keeps me coming back, batch after batch!
Honestly, these cookies feel like a warm hug wrapped in powdered sugar. I hope you’ll give this recipe a try, share your own twists, or tell me how they turned out in the comments below. And if you know someone who needs a little holiday cheer, pass the recipe along—let’s keep the snowball cookie love rolling!
Happy baking, friends—may your kitchen be filled with the sweetest memories!
FAQs About Snowball Cookies (Russian Tea Cakes)
Can I make snowball cookies without nuts?
Absolutely! Just leave out the nuts and add 2 tablespoons extra flour. The cookies will still be tender, just a little less crumbly.
Why did my snowball cookies flatten?
If your cookies spread too much, the butter was probably too soft or melted. Chill the dough for 10-15 minutes next time before baking.
Can I freeze snowball cookies?
Yes! Freeze cooled cookies in a single layer, then transfer to a freezer bag. Thaw at room temperature and re-roll in powdered sugar before serving.
What’s the best nut for snowball cookies?
Pecans and walnuts are traditional, but almonds or hazelnuts work well too. Toasting the nuts makes the flavor richer—give it a try!
How do I get the perfect snowy coating?
Roll cookies in powdered sugar first while warm, then again after they cool. Double rolling gives them that classic, snowy look and keeps them sweet.
Pin This Recipe!

Snowball Cookies (Russian Tea Cakes)

These classic snowball cookies, also known as Russian tea cakes, are buttery, tender, and coated in powdered sugar for a festive, melt-in-your-mouth treat. Perfect for holiday cookie trays, gifting, or cozy winter afternoons.
- Prep Time: 15 minutes
- Cook Time: 12-14 minutes
- Total Time: 27-29 minutes
- Yield: 36 cookies 1x
- Category: Dessert
- Cuisine: Russian, American
Ingredients
- 1 cup (226g) unsalted butter, softened
- 1/2 cup (60g) powdered sugar, plus more for rolling
- 1 teaspoon pure vanilla extract
- 1/4 teaspoon salt
- 2 1/4 cups (270g) all-purpose flour
- 3/4 cup (85g) finely chopped pecans or walnuts, toasted if desired
- 1 cup (120g) powdered sugar, for rolling
Instructions
- Preheat oven to 350°F (175°C). Line a baking sheet with parchment paper.
- Optional: Toast pecans or walnuts on a baking sheet for 5-7 minutes until fragrant. Cool, then chop finely.
- In a large bowl, beat softened butter and 1/2 cup powdered sugar until light and fluffy (2-3 minutes with a mixer, 4-5 minutes by hand).
- Beat in vanilla extract and salt until combined.
- In a separate bowl, whisk together flour and finely chopped nuts. Gradually add to the butter mixture, mixing on low speed or gently by hand until a soft, crumbly dough forms. Do not overmix.
- Scoop dough by tablespoon (or use a #60 cookie scoop) and roll into 1-inch balls. Place 1 inch apart on prepared baking sheet. If dough is sticky, chill for 10 minutes.
- Bake for 12-14 minutes, or until bottoms are lightly golden and tops are set. Cookies will not brown much on top.
- Let cookies cool on the baking sheet for 3-5 minutes.
- While still warm, gently roll each cookie in powdered sugar. Place on a wire rack to finish cooling.
- Once cooled completely, roll cookies again in powdered sugar for a thick, snowy coating.
Notes
For gluten-free cookies, substitute all-purpose flour with a 1-to-1 gluten-free blend. For nut-free, omit nuts and add 2 tablespoons extra flour. Double rolling in powdered sugar gives the best snowy finish. Toasting nuts deepens flavor. Cookies freeze well and are even more tender after a day or two. If dough is too dry, add 1 teaspoon milk.
Nutrition
- Serving Size: 1 cookie (about 1-in
- Calories: 90
- Sugar: 4
- Sodium: 20
- Fat: 6
- Saturated Fat: 3
- Carbohydrates: 8
- Fiber: 0.5
- Protein: 1
Keywords: snowball cookies, Russian tea cakes, holiday cookies, Christmas cookies, powdered sugar cookies, nut cookies, easy cookie recipe