Let me set the scene: the aroma of roasted garlic and melted cheese swirling through my kitchen, mingling with the yeasty scent of freshly baked bread. It’s the kind of smell that stops you in your tracks, makes your stomach rumble, and—if you’re like me—has you hovering by the oven door, peeking in to see the magic unfold. The first time I made this cheesy garlic pull-apart bread wreath, I was instantly swept up in a wave of nostalgia and anticipation. The golden, bubbly cheese spilling over each doughy bite, the crisp edges just begging to be torn apart—honestly, it was the kind of moment where you pause, take a deep breath, and just smile because you know you’re onto something truly special.
Years ago, when I was knee-high to a grasshopper, my grandma used to make big batches of garlic bread for our family gatherings. But this festive party appetizer takes those memories and wraps them up in a show-stopping, Pinterest-worthy wreath that just begs to be shared. I stumbled upon the idea one rainy weekend, trying to jazz up a classic for a holiday potluck. Wish I’d discovered this cheesy garlic pull-apart bread wreath recipe years ago! My family couldn’t stop sneaking pieces off the cooling rack (and, let’s face it, neither could I). It’s dangerously easy, ridiculously comforting, and pretty much guaranteed to brighten up any table.
Picture it: perfect for potlucks, a sweet treat for your kids to pull apart, or the centerpiece for your next holiday spread. Whether you’re looking to impress guests or simply indulge in something warm and satisfying, this savory bread wreath delivers pure, nostalgic comfort in every bite. I tested it four times (in the name of research, of course!) and it’s now a staple for family gatherings and gifting. It feels like a warm hug—you’re going to want to bookmark this one for every festive occasion.
Why You’ll Love This Recipe
Let’s be real: not all garlic breads are created equal. This cheesy garlic pull-apart bread wreath stands out for a bunch of reasons, and after plenty of trial and error (and more than a few taste tests), I’ve got the inside scoop on why you’ll fall head-over-heels for it.
- Quick & Easy: Comes together in under an hour (seriously!), making it perfect for busy weeknights or last-minute party plans.
- Simple Ingredients: No special grocery trips—just pantry staples and a couple of fridge must-haves. You probably have everything on hand.
- Perfect for Parties: Shaped like a festive wreath, it’s a showstopper on any table—think holiday celebrations, game nights, or brunch spreads.
- Crowd-Pleaser: Kids and adults can’t resist pulling off cheesy, garlicky bites. It’s always the first thing to disappear at gatherings.
- Unbelievably Delicious: The combo of gooey cheese, fragrant garlic, and tender bread is next-level comfort food. It’s the kind of recipe that has people asking for seconds (and the recipe!).
What makes this bread wreath different? For starters, it isn’t just another garlic bread. The dough is soft and pillowy but still holds up to all that cheesy goodness. I use a blend of cheeses for flavor depth (hello, mozzarella and tangy cheddar), and the garlic is roasted to mellow perfection. Plus, the pull-apart format makes it interactive and fun, perfect for sharing. Whether you want to swap in whole wheat flour or toss in fresh herbs, this recipe is flexible.
There’s something magical about tearing off a warm, cheesy piece and dipping it into marinara or a creamy sauce. This isn’t just good—it’s close-your-eyes-and-sigh good. It’s comfort food made faster, easier, and more festive, but with all the cozy satisfaction you crave. Trust me, your guests will remember this one long after the party ends.
What Ingredients You Will Need
This recipe uses simple, wholesome ingredients to deliver bold flavor and satisfying texture without the fuss. Most of these are pantry staples, and you can easily substitute based on what you have around.
- For the Dough:
- All-purpose flour (3 cups / 375g) – Regular, unbleached flour works best.
- Active dry yeast (2 1/4 tsp / 7g) – Quick-rising for a faster prep.
- Warm water (1 cup / 240ml) – About 110°F/43°C for proper yeast activation.
- Granulated sugar (2 tbsp / 25g) – Just enough to feed the yeast.
- Salt (1 tsp / 6g) – Essential for flavor.
- Olive oil (2 tbsp / 30ml) – Adds richness and a tender crumb.
- For the Cheesy Garlic Filling:
- Shredded mozzarella cheese (1 cup / 120g) – For that classic stringy cheese pull.
- Shredded sharp cheddar cheese (1 cup / 120g) – Adds a little tang.
- Unsalted butter (1/4 cup / 60g, melted) – Helps carry all the flavors.
- Fresh garlic cloves (6 large, minced) – The star of the show; use more if you like it extra garlicky.
- Fresh parsley (1/4 cup / 10g, chopped) – For color and a burst of freshness.
- Grated Parmesan cheese (1/4 cup / 25g) – Optional, but highly recommended for a savory twist.
- For the Topping:
- Egg wash (1 large egg beaten with 1 tbsp water) – For a glossy, golden finish.
- Extra Parmesan cheese (2 tbsp / 15g) – Sprinkle on top for crunch.
- Red pepper flakes (optional, to taste) – For a tiny kick.
Ingredient Notes & Substitutions:
- Substitute whole wheat flour for half the all-purpose if you want a little more heartiness.
- If you’re dairy-free, swap the cheeses for your favorite plant-based alternatives. Miyoko’s mozzarella works great.
- No fresh parsley? Use dried, but cut the amount in half.
- Don’t have butter? Olive oil can work in a pinch, though the flavor will be different.
- For gluten-free, use a 1:1 GF flour blend (Bob’s Red Mill is my go-to).
I recommend King Arthur or Gold Medal flour for the dough (they’re reliable for structure). For cheese, Tillamook’s sharp cheddar has a nice bite, and Galbani mozzarella melts beautifully. When it’s summer, sometimes I’ll add a little fresh basil with the parsley for a twist. You can swap in roasted garlic or garlic confit for a milder flavor. Pantry-friendly, adaptable, and always delicious.
Equipment Needed
You really don’t need fancy gear for this cheesy garlic pull-apart bread wreath, which is part of what makes it so approachable. Here’s what I use every time:
- Large mixing bowl – For combining the dough.
- Measuring cups and spoons – Accuracy is key with bread.
- Sturdy whisk and wooden spoon – For mixing wet and dry ingredients.
- Baking sheet or round pizza pan – Lined with parchment for easy cleanup.
- Parchment paper – Prevents sticking and helps with shaping the wreath.
- Pastry brush – For butter and egg wash.
- Sharp knife or kitchen scissors – For dividing and scoring the dough.
- Small bowl – For garlic butter mixture.
- Clean kitchen towel – For covering the dough as it rises.
- Optional: Stand mixer with dough hook attachment – Makes kneading super easy, but you can do it by hand.
If you don’t have a stand mixer, don’t sweat it—hand kneading works just fine (plus, it’s a little workout). A pizza stone gives a crisper bottom, but a standard metal baking sheet is totally reliable. I’ve used both parchment and silicone mats; parchment is easier to clean. For budget-friendly options, check out IKEA’s baking pans—they’re sturdy and don’t break the bank. Keep your pastry brush clean by rinsing it right after use, especially with egg wash.
Preparation Method

Ready to get baking? Here’s how I make this savory, cheesy garlic pull-apart bread wreath step by step. Trust me, it’s a project that’s fun and rewarding—plus, it smells amazing while it bakes!
- Activate the Yeast:
Measure 1 cup (240ml) warm water into your mixing bowl. Sprinkle in 2 1/4 tsp (7g) active dry yeast and 2 tbsp (25g) sugar. Stir gently and let it sit for 5-7 minutes, until frothy. If it doesn’t foam, your yeast might be old (start over with fresh yeast). - Mix the Dough:
Add 3 cups (375g) all-purpose flour and 1 tsp (6g) salt to the yeast mixture. Drizzle in 2 tbsp (30ml) olive oil. Mix with a wooden spoon or dough hook until a shaggy dough forms—about 2 minutes. If it’s sticky, add a tablespoon of flour at a time. - Knead the Dough:
Turn dough onto a lightly floured surface and knead for 6-8 minutes until smooth and elastic. If using a stand mixer, knead on medium speed for 5 minutes. The dough should feel soft but not sticky. Cover with a towel and let rest for 10 minutes. - Prepare the Garlic Butter:
In a small bowl, mix 1/4 cup (60g) melted butter, 6 minced garlic cloves, and 1/4 cup (10g) chopped parsley. Stir in 1/4 cup (25g) Parmesan cheese if using. The mixture should smell intensely garlicky and fresh. - Divide and Shape:
Punch down the rested dough and divide into 16 equal pieces (a kitchen scale helps—each piece should be about 40g). Roll each piece into a ball. Flatten slightly and fill with a pinch of shredded mozzarella and cheddar (about 1 tbsp/8g per ball). Pinch edges to seal and roll back into a ball. - Arrange the Wreath:
Place a small bowl in the center of a parchment-lined baking sheet or pizza pan. Arrange dough balls in a circle around the bowl, then another ring outside. Leave a little space for rising. Remove the center bowl once shaped. - Brush with Garlic Butter:
Brush dough balls generously with garlic butter mixture. Make sure some garlic bits stick to each ball. Sprinkle with extra Parmesan, if desired. - Let It Rise:
Cover with a kitchen towel and let rise in a warm spot for 30 minutes. The balls should puff up slightly but not double in size. If your kitchen is chilly, preheat your oven for a minute then turn it off, and let the dough rise inside. - Bake:
Preheat oven to 375°F (190°C). Brush dough balls with egg wash for a glossy finish. Bake for 22-25 minutes, until golden brown and cheese is bubbling. The tops should be deeply golden, and the cheese should ooze out a bit. - Finish & Serve:
Sprinkle with fresh parsley and red pepper flakes if you like heat. Let cool for 5 minutes (if you can wait), then serve warm. The bread should pull apart easily, with melted cheese inside every bite.
Prep Notes: If you’re prepping ahead, assemble the wreath and cover tightly with plastic wrap. Refrigerate overnight, then bake fresh the next day. For troubleshooting: if dough is tough, add a splash of water and knead again; if it’s too sticky, more flour will fix it. The best sensory cue? The bread should smell like garlic heaven and look golden, not pale. For extra crispy bottoms, bake on a pizza stone.
Cooking Tips & Techniques
Years of making bread (and a few disasters along the way) have taught me some tricks for nailing this cheesy garlic pull-apart bread wreath every time. Here’s what I’ve learned:
- Don’t Rush the Rise: Even if you’re tempted, let the dough rest and rise. It’s what gives the bread its fluffy texture.
- Garlic Placement Matters: Mix the garlic into the butter, but save a few bits for sprinkling on top. More garlic on the outside means more flavor with every bite.
- Cheese Choice: Use a blend of mozzarella and cheddar for stretch and tang. Pre-shredded works, but freshly shredded melts better.
- Egg Wash for Shine: Don’t skip the egg wash! It gives a beautiful golden color that makes the wreath look bakery-worthy.
- Common Mistakes: Underbaking leads to doughy centers. If the top browns too fast, cover lightly with foil after 15 minutes. Overstuffing can cause cheese leaks (not a big deal, but slightly messy).
- Multitasking: While the dough rises, prep your garlic butter and shred cheese. Saves time and keeps you organized.
- Consistency: Use a kitchen scale for even dough balls. It makes the wreath look uniform and helps with even baking.
- Failures & Fixes: I once forgot the salt—never again! The flavor was flat. Always double-check your ingredient list before mixing. If dough feels tough, let it rest covered for 5-10 minutes and knead again.
- Finishing Touch: A sprinkle of fresh herbs right before serving brings brightness and makes it pop visually (especially for those Pinterest photos!).
Honestly, most issues come down to dough hydration and oven temp. If in doubt, err on the side of slightly sticky dough—it bakes up softer. The best part? Even imperfect wreaths taste amazing. Don’t stress, just enjoy the process!
Variations & Adaptations
This savory pull-apart bread wreath is wildly customizable. Depending on tastes and dietary needs, you can switch things up in lots of ways:
- Herb Lovers: Add chopped rosemary, thyme, or basil to the garlic butter for extra aroma. I’ve tossed in fresh dill once—surprisingly delicious!
- Low-Carb/Gluten-Free: Use a 1:1 gluten-free flour blend and dairy-free cheeses. You’ll need to watch the dough—GF blends soak up liquid differently, so add water slowly.
- Seasonal Flavors: Swap parsley for sage and use smoked cheese in winter. In summer, add sun-dried tomatoes or roasted peppers to the filling.
- Spicy Kick: Add diced jalapeños to the cheese mix and a sprinkle of chili flakes on top.
- Vegan Option: Use vegan butter and cheese. Miyoko’s mozzarella is my go-to for stretchiness, and Earth Balance for the butter.
For different cooking methods, you can use a cast iron skillet for crisp edges, or bake as mini rolls in a muffin tin for easy serving. I’ve even tried it as a giant loaf—just increase baking time by 10-15 minutes. If you have nut allergies, skip the Parmesan or use a nut-free alternative. This bread is a blank canvas, so don’t be shy about customizing. My favorite twist? Tossing in caramelized onions and chives with the cheese—seriously, next level.
Serving & Storage Suggestions
This cheesy garlic pull-apart bread wreath is best served warm, right out of the oven. The cheese is gooey, the bread is soft, and the garlic aroma fills the room—honestly, it’s hard to wait!
- Serving Temperature: Warm is ideal. If you have leftovers, a quick reheat in the oven (350°F/175°C for 5 minutes) restores that melty cheese magic.
- Presentation: Place on a large wooden board or platter. Sprinkle with fresh herbs and serve with a bowl of marinara, ranch dip, or garlic butter for dipping. Looks gorgeous on holiday tables and for brunch.
- Complementary Dishes: Pairs perfectly with soups (like tomato basil), salads (Caesar or mixed greens), or alongside a cheese board.
- Storage: Wrap leftovers in foil or place in an airtight container. Refrigerate for up to 3 days.
- Freezing: Freeze baked bread (wrapped tightly) for up to 1 month. Thaw and reheat in a 350°F/175°C oven for best texture.
- Flavor Development: Honestly, the garlic flavor deepens overnight. If you have leftovers, they taste even better the next day!
When reheating, avoid microwaving—it makes the bread chewy. Oven is best for restoring the crust and melty cheese. If you’re serving for a crowd, keep warm in a low oven (200°F/93°C) until ready to serve. The wreath shape makes it easy for everyone to tear off a piece, so no knives needed!
Nutritional Information & Benefits
Here’s a quick look at what’s inside each glorious bite of this cheesy garlic pull-apart bread wreath:
- Estimated Nutrition (per serving, 1/16 of wreath):
- Calories: 180
- Protein: 7g
- Carbohydrates: 24g
- Fat: 6g
- Saturated Fat: 3g
- Sodium: 320mg
- Health Benefits:
- Garlic is packed with antioxidants and supports immune health.
- Parsley adds vitamins A, C, and K plus a fresh flavor punch.
- Cheese provides calcium and protein (in moderation!).
- Swap in whole wheat flour for extra fiber.
- Dietary Considerations: Can be adapted for gluten-free, vegan, or dairy-free diets.
- Allergens: Contains wheat, dairy, and eggs (can be substituted as needed).
From a personal wellness perspective, I treat this bread as a special occasion treat—full of real, satisfying ingredients. Pair it with a big salad or veggie soup for balance, and enjoy every bite guilt-free!
Conclusion
If you’re searching for a festive appetizer that’s both easy and unforgettable, this cheesy garlic pull-apart bread wreath is your answer. It’s flavorful, looks stunning on the table, and—let’s face it—it’s just plain fun to eat. Customize it to fit your tastes, swap out cheeses, throw in herbs, or go gluten-free if that’s your thing. There’s no wrong way to enjoy it.
Personally, I love how this recipe brings people together—everyone reaching in, laughing, and savoring every cheesy, garlicky bite. It’s the kind of dish that turns ordinary moments into memories. If you try it, let me know how you adapt it or what creative twists you come up with!
Drop a comment below, share your photos on Pinterest, or pass the recipe to a fellow bread lover. Here’s to more cozy gatherings, delicious bites, and recipes that feel like a warm hug. Happy baking!
Frequently Asked Questions
Can I make the cheesy garlic pull-apart bread wreath ahead of time?
Absolutely! You can shape the dough balls, assemble the wreath, and refrigerate overnight. Just let it come to room temperature before baking the next day.
What if I don’t have active dry yeast?
Instant yeast works as a substitute—use the same amount and skip the first activation step. Mix it right into the flour.
Can I make this bread gluten-free?
Yes! Use a 1:1 gluten-free flour blend. The texture will be a bit different, but it still pulls apart beautifully. Just watch the dough hydration and adjust water as needed.
How do I keep the bread soft after baking?
Wrap leftovers in foil and store in an airtight container. To reheat, use the oven to maintain softness—microwaving tends to make it tough.
What cheeses work best for the filling?
Moisture-rich mozzarella and sharp cheddar are my favorites, but you can use provolone, gouda, or even a little cream cheese for extra richness.
Pin This Recipe!
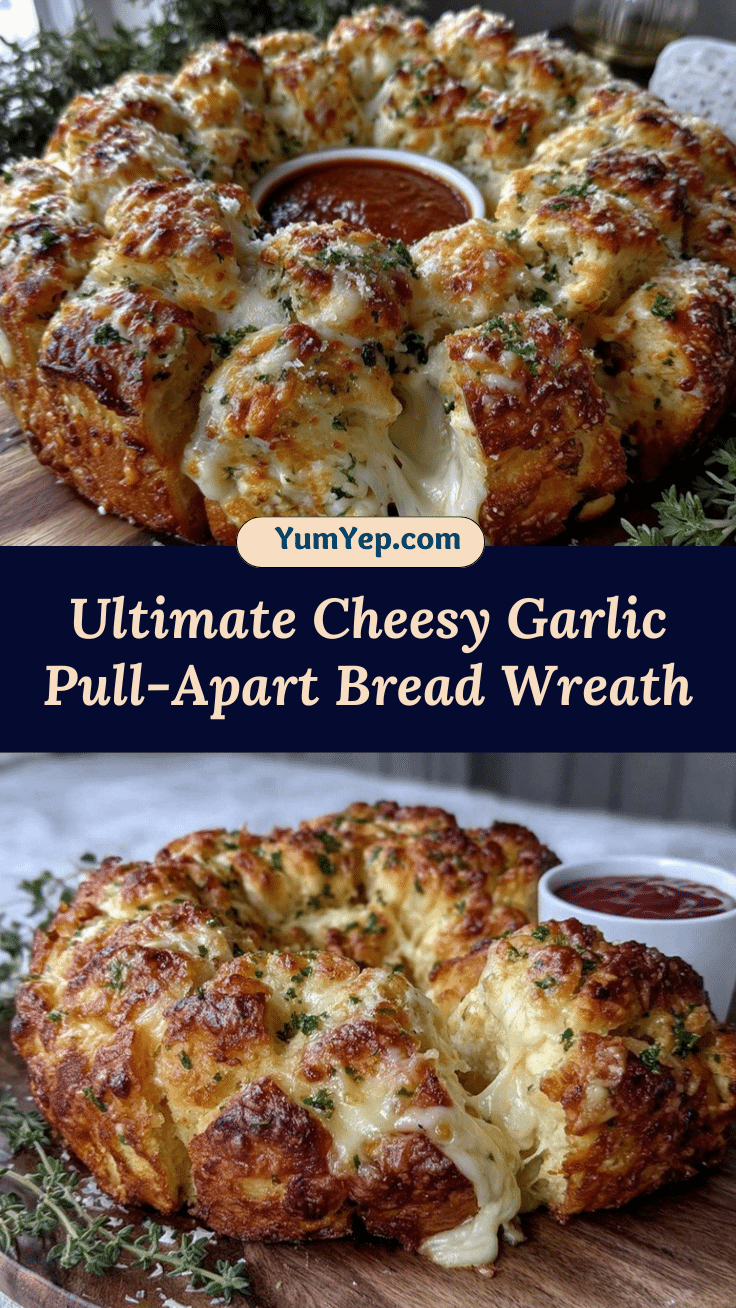
Cheesy Garlic Pull-Apart Bread Wreath

This festive cheesy garlic pull-apart bread wreath is a show-stopping appetizer, featuring pillowy homemade dough stuffed with gooey cheese and fragrant garlic butter. Perfect for parties, potlucks, or holiday gatherings, it’s easy to make and guaranteed to impress.
- Prep Time: 20 minutes
- Cook Time: 25 minutes
- Total Time: 45 minutes
- Yield: 16 servings 1x
- Category: Appetizer
- Cuisine: American
Ingredients
- 3 cups all-purpose flour
- 2 1/4 teaspoons active dry yeast
- 1 cup warm water (about 110°F)
- 2 tablespoons granulated sugar
- 1 teaspoon salt
- 2 tablespoons olive oil
- 1 cup shredded mozzarella cheese
- 1 cup shredded sharp cheddar cheese
- 1/4 cup unsalted butter, melted
- 6 large garlic cloves, minced
- 1/4 cup fresh parsley, chopped
- 1/4 cup grated Parmesan cheese (optional)
- 1 large egg
- 1 tablespoon water
- 2 tablespoons extra Parmesan cheese
- Red pepper flakes (optional, to taste)
Instructions
- Measure warm water into a large mixing bowl. Sprinkle in yeast and sugar, stir gently, and let sit for 5-7 minutes until frothy.
- Add flour and salt to the yeast mixture. Drizzle in olive oil. Mix until a shaggy dough forms.
- Turn dough onto a lightly floured surface and knead for 6-8 minutes until smooth and elastic. Cover and let rest for 10 minutes.
- In a small bowl, mix melted butter, minced garlic, chopped parsley, and Parmesan cheese (if using).
- Punch down the rested dough and divide into 16 equal pieces. Roll each piece into a ball, flatten slightly, and fill with a pinch of mozzarella and cheddar. Pinch edges to seal and roll back into a ball.
- Arrange dough balls in a wreath shape on a parchment-lined baking sheet or pizza pan, leaving space for rising.
- Brush dough balls generously with garlic butter mixture. Sprinkle with extra Parmesan if desired.
- Cover with a kitchen towel and let rise in a warm spot for 30 minutes.
- Preheat oven to 375°F. Brush dough balls with egg wash (egg beaten with water).
- Bake for 22-25 minutes, until golden brown and cheese is bubbling.
- Sprinkle with fresh parsley and red pepper flakes if desired. Let cool for 5 minutes, then serve warm.
Notes
For gluten-free, use a 1:1 GF flour blend. Dairy-free cheese and butter substitutes work well. Prep ahead by assembling the wreath and refrigerating overnight. For extra crispy bottoms, bake on a pizza stone. Use a kitchen scale for even dough balls. Serve with marinara or ranch dip for extra flavor.
Nutrition
- Serving Size: 1/16 of wreath
- Calories: 180
- Sugar: 2
- Sodium: 320
- Fat: 6
- Saturated Fat: 3
- Carbohydrates: 24
- Fiber: 1
- Protein: 7
Keywords: cheesy garlic bread, pull-apart bread, bread wreath, holiday appetizer, party food, festive bread, easy appetizer, garlic cheese bread