Imagine this: the unmistakable aroma of cinnamon, nutmeg, and pumpkin swirling through the kitchen, mingling with the sweet scent of graham crackers. There’s a cool, creamy texture that melts on your tongue, and the taste—well, it’s pure autumn comfort wrapped up in every luscious bite. That’s what you get with these Creamy No Bake Pumpkin Cheesecake Bars. Honestly, I can still remember the first time I made a batch on a chilly October afternoon, leaves crunching outside and my little one perched on the counter, eager to lick the bowl (who can blame her?).
The first forkful was a revelation—the kind of moment where you pause, take a deep breath, and just smile because you know you’re onto something truly special. These bars instantly reminded me of the pumpkin pies my grandma used to make when I was knee-high to a grasshopper, but with a modern twist that feels right at home for busy folks. I stumbled upon the idea during a family bake sale, desperate for something festive but easy (let’s face it, oven space gets precious around the holidays). I wish I’d discovered these years ago!
Let me tell you, my family couldn’t stop sneaking pieces off the tray. Even my notoriously picky uncle went back for seconds. That’s when I knew these creamy no bake pumpkin cheesecake bars were a hit. They’ve become a staple for family gatherings, gifts for neighbors, and, yes, for brightening up my Pinterest board with their gorgeous swirls and layers. Honestly, they’re dangerously easy and provide pure, nostalgic comfort. If you’re looking for a sweet treat for your kids or something to wow your guests at a potluck, this recipe has your back. I’ve tested them more times than I can count (all in the name of research, of course), and every time, it feels like a warm hug. You’re going to want to bookmark this one for sure!
Why You’ll Love These Creamy No Bake Pumpkin Cheesecake Bars
You know what? These creamy no bake pumpkin cheesecake bars aren’t just another fall dessert—they’re the kind that makes you close your eyes after the first bite. Years of baking and a few kitchen disasters have taught me what really works, and these bars check every box. Here’s why you’ll fall in love with them, just like I did:
- Quick & Easy: Whip up in under 30 minutes, then let the fridge do the rest. Perfect for last-minute parties or when you’re craving something sweet but don’t want to fuss with the oven.
- Simple Ingredients: Nothing fancy or hard to find. You probably have most of what you need already—graham crackers, cream cheese, pumpkin puree, and a handful of pantry staples.
- Perfect for Fall Gatherings: These bars are a guaranteed hit at potlucks, Friendsgiving, school events, or cozy Sunday dinners. They look gorgeous on a dessert table and taste even better.
- Crowd-Pleaser: Kids love them for the creamy sweetness, adults appreciate the nostalgic pumpkin spice flavor, and everyone comes back for seconds (trust me, I’ve seen it happen).
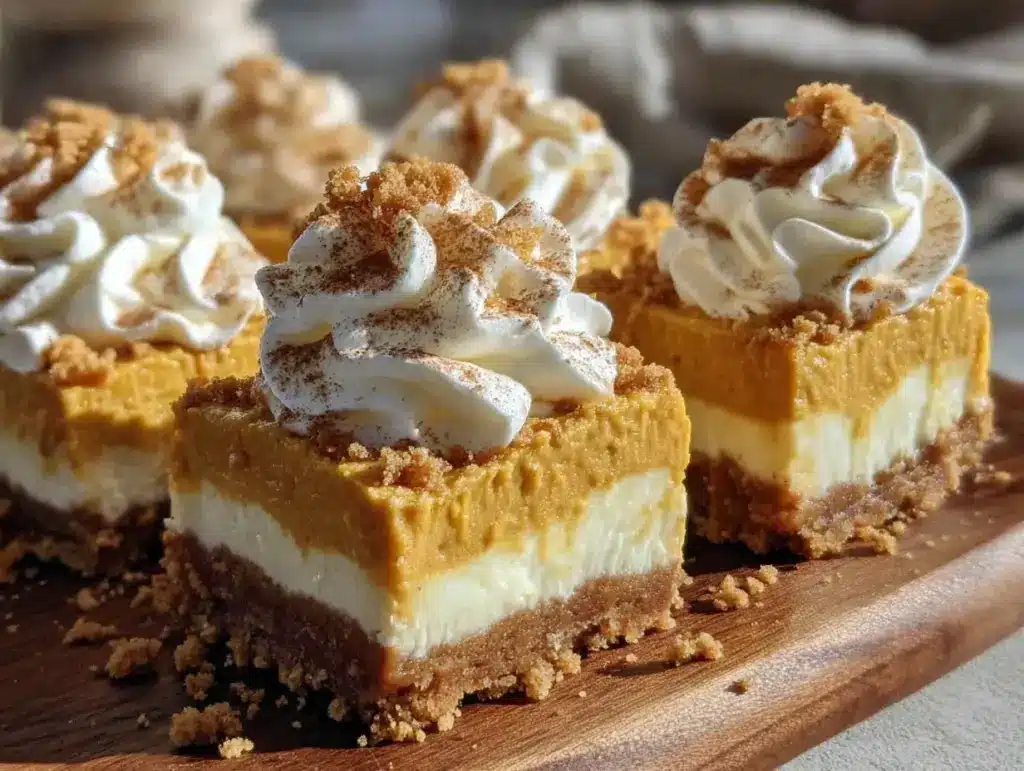
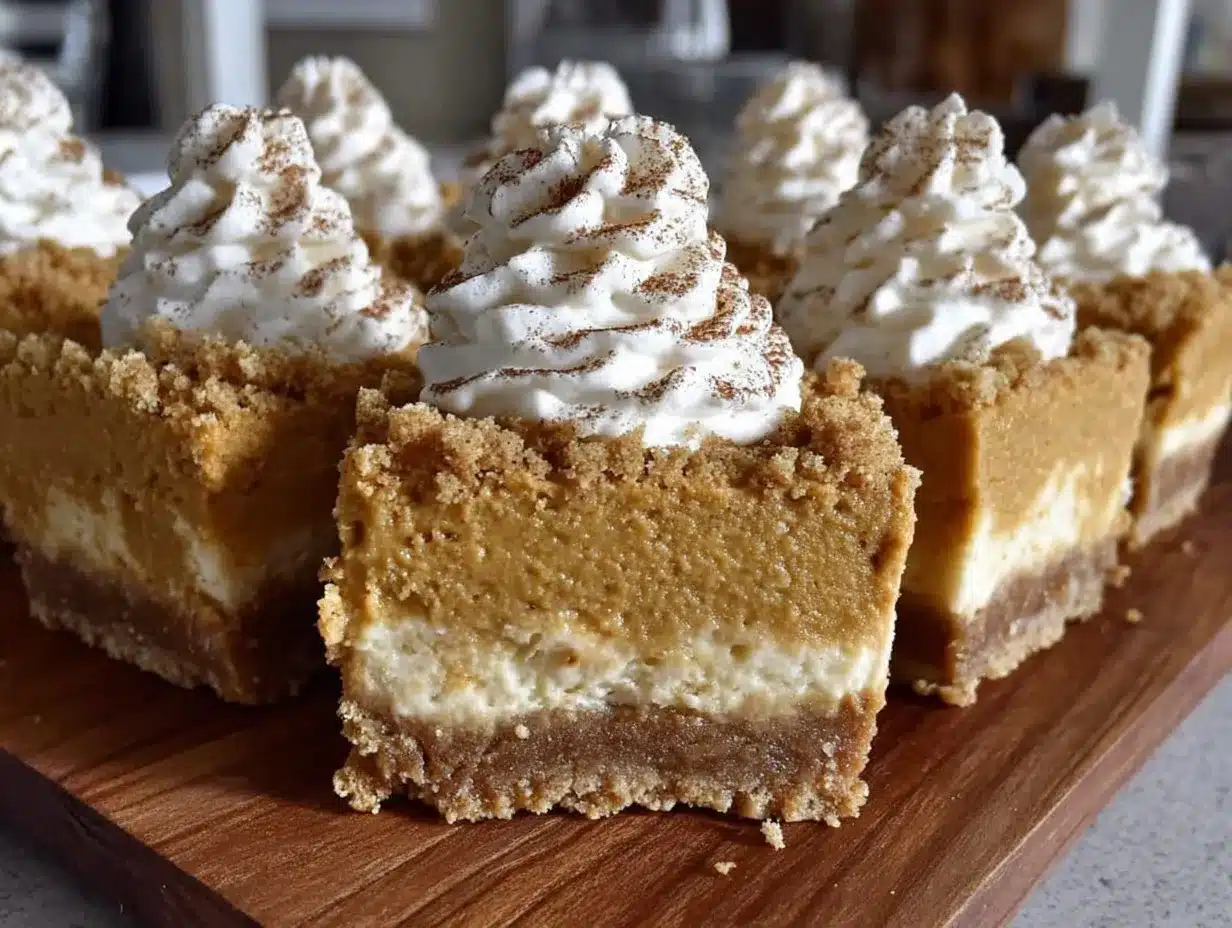
- Unbelievably Delicious: There’s something about the light, mousse-like pumpkin cheesecake layer—spiced just right, not too sweet—resting on a buttery graham cracker crust. It’s comfort food with a grown-up twist.
What sets these bars apart is the no bake method—no risk of cracking, no waiting for the oven to preheat, and zero stress about overbaking. I use extra creamy cream cheese for that dreamy texture, and a special blend of pumpkin pie spice, which honestly makes all the difference. If you’re after the perfect balance between tangy and sweet, this recipe nails it every time.
This dessert isn’t just good—it’s the kind that turns an ordinary meal into a celebration. Healthier than a traditional pie (less sugar, lighter crust), it’s also easier, faster, and just as satisfying. Whenever I want to impress without the headache, this is my go-to. Who knew comfort food could be so effortless?
What Ingredients You Will Need
This recipe uses simple, wholesome ingredients to deliver bold flavor and satisfying texture without the fuss. Most of these are pantry staples, and you can swap things around to suit your own taste or dietary needs. Here’s what you’ll need to make the best creamy no bake pumpkin cheesecake bars:
- For the Crust:
- 2 cups (240g) graham cracker crumbs (classic, or swap with gluten-free graham crackers for allergies)
- 1/2 cup (115g) unsalted butter, melted (adds richness—Kerrygold is my go-to for flavor)
- 1/4 cup (50g) brown sugar (for a hint of caramel depth)
- Pinch of salt (balances the sweetness, don’t skip it!)
- For the Pumpkin Cheesecake Layer:
- 16 oz (450g) cream cheese, softened (full-fat for best texture—Philadelphia never lets me down)
- 1 cup (240g) pumpkin puree (not pumpkin pie filling—Libby’s is the classic choice)
- 1/2 cup (120ml) heavy whipping cream (for that airy, mousse-like finish)
- 2/3 cup (80g) powdered sugar (sifted, for smoothness)
- 2 tsp pumpkin pie spice (or mix ground cinnamon, nutmeg, ginger, and cloves)
- 1 tsp vanilla extract (pure, if you can swing it)
- For the Topping (Optional):
- Whipped cream (store-bought or homemade—adds a lovely contrast)
- Extra sprinkle of pumpkin pie spice or cinnamon (for a pretty finish)
- Chopped pecans or walnuts (totally optional, but I love the crunch!)
Ingredient Tips: For the best results, use room temperature cream cheese—it blends smoother and leaves no lumps. If you’re making these bars for a crowd with allergies, swap in dairy-free butter and vegan cream cheese (Violife and Miyoko’s are my favorites). You can use gingersnap cookies instead of graham crackers for a spicy kick, or add a tablespoon of maple syrup to the filling if you want a deeper sweetness.
In summer, I’ve swapped pumpkin puree for mashed sweet potato—surprisingly good! And if you’re out of heavy cream, use chilled coconut cream instead (it’s a lovely dairy-free twist). These ingredients are flexible, so don’t be afraid to make them your own.
Equipment Needed
To make creamy no bake pumpkin cheesecake bars, you really don’t need much—just a few reliable kitchen tools. Here’s what works best, plus some personal notes:
- 9×13-inch (23x33cm) baking pan (glass or metal, lined with parchment for easy lifting)
- Mixing bowls (at least two—one for crust, one for filling)
- Hand mixer or stand mixer (a whisk will do in a pinch, but electric makes the filling ultra-smooth)
- Spatula (silicone is best for scraping every last bit)
- Measuring cups and spoons (accuracy means a perfect set every time)
- Plastic wrap or aluminum foil (for chilling and storing)
If you don’t have a 9×13 pan, you can use two 8×8 pans, or even make mini bars in muffin tins for individual servings. I’ve tried pressing the crust with a measuring cup for an even layer—works like a charm. For budget-friendly options, most stores carry basic pans for under $10, and hand mixers can be found secondhand (I snagged one at a garage sale that’s still kicking years later). If you’re using nonstick equipment, a gentle wash keeps it lasting longer. Don’t stress about fancy gadgets—simple tools get the job done.
Preparation Method
Ready to make creamy no bake pumpkin cheesecake bars? Here’s the step-by-step guide that’s been tried and tested in my kitchen (with all the little tips I wish I’d known the first time).
-
Prepare the Crust
In a medium bowl, combine 2 cups (240g) graham cracker crumbs, 1/2 cup (115g) melted unsalted butter, 1/4 cup (50g) brown sugar, and a pinch of salt. Stir until mixture resembles wet sand (it should hold together when pressed). Pour into a 9×13-inch (23x33cm) pan lined with parchment paper.
Using the bottom of a measuring cup, press the mixture firmly and evenly. The crust should be compact—not crumbly. If it’s too dry, add a tablespoon more melted butter. Chill in the fridge while you make the filling (at least 10 minutes).
-
Make the Pumpkin Cheesecake Layer
In a large bowl, beat 16 oz (450g) softened cream cheese with a hand mixer until smooth and fluffy (about 2 minutes). Add 2/3 cup (80g) powdered sugar and beat again until fully incorporated.
Scrape down the sides, add 1 cup (240g) pumpkin puree, 2 tsp pumpkin pie spice, and 1 tsp vanilla extract. Mix until just combined—don’t overbeat or the filling can get runny. Pour in 1/2 cup (120ml) heavy whipping cream and beat until the mixture is light and airy (another 1-2 minutes). The filling should be thick but spreadable, with a pale orange color and a sweet, spicy scent.
-
Assemble the Bars
Remove the crust from the fridge. Pour the pumpkin cheesecake mixture over the crust and use a spatula to spread it evenly. Smooth the top with the back of a spoon for those signature swirls.
If you want a marble effect, drop a few small spoonfuls of pumpkin puree on top and swirl gently with a knife.
-
Chill to Set
Cover the pan with plastic wrap or foil and refrigerate for at least 4 hours, or overnight for best results. The filling should be firm to the touch and slice cleanly (if too soft, chill longer).
Troubleshooting: If your bars seem runny after chilling, check your cream cheese and pumpkin for excess moisture—draining pumpkin puree before use helps.
-
Add the Topping
Once set, cut into bars (about 16 squares). Top each bar with a dollop of whipped cream, a sprinkle of pumpkin pie spice, and chopped nuts if desired. Serve cold for the creamiest texture.
Preparation note: For clean slices, wipe your knife between cuts. If you’re serving at a party, make them ahead—the flavors only get better!
My personal tip: I prep the crust the night before and make the filling in the morning. That way, it’s ready for evening gatherings (and I don’t have to rush). If you want mini bars, use muffin tins and chill for 2 hours—perfect for kids’ parties!
Cooking Tips & Techniques
I’ve made creamy no bake pumpkin cheesecake bars more times than I can count (and learned a few lessons the hard way). Here are my best tips for foolproof results:
- Room Temperature Ingredients: Always use softened cream cheese. Cold cream cheese leads to lumps and uneven texture. If you forget, microwave for 10 seconds—works in a pinch!
- Don’t Overmix: Overbeating the filling can make it loose and runny. Mix just until smooth and creamy. If it starts to look watery, pop it in the fridge for 10 minutes before spreading.
- Chill Time Matters: Bars need plenty of time to set—at least 4 hours, ideally overnight. I once tried to rush it for a picnic, and the filling was too soft to slice. Lesson learned!
- Press the Crust Firmly: A loose crust crumbles when you cut the bars. Use a measuring cup or your fingers to really pack it down.
- Troubleshooting Runny Filling: If your filling doesn’t firm up, check your pumpkin puree. Some brands have more water—drain with a fine mesh sieve if needed.
- Multitasking: While the crust chills, prep your cheesecake filling. This saves time and keeps everything moving smoothly.
- Consistency: For the creamiest results, use full-fat dairy. Low-fat versions work but may not set as firmly.
Honestly, my early attempts ended up with a soupy mess once or twice, but after a few tweaks, I nailed the method. Remember, it’s better to chill longer than not enough—the flavor deepens, and the bars slice like a dream.
Variations & Adaptations
One of my favorite things about creamy no bake pumpkin cheesecake bars is how easy they are to customize. Here are a few tasty variations and adaptations:
- Gluten-Free: Swap graham crackers for gluten-free cookies or almond flour crust. No one will notice the difference!
- Dairy-Free/Vegan: Use dairy-free cream cheese (Violife or Miyoko’s), coconut milk for whipping, and vegan butter. I’ve made these for a vegan friend—still creamy and delish!
- Spiced Gingersnap Crust: Replace graham crackers with crushed gingersnap cookies for extra autumn spice. My family loves this twist during Thanksgiving.
- Nutty Crunch: Add a layer of chopped pecans or walnuts between the crust and filling. It brings a lovely texture and nutty flavor.
- Chocolate Swirl: Drizzle melted chocolate over the cheesecake layer before chilling. Kids go wild for this version!
You can also adjust the spice blend—add more cinnamon for warmth, or a dash of cardamom for something unique. If you’re making these for a holiday, a cranberry sauce drizzle on top is festive and tart. Feel free to experiment; I once added maple syrup to the filling, and it was a huge hit!
Serving & Storage Suggestions
These creamy no bake pumpkin cheesecake bars are best served chilled—straight from the fridge, they’re at their creamiest. For a beautiful presentation, cut them into squares and top with whipped cream, a sprinkle of spice, and a few chopped nuts.
Pair with hot apple cider, chai tea, or coffee for a cozy fall vibe. If you’re hosting a party, arrange the bars on a platter and garnish with fresh mint or edible flowers for a Pinterest-worthy look.
For storage, cover the bars tightly with plastic wrap or foil and refrigerate for up to 5 days. They freeze well, too—just wrap in parchment and place in a freezer bag. Thaw in the fridge overnight before serving. Reheat isn’t necessary, but if you want a softer bite, leave at room temperature for 10 minutes.
Flavor note: The pumpkin spice deepens after a day or two, making leftovers even better. Honestly, sometimes I think the bars taste best after a night in the fridge!
Nutritional Information & Benefits
Each creamy no bake pumpkin cheesecake bar is estimated to provide about 180 calories, 14g fat, 3g protein, and 15g carbs per serving (based on 16 bars per pan). Pumpkin is packed with vitamin A, fiber, and antioxidants, while the cream cheese offers calcium and a bit of protein.
For gluten-free and dairy-free adaptations, the nutrition changes slightly—less saturated fat and potentially fewer calories. These bars are naturally vegetarian and can be made nut-free by omitting the topping. Allergens to note: wheat (in the crust), dairy (in the filling), and nuts (in the topping, if used).
Personally, I love that these bars feel indulgent but aren’t overloaded with sugar. Pumpkin adds a wholesome touch, and you can adjust the sweetness to suit your diet. They’re a lighter alternative to traditional pumpkin pie—great for those watching their carb intake!
Conclusion
Creamy no bake pumpkin cheesecake bars are the kind of recipe you’ll want to make again and again. They’re easy, festive, and absolutely delicious—perfect for fall gatherings, holiday parties, or just a sweet treat after dinner. The flavors are a nostalgic nod to pumpkin pie, with a modern spin that feels fresh and fun.
Don’t be afraid to tweak the spices, swap out ingredients, or try new toppings. That’s the beauty of this recipe—it’s endlessly adaptable. I truly adore making these bars; they’ve brought smiles to my family, and I hope they do the same for yours.
If you give them a try, drop a comment below and let me know your favorite variation! Share with friends, pin for later, and tag me if you post your beautiful bars online. Wishing you warm kitchens and happy memories—these bars might just become your new fall tradition!
FAQs About Creamy No Bake Pumpkin Cheesecake Bars
Can I use canned pumpkin pie filling instead of pumpkin puree?
It’s best to stick with pure pumpkin puree. Pumpkin pie filling has added sugar and spices, which can make the bars too sweet and change the texture.
How long do these bars need to chill?
They should chill for at least 4 hours, but overnight gives the best texture and flavor. The longer they set, the firmer and creamier they get.
Can I make these ahead of time for a party?
Absolutely! Make them up to 2 days in advance and keep them covered in the fridge. The flavors develop beautifully with time.
Do I need to use a mixer, or can I mix by hand?
A mixer makes the filling much smoother and creamier, but you can use a sturdy whisk if needed. Just be prepared for a good arm workout!
Can I freeze these bars?
Yes, they freeze very well. Wrap tightly and store for up to 2 months. Thaw overnight in the fridge before serving—easy for holiday prep!
Pin This Recipe!
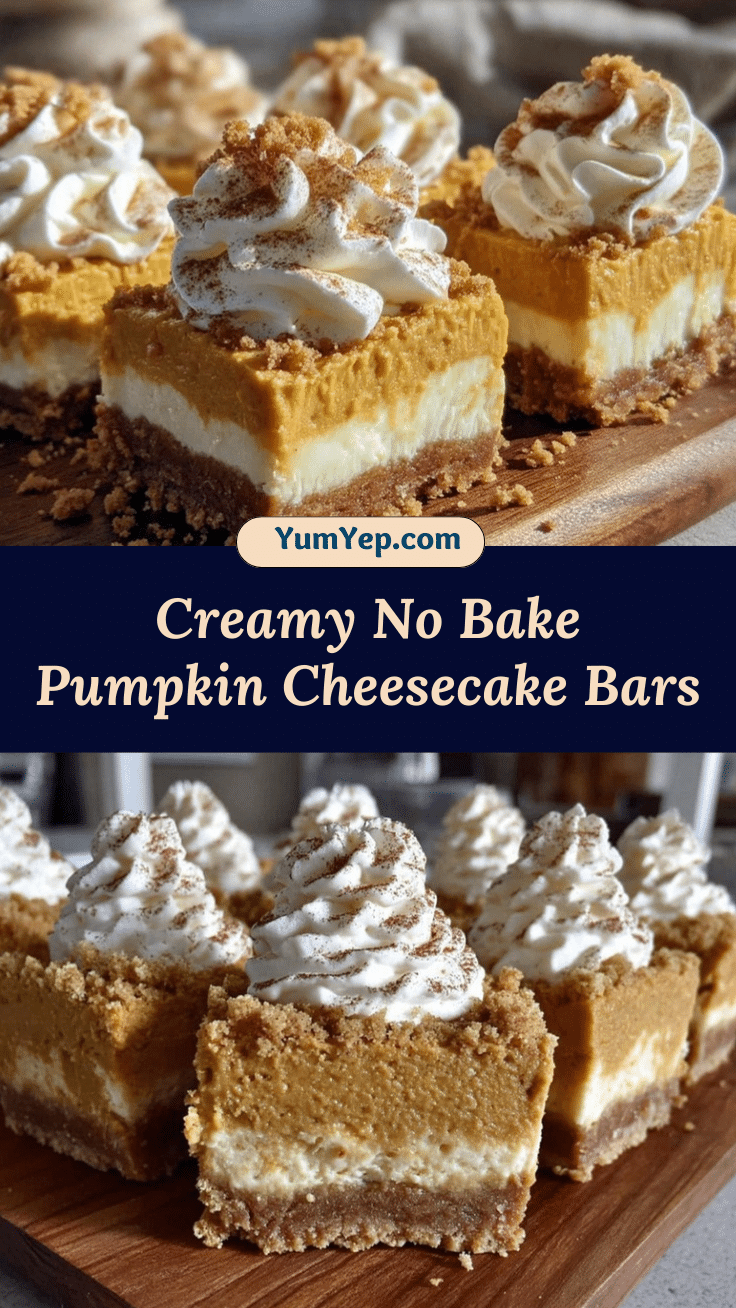
Creamy No Bake Pumpkin Cheesecake Bars

These creamy no bake pumpkin cheesecake bars feature a buttery graham cracker crust and a mousse-like pumpkin cheesecake layer, spiced just right for autumn. They’re easy to make, require no oven, and are perfect for fall gatherings or holiday parties.
- Prep Time: 20 minutes
- Cook Time: 0 minutes
- Total Time: 4 hours 20 minutes
- Yield: 16 bars 1x
- Category: Dessert
- Cuisine: American
Ingredients
- 2 cups graham cracker crumbs
- 1/2 cup unsalted butter, melted
- 1/4 cup brown sugar
- Pinch of salt
- 16 oz cream cheese, softened
- 1 cup pumpkin puree
- 1/2 cup heavy whipping cream
- 2/3 cup powdered sugar, sifted
- 2 tsp pumpkin pie spice
- 1 tsp vanilla extract
- Whipped cream (optional, for topping)
- Pumpkin pie spice or cinnamon (optional, for topping)
- Chopped pecans or walnuts (optional, for topping)
Instructions
- Line a 9×13-inch baking pan with parchment paper.
- In a medium bowl, combine graham cracker crumbs, melted butter, brown sugar, and a pinch of salt. Stir until the mixture resembles wet sand.
- Press the mixture firmly and evenly into the prepared pan using the bottom of a measuring cup. Chill in the fridge for at least 10 minutes.
- In a large bowl, beat softened cream cheese with a hand mixer until smooth and fluffy (about 2 minutes).
- Add powdered sugar and beat until fully incorporated.
- Scrape down the sides, then add pumpkin puree, pumpkin pie spice, and vanilla extract. Mix until just combined.
- Pour in heavy whipping cream and beat until the mixture is light and airy (1-2 minutes).
- Remove the crust from the fridge. Spread the pumpkin cheesecake mixture evenly over the crust and smooth the top.
- For a marble effect, drop small spoonfuls of pumpkin puree on top and swirl gently with a knife (optional).
- Cover the pan with plastic wrap or foil and refrigerate for at least 4 hours, or overnight for best results.
- Once set, cut into bars (about 16 squares). Top each bar with whipped cream, a sprinkle of pumpkin pie spice, and chopped nuts if desired.
- Serve chilled. For clean slices, wipe your knife between cuts.
Notes
Use room temperature cream cheese for a smooth filling. Chill bars for at least 4 hours, ideally overnight, for best texture. For gluten-free or dairy-free adaptations, substitute with appropriate ingredients. Bars freeze well for up to 2 months. For a nut-free version, omit the nut topping.
Nutrition
- Serving Size: 1 bar (1/16 of pan)
- Calories: 180
- Sugar: 10
- Sodium: 120
- Fat: 14
- Saturated Fat: 8
- Carbohydrates: 15
- Fiber: 1
- Protein: 3
Keywords: pumpkin cheesecake bars, no bake dessert, fall recipe, easy pumpkin bars, Thanksgiving dessert, autumn treats, creamy cheesecake, party dessert


