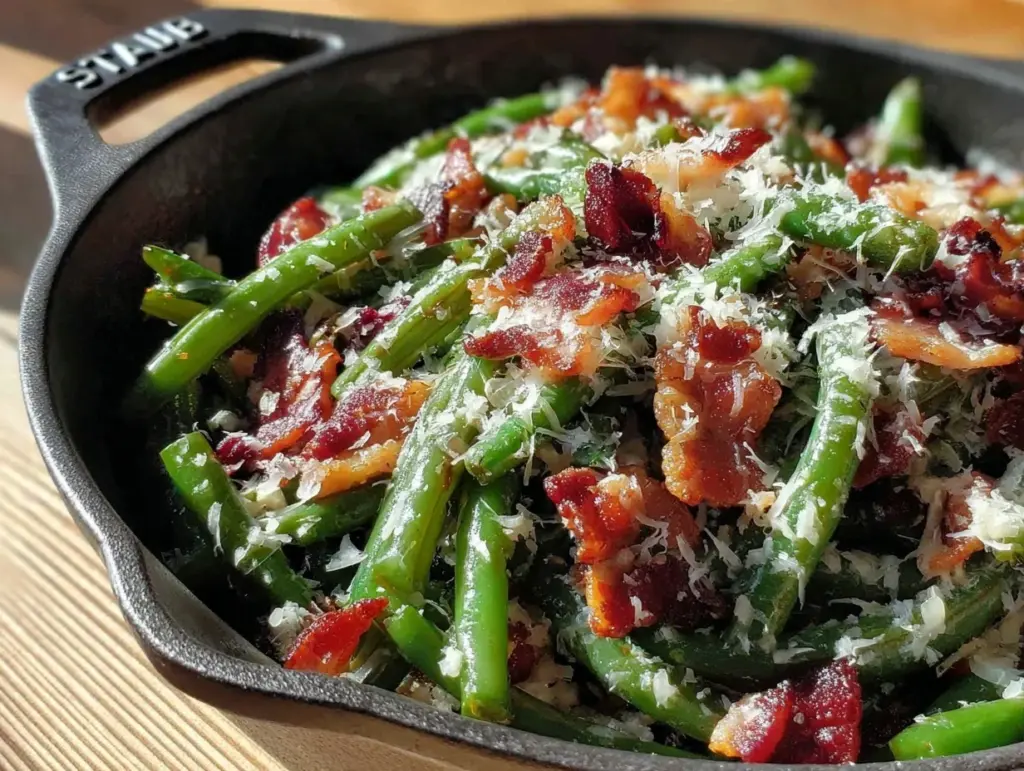
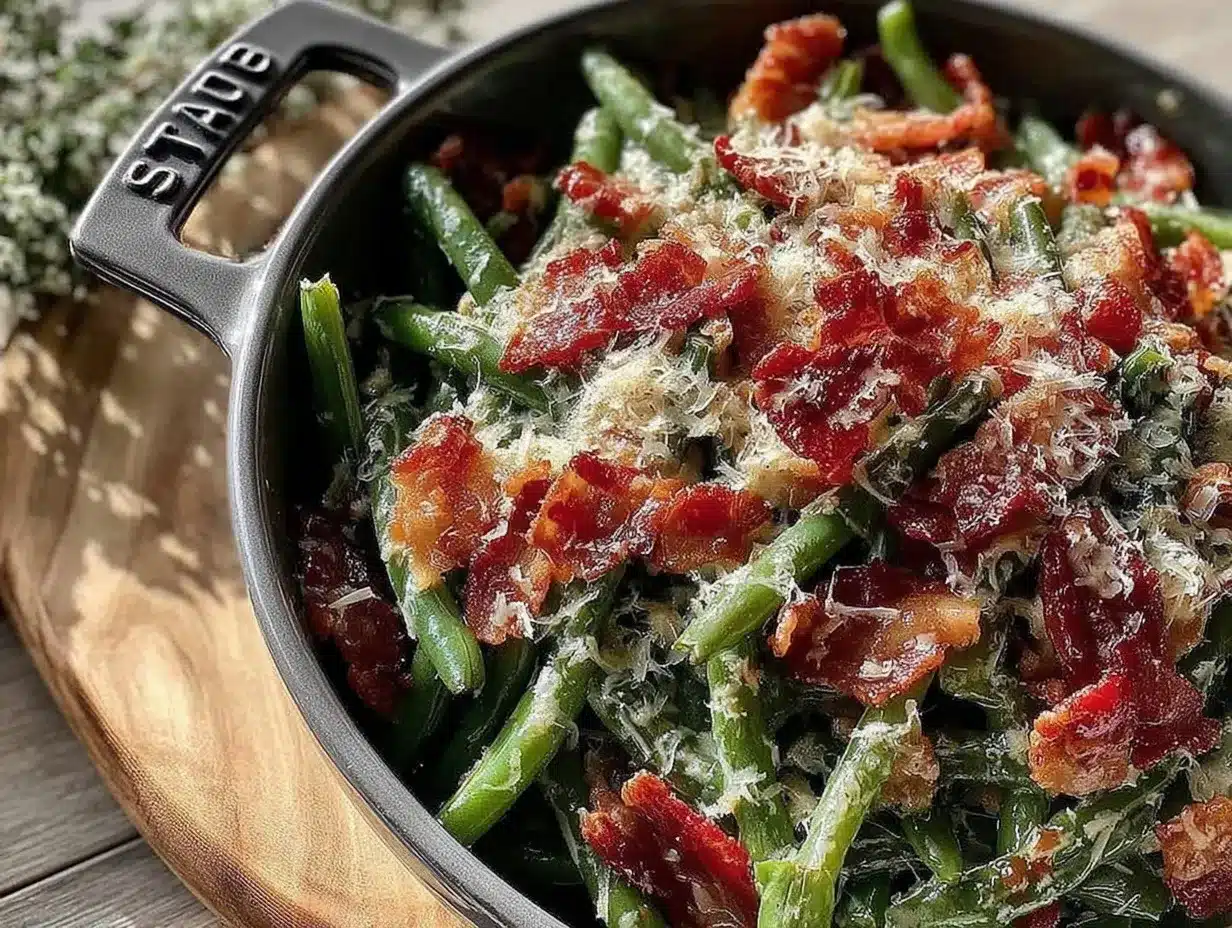
Let me set the scene: the aroma of sizzling bacon fills the kitchen, mingling with the earthy snap of fresh green beans as they hit the hot skillet. There’s that satisfying crackle, the kind that makes you pause mid-stir just to inhale deeply and smile. The colors alone—vivid green beans and golden bacon bits—could brighten up any dinner table (honestly, it’s a Pinterest dream come to life). The first time I made these crispy green beans with bacon, it was a blustery Thanksgiving morning. My mom handed me a pile of green beans and said, “Make them special, kiddo.” I was knee-high to a grasshopper and determined to impress. The moment I tasted the first batch—crispy, salty, and a little smoky—I knew I’d stumbled onto something that was pure, nostalgic comfort.
This recipe’s roots go way back in my family. We always had a green bean dish at Thanksgiving, but they were usually steamed and, well, a little dull. Years ago, after tasting a crispy version at a friend’s potluck, I went home and tinkered until I found the perfect combination. (Wish I’d figured this out sooner, honestly!) Now, these crispy green beans with bacon are a staple for family gatherings and holiday feasts. I catch my kids sneaking pieces off the pan and my husband “taste-testing” more than his fair share. Let’s face it: when you bring a platter of these to the table, they disappear faster than you can say “second helping.”
There’s just something magical about the mix of crisp-tender beans and savory bacon that makes everyone reach for seconds. Perfect for potlucks, as a sweet treat for your kids, or to brighten up your Pinterest board with a burst of color, this recipe delivers every time. I’ve tested it more times than I care to admit—in the name of research, of course—and it never fails to bring joy (and lots of compliments). If you’re searching for a Thanksgiving side dish that feels like a warm hug and tastes even better, you’re going to want to bookmark this one. Crispy green beans with bacon have officially earned their spot in my holiday hall of fame.
Why You’ll Love This Recipe
Trust me, after years of holiday cooking and more than a few green bean mishaps, I can say with confidence: this crispy green beans with bacon recipe is a keeper. I’ve tweaked, tasted, and perfected it for foolproof results, and here’s why it’s about to become your go-to Thanksgiving side dish:
- Quick & Easy: Comes together in under 30 minutes—no more marathon side dish prep!
- Simple Ingredients: Just green beans, bacon, a few pantry staples, and you’re set (no fancy grocery trips required).
- Perfect for Thanksgiving (and beyond): Whether you’re hosting a crowd or just want something special for Sunday dinner, these beans fit right in.
- Crowd-Pleaser: Kids love the crispy bacon, adults appreciate the fresh snap of beans. Everyone asks for seconds.
- Unbelievably Delicious: The combo of crunchy beans and savory bacon is next-level comfort—honestly, you’ll want to eat them right off the pan.
What sets this recipe apart is the technique: instead of boiling the beans to mush, you pan-fry them just enough to keep a crisp bite. The bacon isn’t just a garnish—it’s a main player, lending smoky depth and a hint of richness. I use thick-cut bacon for maximum crunch, and a quick toss with garlic and shallots brings out all the flavors. It’s not just another green bean side; it’s the version your family will beg for every year.
This is the kind of dish that turns skeptics into believers. The first bite is a little salty, a little sweet, and so satisfyingly crisp that you close your eyes for a second. It’s comfort food, but brighter and fresher. If you want a side dish that looks impressive, tastes incredible, and doesn’t leave you frazzled before dinner, this one’s for you. Crispy green beans with bacon are the answer to boring veggies—healthier, happier, and the soul of the holiday table.
What Ingredients You Will Need
Crispy green beans with bacon require just a handful of ingredients, most of which you probably have on hand. These ingredients work together to build flavor, texture, and that eye-catching color that makes the dish irresistible. You’ll find plenty of room for swaps and tweaks, but here’s what I reach for every time:
- Green beans: Fresh, trimmed (about 1 pound / 450g). Look for bright, firm beans—skip any that look limp or spotted.
- Bacon: Thick-cut, smoked (6 slices / about 170g). I love using applewood smoked bacon for extra depth. If you want a bit less fat, turkey bacon works too, though it won’t crisp up quite the same way.
- Shallots: Thinly sliced (1 medium shallot / about 40g). Adds a subtle sweetness and a hint of onion flavor without overpowering the beans.
- Garlic: Minced (2 cloves / about 10g). Garlic brings that cozy, savory note—use fresh if possible, but garlic powder will work in a pinch (about ½ tsp).
- Olive oil: 2 tablespoons (30ml). This helps crisp the beans and gives a nice sheen. If you want even more flavor, try bacon fat reserved from cooking.
- Salt: ½ teaspoon (or to taste). Kosher salt is my go-to; it clings to the beans and brings out their natural flavor.
- Black pepper: ¼ teaspoon (freshly cracked). Adds a gentle heat—feel free to add more if you like things spicy.
- Optional for garnish: Lemon zest (½ teaspoon), chopped fresh parsley (1 tablespoon), or toasted slivered almonds (2 tablespoons). These extras add brightness and crunch, but you can skip them if you’re keeping it classic.
Ingredient Tips: For the crispiest beans, use fresh—frozen beans tend to steam rather than crisp. If you’re shopping ahead, store beans in the fridge wrapped in a clean towel to keep them snappy. I’ve tried a bunch of bacon brands, and honestly, Wright and Nueske’s are my favorites for flavor and texture. If you need a gluten-free option, this recipe is naturally gluten-free—just double-check your bacon and seasoning labels.
Substitution Suggestions: For a vegetarian twist, skip the bacon and add a handful of smoked almonds or crumbled feta. If you’re dairy-free, no worries—these beans work perfectly without any cheese. And if you’re prepping for a crowd, just double the batch; the cooking time stays about the same, as long as you use a big enough pan.
Seasonal Swaps: In summer, I sometimes swap green beans for wax beans or even snap peas (same cooking method). For autumn, a bit of chopped sage or thyme makes things extra cozy. Make these crispy green beans with bacon your own—they’re versatile enough for any season.
Equipment Needed
Making crispy green beans with bacon doesn’t require any fancy gadgets—just a few reliable kitchen tools. Here’s what you’ll need:
- Large skillet or sauté pan: (12-inch / 30cm recommended) Cast iron or stainless steel is best for getting a good crisp on the beans and bacon.
- Tongs: For turning the beans and bacon without crushing them. If you don’t have tongs, a sturdy spatula will work in a pinch.
- Cutting board and sharp knife: For trimming beans, dicing shallots, and chopping bacon. (I’ve tried fancy bean slicers—they’re fun, but a good knife does the trick.)
- Paper towels: To drain the cooked bacon and blot any excess oil from the beans.
- Mixing bowl: For tossing the beans with oil, salt, and pepper before cooking.
- Plate or serving dish: Something wide and shallow to show off those crispy edges (bonus points if it’s festive for Thanksgiving!).
If you’re cooking a double batch, a sheet pan works great for keeping beans warm in the oven. For those on a budget, don’t worry—an old frying pan and wooden spoon will get the job done. Just make sure your pan is big enough to give the beans room to crisp (crowding = steaming, not frying). And if you’re lucky enough to have a cast iron skillet, use it! That extra heat retention makes everything taste better. Keep your tools clean and dry; bacon grease can get sticky, so a quick wipe-down after cooking saves headaches later.
Preparation Method
Here’s the step-by-step guide for making crispy green beans with bacon. I’ve included exact measurements and time estimates, plus a few personal tips to help you avoid common pitfalls. Don’t rush the crisping—patience pays off!
- Prep the ingredients:
- Trim the ends off 1 lb (450g) green beans. Slice 6 thick-cut bacon strips (170g) into ½-inch pieces. Mince 2 garlic cloves (10g) and slice 1 shallot (40g).
Tip: Pat green beans dry with a towel—moisture will keep them from crisping.
- Cook the bacon:
- Heat a 12-inch (30cm) skillet over medium heat. Add bacon pieces and cook, stirring occasionally, until crispy and golden (about 7-10 minutes).
Note: Watch the heat—too high and the bacon burns before it crisps. Remove bacon with a slotted spoon and set aside on a paper towel-lined plate.
- Sauté the shallots and garlic:
- If there’s more than 2 tablespoons (30ml) bacon fat left in the pan, pour off the excess. Add sliced shallot and cook until soft and fragrant (about 2 minutes). Stir in minced garlic and cook 30 seconds more.
Warning: Garlic burns fast, so don’t walk away here!
- Crisp the green beans:
- Add green beans to the skillet, tossing to coat in the bacon fat. Drizzle with 2 tablespoons (30ml) olive oil if needed. Season with ½ teaspoon salt and ¼ teaspoon black pepper.
Cook over medium-high heat, stirring every minute or so, until beans are blistered and crisp-tender (8-10 minutes). You’ll see some brown spots—don’t worry, that’s flavor!
- Combine and finish:
- Return crispy bacon to the pan and toss with beans. If using, add lemon zest, parsley, or almonds. Cook 1 minute more to warm everything through.
Taste and adjust seasoning. The beans should be bright green with golden bacon bits—smells amazing!
- Serve:
- Transfer to a wide serving plate. Serve immediately for maximum crunch.
Tip: If you need to hold them for a bit, keep in a warm oven (about 200°F / 95°C)—but not too long, or they’ll lose their crisp.
If your beans start to look limp, crank up the heat and spread them out—crowding is the enemy of crispness. Sometimes I add the bacon halfway through cooking for extra flavor. And if the kitchen gets smoky, open a window—it’s worth it for those crispy edges!
Cooking Tips & Techniques
Getting crispy green beans with bacon just right isn’t hard, but a few tricks make all the difference. Here’s what I’ve learned over years of trial, error, and some hilarious kitchen fails:
- Don’t overcrowd the pan: When you pile up the beans, they steam instead of fry. Use your biggest skillet, or cook in batches if needed.
- Dry your beans thoroughly: Water on the beans = soggy results. A quick pat with paper towels is worth the extra minute.
- Watch the bacon: Bacon goes from perfect to burnt fast. Stir it often and pull it out as soon as it’s golden and crisp.
- Keep the heat medium-high: Too low, and the beans get soft before they brown. Too high, and you risk burning the garlic. Adjust as you go, and trust your nose!
- Use bacon fat wisely: Some folks pour off all the fat, but a little keeps things flavorful and helps the beans crisp.
- Taste as you go: Seasoning is personal. Start light and add more salt or pepper at the end.
I used to skip the drying step and wondered why my beans were always limp—lesson learned. One Thanksgiving, I crowded the pan and ended up with steamed beans (not my proudest moment, but hey, now I know). If you want extra crunch, let the beans sit undisturbed for a minute or two between stirs. And for multitasking, cook the bacon first, prep the beans while it crisps, and have everything chopped before you start. Consistency is all about the details—and a little patience. Your crispy green beans with bacon will be the talk of the table if you follow these tried-and-true tips.
Variations & Adaptations
Crispy green beans with bacon are a canvas for creativity. Here are a few ways you can make the dish fit your tastes, dietary needs, or the season:
- Dairy-free & gluten-free: Good news: the base recipe is naturally dairy- and gluten-free. Just check your bacon and seasonings for any hidden wheat.
- Vegetarian version: Skip the bacon, and sauté the beans in olive oil. Add smoked paprika or liquid smoke for a hint of savory flavor, and top with toasted almonds or crumbled feta.
- Seasonal swaps: Try wax beans, snap peas, or even asparagus when green beans aren’t in season. Same method, different flavor!
- Spicy kick: Add a pinch of red pepper flakes with the garlic for a little heat. My brother loves this version for game day snacks.
- Asian-inspired: Toss the finished beans with a splash of soy sauce and sprinkle with sesame seeds (skip the bacon or use pork belly for extra richness).
If you’re cooking for a crowd and need to keep things warm, transfer the beans to a sheet pan and pop them in a low oven. For a fun twist, I once added grated parmesan and a squeeze of lemon juice—my family went wild for it. Allergens? If nuts are an issue, skip the almond garnish and use seeds. Make crispy green beans with bacon your own; there’s no wrong way to enjoy them.
Serving & Storage Suggestions
Crispy green beans with bacon are best served hot, straight from the skillet. The beans stay crisp and the bacon is perfectly salty—just what you want for Thanksgiving or any festive meal. Here’s how I like to serve and store them:
- Serving: Arrange on a wide platter so everyone can see those beautiful colors. Sprinkle with fresh parsley or lemon zest for a pop of brightness. Serve as a side alongside roast turkey, mashed potatoes, or stuffing. These beans are also amazing with grilled chicken or pork chops.
- Temperature: Serve hot for maximum crunch, but room temperature works if you’re juggling lots of dishes.
- Storage: Leftovers can be stored in an airtight container in the fridge for up to 3 days. The beans will soften a bit, but the flavor stays great.
- Reheating: Reheat in a hot skillet for a couple of minutes to restore some crispness. Microwaving works, but the beans won’t be as crunchy.
- Flavor development: The bacon and beans mingle more as they sit, so leftovers taste even more savory. I like to chop up leftover beans and add them to salads or omelets the next day.
If you’re making these for a big crowd, keep batches warm in the oven (200°F / 95°C) and toss with bacon right before serving. For meal prep, cook the bacon and trim the beans ahead—just crisp everything together close to mealtime for best results. These crispy green beans with bacon are a side dish that fits in anywhere, from holiday tables to weeknight dinners.
Nutritional Information & Benefits
Here’s a quick look at the nutrition and health perks of crispy green beans with bacon. Remember, serving size and toppings will affect the final numbers.
| Per serving (about 1 cup) | Estimated Value |
|---|---|
| Calories | 165 |
| Fat | 9g |
| Carbohydrates | 10g |
| Protein | 8g |
| Fiber | 3g |
Health Benefits: Green beans are naturally low in calories and packed with fiber, vitamin C, and antioxidants. Bacon adds a touch of protein and flavor, but you can control the amount by using less or opting for turkey bacon. This dish is gluten-free and can be made dairy-free easily. Allergens? Watch out for nuts if you add almonds, and double-check bacon labels for hidden additives.
Personally, I love that this recipe is satisfying without being heavy. It’s a great way to get veggies onto the table in a way that everyone actually wants to eat. Crispy green beans with bacon are proof that healthy-ish sides can still bring the “wow” factor.
Conclusion
If you’re looking for a side dish that’s quick, colorful, and totally addictive, crispy green beans with bacon are the answer. They’ve got crunch, flavor, and that homey vibe that makes holidays feel special. Whether you follow the recipe to the letter or put your own spin on it, you’ll end up with a dish everyone loves.
I keep coming back to this recipe because it’s simple, reliable, and delicious—plus, it’s one of the few veggie sides my whole family agrees on (miracle!). Give it a try for Thanksgiving or any night you want something extra tasty. And hey, if you come up with a cool variation, let me know in the comments below! Share, pin, or tag your creations—I love seeing what you come up with.
So go ahead, make crispy green beans with bacon the star of your table. From my kitchen to yours, happy cooking and even happier eating!
FAQs
Can I use frozen green beans instead of fresh?
Fresh green beans work best for crispiness, but if you’re in a pinch, frozen beans will do. Just thaw and pat dry very well before cooking—they’ll be a bit softer but still tasty.
What’s the best way to trim green beans quickly?
Line up a handful of beans on your cutting board, trim the ends with a sharp knife, then flip and trim the other side. It’s way faster than snipping each bean individually.
Can I make crispy green beans with bacon ahead of time?
Yes, you can cook the bacon and prep the beans earlier in the day. For best results, crisp the beans right before serving so they stay crunchy.
Is this recipe gluten-free?
Absolutely! The base recipe doesn’t contain any gluten. Just check your bacon and seasonings to make sure there are no hidden sources.
What can I use instead of bacon?
You can skip the bacon for a vegetarian version. Try smoked almonds, crumbled feta, or a sprinkle of smoked paprika for a similar savory kick.
Pin This Recipe!

Crispy Green Beans with Bacon

Crispy green beans with bacon is a quick and easy Thanksgiving side dish featuring fresh green beans pan-fried with smoky bacon, garlic, and shallots for maximum flavor and crunch. This crowd-pleasing recipe is naturally gluten-free and perfect for holiday gatherings or weeknight dinners.
- Prep Time: 10 minutes
- Cook Time: 20 minutes
- Total Time: 30 minutes
- Yield: 4 servings 1x
- Category: Side Dish
- Cuisine: American
Ingredients
- 1 lb fresh green beans, trimmed
- 6 slices thick-cut smoked bacon (about 6 oz), sliced into 1/2-inch pieces
- 1 medium shallot, thinly sliced
- 2 cloves garlic, minced
- 2 tablespoons olive oil
- 1/2 teaspoon kosher salt (or to taste)
- 1/4 teaspoon freshly cracked black pepper
- Optional garnish: 1/2 teaspoon lemon zest
- Optional garnish: 1 tablespoon chopped fresh parsley
- Optional garnish: 2 tablespoons toasted slivered almonds
Instructions
- Trim the ends off the green beans. Slice bacon into 1/2-inch pieces. Mince garlic and slice shallot.
- Pat green beans dry with a towel to ensure crispiness.
- Heat a large (12-inch) skillet over medium heat. Add bacon pieces and cook, stirring occasionally, until crispy and golden, about 7-10 minutes. Remove bacon with a slotted spoon and set aside on a paper towel-lined plate.
- If more than 2 tablespoons bacon fat remain in the pan, pour off excess. Add sliced shallot and cook until soft and fragrant, about 2 minutes. Stir in minced garlic and cook for 30 seconds more.
- Add green beans to the skillet, tossing to coat in bacon fat. Drizzle with olive oil if needed. Season with salt and pepper.
- Cook over medium-high heat, stirring every minute or so, until beans are blistered and crisp-tender, 8-10 minutes.
- Return crispy bacon to the pan and toss with beans. If using, add lemon zest, parsley, or almonds. Cook 1 minute more to warm through.
- Taste and adjust seasoning. Transfer to a wide serving plate and serve immediately for maximum crunch.
Notes
For best results, use fresh green beans and dry them thoroughly before cooking. Don’t overcrowd the pan—cook in batches if needed for maximum crispiness. You can substitute turkey bacon or make vegetarian by omitting bacon and adding smoked almonds or feta. Keep beans warm in a low oven if making ahead, but serve soon for best texture.
Nutrition
- Serving Size: About 1 cup
- Calories: 165
- Sugar: 3
- Sodium: 400
- Fat: 9
- Saturated Fat: 3
- Carbohydrates: 10
- Fiber: 3
- Protein: 8
Keywords: green beans, bacon, Thanksgiving, side dish, crispy, gluten-free, easy, holiday, skillet, vegetables