“You packed the sunscreen, the beach towels, the cooler—but what about the snacks?” That was the question buzzing in my head one bright summer morning, as I scrambled to prepare for a spontaneous beach trip. Honestly, the last thing I wanted was to lug around a cooler or worry about melting chocolate. So, I threw together a batch of what I now call my Easy No-Refrigeration Trail Mix Cookies for Beach Days. They came from that rushed moment when I realized the usual chilled treats just wouldn’t cut it.
The magic? These cookies don’t need refrigeration, making them perfect for sun-soaked afternoons where the only thing melting should be your worries. Crisp, chewy, nutty, and packed with bits of dried fruit and chocolate chips, they quickly became the snack I’d reach for every time I headed to the shore. My friends even started asking for the recipe during our beach hangouts, which honestly surprised me because I was skeptical at first about how well they’d hold up in the heat.
What stuck with me is how effortlessly these cookies fit into the easygoing vibe of a day by the water. No fuss, no fridge, no mess—just grab and go. They’ve since become my go-to not only for beach days but for hikes, park picnics, and even last-minute snack emergencies. There’s something quietly satisfying about having a treat that’s both wholesome and hassle-free, you know? It’s like sunshine baked into each bite.
Why You’ll Love This Recipe
Having tested these cookies on multiple beach trips, family outings, and even during a solo afternoon stroll, I can confidently say this recipe ticks all the boxes for a fuss-free, delicious snack. Here’s why it’s become a staple in my snack arsenal:
- Quick & Easy: Comes together in just 20 minutes, making it perfect for those last-minute packing moments or when you want to whip something up fast.
- Simple Ingredients: Uses pantry staples and trail mix essentials, so no surprise grocery runs needed.
- Perfect for Beach Days: No refrigeration means you can leave these cookies in your bag without worrying about melting or spoilage.
- Crowd-Pleaser: Kids and adults alike love the chewy texture and mix of nuts, seeds, and dried fruits that keep every bite interesting.
- Unbelievably Delicious: The combination of honey, oats, and trail mix creates a flavor and texture that’s both comforting and energizing.
What sets this recipe apart is the balance it strikes between convenience and taste. I’ve played around with various nuts and dried fruits, but the real trick is in the binding—the honey and peanut butter glue everything together without needing eggs or butter, which makes refrigeration unnecessary. Honestly, it’s the kind of cookie that makes you close your eyes after the first bite, savoring that perfect chewy crispness. Plus, it’s a little healthier than your average sugar bomb, so you feel good about snacking while soaking up the sun.
For a snack that’s as easy as tossing your towel in the car, this recipe feels like a lifesaver. Whether you’re a beach regular or just need a sweet treat that travels well, these trail mix cookies have your back.
What Ingredients You Will Need
This recipe uses simple, wholesome ingredients to deliver bold flavor and satisfying texture without the fuss. Most of these are pantry staples or items you might already have from your last trail mix bag. Feel free to swap ingredients based on your preferences or what you have on hand.
- Old-fashioned rolled oats: 1 ½ cups (135g) – provides that hearty, chewy base
- All-purpose flour: 1 cup (120g) – for structure; you can use almond flour for gluten-free option
- Baking soda: ½ teaspoon – helps cookies rise just enough
- Salt: ¼ teaspoon – balances the sweetness
- Natural peanut butter: ½ cup (130g), creamy or chunky – acts as a binder and adds richness
- Honey: ⅓ cup (113g) – natural sweetener and sticky binder
- Vanilla extract: 1 teaspoon – for warmth and depth
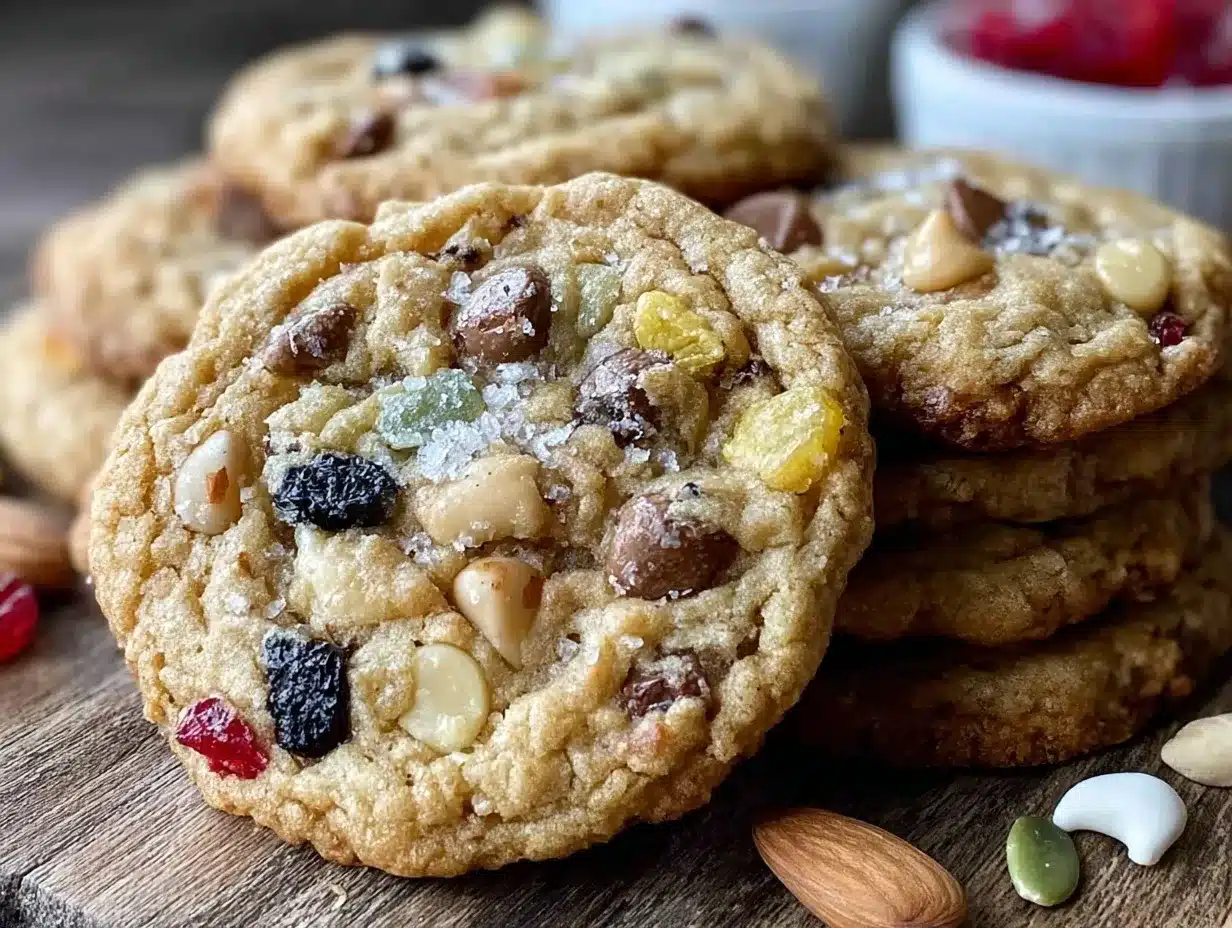
- Trail mix: 1 cup (approx. 150g) – a mix of your favorite nuts, seeds, dried fruits, and chocolate chips (I love a combo of almonds, pumpkin seeds, dried cranberries, and mini dark chocolate chips)
For best results, I recommend using a peanut butter brand like Smucker’s Natural for that perfect balance of smoothness and flavor. When choosing your trail mix, opt for small-curd dried fruits to prevent chewiness from turning into toughness. I’ve also tried adding a handful of crispy candied pecans for extra crunch, which was a nice twist.
Substitutions to consider: swap honey for maple syrup if you prefer vegan-friendly, and you can use sunflower seed butter if you have a peanut allergy. Frozen dried fruits work fine but let them thaw before mixing to avoid excess moisture.
Equipment Needed
- Mixing bowls: One large for combining wet and dry ingredients, and one small for trail mix
- Measuring cups and spoons: Precise measurements matter for texture
- Wooden spoon or sturdy spatula: For mixing sticky dough without a mess
- Baking sheet: Preferably with a non-stick surface or lined with parchment paper
- Cooling rack: Helps cookies cool evenly and keep their crisp edges
- Optional: Cookie scoop — I like using a 1 ½ tablespoon scoop for consistent cookie sizes
If you don’t have a cookie scoop, a regular tablespoon works fine, but your cookies might vary a bit in size. When it comes to baking sheets, I’ve found that aluminum pans conduct heat best for even browning, but a silicone mat or parchment paper-lined tray works just as well for easy cleanup. Personally, I keep a trusty wooden spoon for mixing this dough because it handles the sticky texture better than plastic spatulas, which sometimes flex too much.
Preparation Method
- Preheat your oven to 350°F (175°C). Line a baking sheet with parchment paper or a silicone baking mat to prevent sticking and make cleanup easier. This step takes about 5 minutes.
- Combine dry ingredients: In a large bowl, whisk together the rolled oats, all-purpose flour, baking soda, and salt. Mix well to distribute the leavening evenly. This usually takes 2-3 minutes.
- Mix wet ingredients: In another bowl, stir together the peanut butter, honey, and vanilla extract until smooth. If your peanut butter is a bit stiff, warming it slightly in the microwave for 15-20 seconds helps with mixing.
- Combine wet and dry: Pour the peanut butter mixture into the dry ingredients. Stir gently with a wooden spoon or spatula until a sticky dough forms. It should hold together but not be too wet. If it feels too dry, add a teaspoon of water or milk (dairy or non-dairy) at a time.
- Fold in trail mix: Gently fold in 1 cup of your trail mix blend, making sure the nuts, seeds, fruits, and chocolate chips are evenly distributed. This adds texture and flavor bursts.
- Shape the cookies: Using a cookie scoop or tablespoon, drop rounded spoonfuls of dough onto the prepared baking sheet. Space them about 2 inches apart because they will spread slightly but mostly hold their shape.
- Bake: Place the sheet in the oven and bake for 10-12 minutes. You’ll know they’re done when the edges turn golden brown and the centers look set but still soft. Don’t overbake — these cookies finish firming up as they cool.
- Cool: Let the cookies cool on the baking sheet for 5 minutes before transferring to a cooling rack. This helps them firm up without breaking.
If you notice your cookies are too crumbly, it’s usually due to dry ingredients or lack of enough binder—adding a bit more honey or peanut butter next time can help. On the flip side, if they spread too much, try chilling the dough for 15 minutes or reducing the honey slightly. I often bake a test cookie first, especially when swapping trail mix ingredients, to make sure the texture is just right.
Cooking Tips & Techniques
In my experience, a few tricks make these trail mix cookies stand out every time. First, using old-fashioned rolled oats instead of instant oats gives a chewier, more satisfying bite. Instant oats can make the texture too soft or cakey.
Also, don’t underestimate the power of honey combined with peanut butter. This duo binds the dough naturally, so you get cookies that hold together without eggs or butter. If you’re allergic or prefer a different nut butter, almond or sunflower seed butter works but may slightly change flavor and texture.
Watch your oven temperature carefully. A hotter oven can brown the edges before the center is cooked, while a cooler oven might leave the cookies too soft. Using an oven thermometer can help you avoid surprises. And don’t skip the cooling step; these cookies firm up significantly once they’re off the heat.
For multitasking, I sometimes mix the dough the night before and refrigerate it. This helps develop flavor and makes portioning easier, though it’s not required. Just remember to bring the dough back to room temperature before baking for even cooking.
One common mistake is adding too much dried fruit or chocolate chips, which can make the cookies fall apart. Stick to the recommended amount or slightly less if your mix is very chunky.
Variations & Adaptations
This recipe is a great canvas for personalization. Here are a few ideas I’ve tried or recommend based on different tastes and dietary needs:
- Nut-Free Version: Swap nuts in your trail mix for extra seeds like sunflower and pumpkin seeds, and use sunflower seed butter instead of peanut butter.
- Seasonal Twist: In the fall, try adding chopped dried apples and a pinch of cinnamon for a cozy vibe reminiscent of pumpkin spice rolls (speaking of which, you might enjoy my cinnamon roll casserole for a comforting morning treat).
- Chocolate Lover’s Boost: Double the mini chocolate chips and add a tablespoon of cocoa powder to the dry mix for a richer, fudgier cookie.
- Low-Sugar Option: Use unsweetened dried fruits and reduce honey to ¼ cup, adding a splash of vanilla or almond extract for depth.
Personally, I once tried mixing in some shredded coconut and chopped dried mango for a tropical spin that paired beautifully with beach vibes. Feel free to get creative—just keep an eye on dough consistency so it holds together well.
Serving & Storage Suggestions
These trail mix cookies taste best at room temperature, where their chewy-crisp texture shines. They’re perfect for packing in a beach bag, picnic basket, or even a lunchbox without melting or getting soggy.
Pair them with a refreshing iced tea, lemonade, or even a chilled coffee for a balanced snack break. For a heartier treat, serve alongside creamy yogurt or sliced fresh fruit.
To store, keep the cookies in an airtight container at room temperature for up to 5 days. If you want to keep them longer, freezing works great—just thaw at room temperature for about 30 minutes before enjoying. Avoid refrigeration, as it can dry the cookies out.
Flavors actually deepen after a day or two, making them even better for prepping in advance. Just don’t expect leftovers for long—they tend to disappear fast!
Nutritional Information & Benefits
Each cookie (based on 18 cookies per batch) roughly contains:
- Calories: 120-140 kcal
- Protein: 3-4 grams
- Fat: 6-7 grams (mostly from healthy nuts and peanut butter)
- Carbohydrates: 14-16 grams
- Fiber: 2-3 grams
The nuts and seeds provide heart-healthy fats and protein, while oats contribute fiber that helps keep you full on your beach adventures. Using natural sweeteners like honey adds flavor without refined sugars. This recipe is naturally gluten-free if you swap the flour for almond or oat flour.
Keep in mind the trail mix may contain allergens like nuts and chocolate, so adjust accordingly if needed. From a wellness perspective, these cookies offer a balanced snack that combines energy and nutrients, perfect for active days outdoors.
Conclusion
Easy No-Refrigeration Trail Mix Cookies for Beach Days is one of those recipes I keep coming back to because it matches my on-the-go lifestyle without sacrificing flavor or texture. Whether you’re heading out for a family day, hiking, or just need a reliable snack, these cookies hold up beautifully and taste fantastic.
Feel free to swap ingredients to suit your taste or dietary needs, and don’t hesitate to experiment with your favorite trail mix combos. I love how this recipe turns simple pantry items into a beach-ready treat that makes snack time a little sweeter and simpler.
If you’ve enjoyed this recipe, I’d love to hear your favorite trail mix combinations or any tweaks you’ve tried. Sharing your thoughts always makes the kitchen feel cozier, even miles away from the shore.
Here’s to many sunny days and easy snacks that just work.
Frequently Asked Questions
Can I make these cookies vegan?
Yes! Substitute the honey with maple syrup or agave nectar and use a plant-based butter or nut butter that doesn’t contain animal products.
Do these cookies keep well without refrigeration?
Absolutely. They hold up well at room temperature for several days, making them ideal for beach trips or packed lunches.
Can I use different nut butters?
Yes, almond butter or sunflower seed butter both work well, but keep in mind the flavor and texture may vary slightly.
What if I don’t have trail mix on hand?
You can mix your own with nuts, seeds, dried fruit, and chocolate chips, or substitute with just nuts and chocolate for a simpler version.
How do I prevent the cookies from spreading too much?
Try chilling the dough for 15-30 minutes before baking or reduce the honey slightly. Also, make sure your oven temperature is accurate.
Pin This Recipe!

Easy No-Refrigeration Trail Mix Cookies Recipe Perfect for Beach Days

These no-refrigeration trail mix cookies are perfect for beach days and outdoor adventures. They are chewy, nutty, and packed with dried fruit and chocolate chips, requiring no refrigeration and made with simple pantry staples.
- Prep Time: 10 minutes
- Cook Time: 12 minutes
- Total Time: 22 minutes
- Yield: 18 cookies 1x
- Category: Snack
- Cuisine: American
Ingredients
- 1 ½ cups old-fashioned rolled oats (135g)
- 1 cup all-purpose flour (120g) (can substitute almond flour for gluten-free)
- ½ teaspoon baking soda
- ¼ teaspoon salt
- ½ cup natural peanut butter (130g), creamy or chunky
- ⅓ cup honey (113g)
- 1 teaspoon vanilla extract
- 1 cup trail mix (approx. 150g) – mix of nuts, seeds, dried fruits, and chocolate chips (e.g., almonds, pumpkin seeds, dried cranberries, mini dark chocolate chips)
Instructions
- Preheat your oven to 350°F (175°C). Line a baking sheet with parchment paper or a silicone baking mat.
- In a large bowl, whisk together the rolled oats, all-purpose flour, baking soda, and salt.
- In another bowl, stir together the peanut butter, honey, and vanilla extract until smooth. Warm peanut butter slightly if needed.
- Pour the peanut butter mixture into the dry ingredients and stir gently until a sticky dough forms. Add water or milk by teaspoon if too dry.
- Fold in the trail mix evenly.
- Using a cookie scoop or tablespoon, drop rounded spoonfuls of dough onto the baking sheet about 2 inches apart.
- Bake for 10-12 minutes until edges are golden and centers look set but soft.
- Cool on the baking sheet for 5 minutes, then transfer to a cooling rack to firm up.
Notes
Use old-fashioned rolled oats for best chewy texture. Warm peanut butter slightly if stiff. Avoid too much dried fruit or chocolate chips to prevent crumbling. Chill dough 15 minutes if cookies spread too much. Store in airtight container at room temperature up to 5 days or freeze for longer storage. Avoid refrigeration to prevent drying out.
Nutrition
- Serving Size: 1 cookie
- Calories: 130
- Sugar: 7
- Sodium: 100
- Fat: 6.5
- Saturated Fat: 1
- Carbohydrates: 15
- Fiber: 2.5
- Protein: 3.5
Keywords: trail mix cookies, no refrigeration cookies, beach snacks, easy cookies, peanut butter cookies, healthy snacks, chewy cookies, no bake cookies