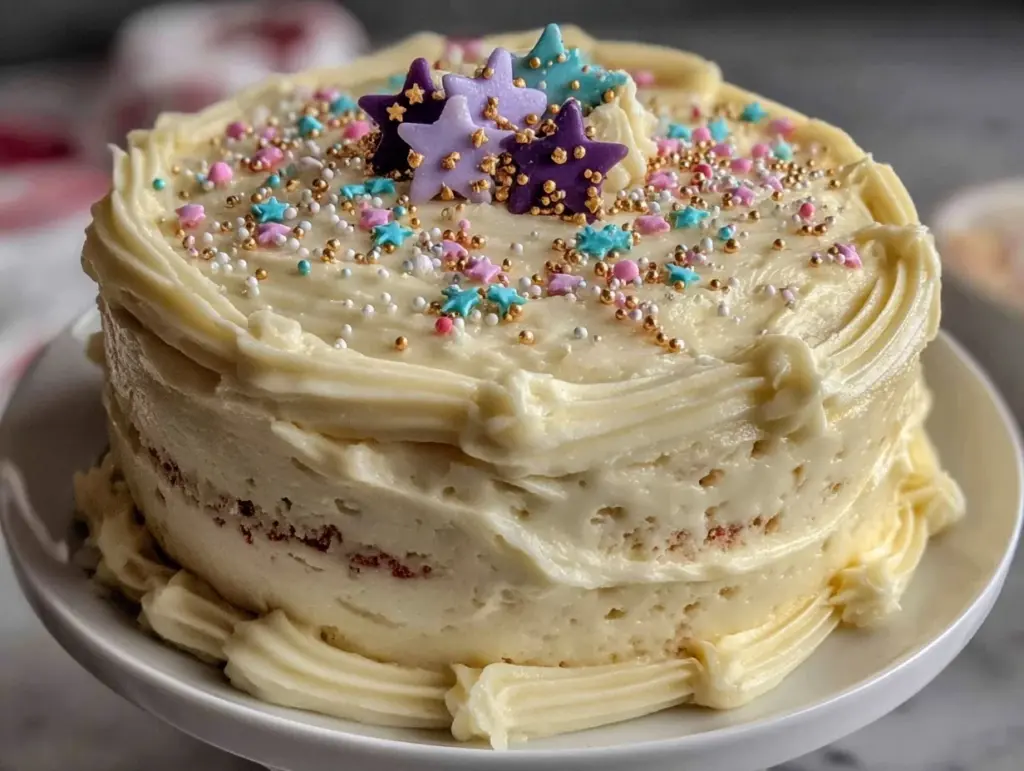
“Are you sure this cake is going to hold up?” my sister asked, eyeing the two-tier vanilla buttercream graduation cake wobbling precariously on the kitchen counter. Honestly, I wasn’t 100% confident either. Baking cakes has never been my strong suit, and the idea of stacking two layers with smooth buttercream frosting felt like something only pros attempted. But there I was, a self-proclaimed beginner, diving into this project with nothing but a recipe and stubborn determination.
It all started on an evening when I realized the local bakery’s turnaround time for graduation cakes was longer than I had patience for. I needed something simple, sweet, and special to celebrate my niece’s big day. After some trial and error (and a few frosting mishaps), this easy two-tier vanilla buttercream cake came together—fluffy layers, creamy frosting, and just enough charm to make us all smile. The best part? It didn’t require fancy tools or years of baking experience, just patience and a bit of guidance.
Now, whenever someone mentions graduation parties, this cake recipe pops up in my mind first. It’s that kind of recipe that feels like a quiet victory—proof that with a little effort, anyone can create something beautiful and delicious. And honestly, it’s become a bit of a tradition for us, the kind of sweet centerpiece you look forward to sharing, one slice at a time.
Why You’ll Love This Recipe
After making this easy two-tier vanilla buttercream graduation cake more times than I can count, I’ve gathered a few reasons it stands out from the crowd:
- Quick & Easy: This cake comes together in about 2 hours, including baking, cooling, and frosting—perfect when you’re juggling a million graduation party details.
- Simple Ingredients: No need for specialty stores. Everything you need is probably already in your pantry or local grocery store.
- Perfect for Celebrations: Whether it’s a graduation, birthday, or any special occasion, this cake fits right in with its classic vanilla charm.
- Crowd-Pleaser: The light, fluffy layers paired with the creamy vanilla buttercream always get compliments, especially from kids and adults alike.
- Beginner-Friendly: No complicated piping or multi-step fillings—just straightforward steps that you can trust to yield a beautiful cake.
What really makes this cake different? The buttercream frosting is whipped just right, with a touch of vanilla that’s not too sweet and a texture so smooth you’d think it was from a bakery. Plus, stacking the two tiers feels fancy but is surprisingly manageable once you get the hang of it. Honestly, this recipe has turned many skeptics into confident bakers who can proudly present their own two-tier masterpiece.
It’s more than just a cake; it’s a sweet way to celebrate milestones without stress or fuss, a recipe that brings a little joy to the kitchen and the party table alike.
What Ingredients You Will Need
This easy two-tier vanilla buttercream graduation cake recipe relies on simple, wholesome ingredients that come together to create a tender crumb and luscious frosting. Most are pantry staples, so you won’t need to hunt down anything fancy.
- For the Cake Layers:
- All-purpose flour – 3 cups (360g), sifted for lightness
- Baking powder – 1 tablespoon (15g), to help the cake rise nicely
- Salt – ½ teaspoon (3g), balances the sweetness
- Unsalted butter – 1 cup (227g), softened (I prefer Land O’ Lakes for consistency)
- Granulated sugar – 2 cups (400g), for that classic vanilla sweetness
- Large eggs – 4, room temperature for better mixing
- Pure vanilla extract – 2 teaspoons (10ml), the star flavor
- Whole milk – 1 cup (240ml), at room temperature to keep the batter smooth
- For the Vanilla Buttercream Frosting:
- Unsalted butter – 1 cup (227g), softened to room temperature
- Powdered sugar – 4 cups (480g), sifted to avoid lumps
- Pure vanilla extract – 2 teaspoons (10ml), enhances the buttery flavor
- Heavy cream or whole milk – 2-4 tablespoons (30-60ml), to adjust consistency
- Pinch of salt, to balance sweetness
Feel free to swap out whole milk with almond or oat milk if you prefer a dairy-free cake, and use dairy-free butter alternatives for the frosting. For a gluten-free version, almond flour can work, but be aware the texture will be a bit different from the classic crumb. I’ve found it’s best to use fresh vanilla extract rather than imitation for that true vanilla punch. Plus, sifting the flour and powdered sugar makes a surprising difference in the final texture.
Equipment Needed
- Two round cake pans (6-inch and 8-inch) – Nonstick pans are great, but you can line regular pans with parchment paper if needed.
- Electric mixer – Stand mixer or hand mixer works well for creaming butter and whipping frosting.
- Mixing bowls – At least two, one for dry ingredients and one for wet.
- Measuring cups and spoons – Accurate measurements are key, especially for baking powder and salt.
- Rubber spatula – For folding and scraping batter from bowls.
- Cake leveler or serrated knife – To level the cake layers for stacking.
- Offset spatula or butter knife – For smooth frosting application.
- Turntable (optional) – Makes frosting easier, but you can do fine without it.
- Cooling racks – To cool the cakes completely before frosting.
If you don’t have a cake leveler, a serrated knife with a steady hand works just fine—practice makes perfect! For frosting, an offset spatula is a game changer, but a flat butter knife can step in during early attempts. When I first made this cake, I didn’t have a turntable, and it was a bit messier, but still delicious. Budget-wise, simple tools like mixing bowls and spatulas can be found inexpensively at most kitchen stores or online.
Preparation Method
- Preheat and Prep: Set your oven to 350°F (175°C). Grease and flour your 6-inch and 8-inch cake pans or line them with parchment paper. This helps the cakes release easily after baking. About 10 minutes prep time.
- Mix Dry Ingredients: In a medium bowl, whisk together 3 cups (360g) sifted all-purpose flour, 1 tablespoon (15g) baking powder, and ½ teaspoon (3g) salt. Set aside. This ensures even distribution of leavening agents.
- Cream Butter and Sugar: Using an electric mixer, beat 1 cup (227g) softened unsalted butter with 2 cups (400g) granulated sugar on medium-high speed until light and fluffy—about 3-5 minutes. The mixture should look pale and airy. This step is crucial for a tender crumb.
- Add Eggs and Vanilla: Beat in 4 large eggs, one at a time, making sure each is fully incorporated before adding the next. Then stir in 2 teaspoons (10ml) pure vanilla extract. Scrape down the sides with a spatula as needed.
- Alternate Adding Dry Ingredients and Milk: Reduce mixer speed to low. Add the dry flour mixture in three additions, alternating with 1 cup (240ml) room temperature whole milk, starting and ending with flour. Mix just until combined—overmixing can make the cake tough. This should take about 2-3 minutes total.
- Divide Batter and Bake: Pour the batter evenly into the prepared pans. Tap the pans gently on the counter to release any air bubbles. Bake for 30-35 minutes, or until a toothpick inserted in the center comes out clean. The cakes should spring back when lightly pressed.
- Cool Completely: Let the cakes cool in the pans for 10 minutes, then turn them out onto wire racks to cool completely before frosting. This prevents the frosting from melting. Cooling usually takes 1-2 hours.
- Prepare Buttercream Frosting: Beat 1 cup (227g) softened unsalted butter on medium speed until creamy. Gradually add 4 cups (480g) sifted powdered sugar, mixing slowly at first to avoid a sugar cloud, then bump up to medium speed. Add 2 teaspoons (10ml) vanilla extract and 2-4 tablespoons (30-60ml) heavy cream or milk to reach a smooth, spreadable consistency. Add a pinch of salt to balance sweetness. Beat for 3-5 minutes until light and fluffy.
- Level the Cakes: Use a serrated knife or cake leveler to trim the dome off the top of each cake layer, creating a flat surface for stacking. This step helps the tiers sit evenly.
- Assemble the Cake: Place the 8-inch layer on your serving plate. Spread a thick, even layer of buttercream on top (about ½ inch or 1.3 cm). Add the 6-inch cake layer on top carefully. Apply a thin crumb coat over the whole cake to seal in crumbs. Chill in the fridge for 20 minutes.
- Final Frosting: Apply a generous final coat of buttercream using an offset spatula. Smooth the sides and top as best as you can. Don’t stress about perfection—rustic charm counts! Chill again for 15 minutes if needed.
Pro tip: If your buttercream feels too stiff, add a splash more milk. If it’s too soft, pop it in the fridge for 10 minutes to firm up. Patience is key when frosting—go slow to avoid tearing the cake. Once your cake looks good, you’re ready to celebrate!
Cooking Tips & Techniques
Buttercream frosting can be intimidating, but I’ve learned a few tricks that helped me master it for this two-tier vanilla buttercream graduation cake.
- Room Temperature Ingredients: Always start with butter and eggs at room temperature. Cold ingredients don’t blend well and can leave lumps or cause the batter to curdle.
- Sift Powdered Sugar: This keeps your frosting smooth and lump-free. Trust me, it’s worth the extra step.
- Beat Butter First: Whip the butter alone until creamy before adding sugar. This creates a lighter texture.
- Go Slow with Sugar: Add powdered sugar gradually to avoid a powdery cloud in your kitchen and to ensure it incorporates fully.
- Crumb Coat is Your Friend: Applying a thin layer of frosting before the final coat traps crumbs, giving you a clean finish.
- Chill Between Steps: Cooling the cake before frosting and chilling after the crumb coat helps the buttercream set up and makes smoothing easier.
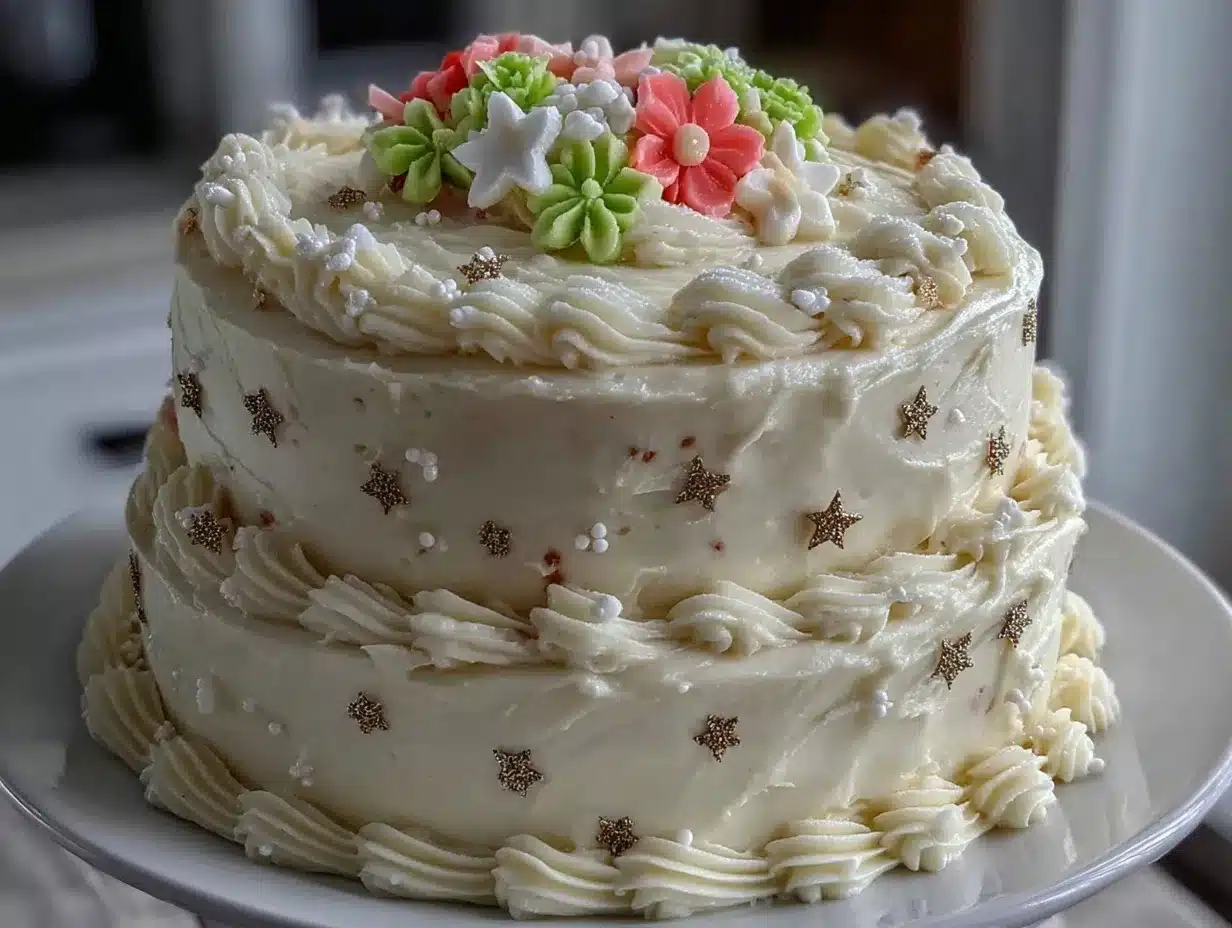
- Stacking Tiers: Make sure cake layers are completely cool and level. If you want to get fancy, add dowels or straws for extra support, but for a beginner-friendly cake, leveling and chilling usually do the trick.
One time, I tried rushing the cooling step and ended up with a melty mess of frosting sliding off the sides—lesson learned the hard way! Also, don’t forget to scrape the bowl sides frequently while mixing to avoid uneven texture. And if you find yourself frosting late at night (been there!), a little music and patience make all the difference.
Variations & Adaptations
This easy two-tier vanilla buttercream graduation cake is a great base for creative twists. Here are some ideas you can try:
- Flavor Swaps: Add a teaspoon of almond extract or lemon zest to the batter and frosting for a fresh flavor boost.
- Chocolate Layer: Substitute ½ cup (60g) of flour with unsweetened cocoa powder to create a chocolate layer for a fun two-tone effect.
- Berry Filling: Add a thin layer of raspberry jam or fresh berry compote between tiers for a tart contrast to the sweet buttercream.
- Dairy-Free Version: Use dairy-free butter and milk substitutes like coconut cream and almond milk to make it vegan-friendly.
- Decorations: Top with fresh flowers, edible glitter, or piped rosettes made with your leftover buttercream for a personalized touch.
I once made a version with lavender-infused buttercream for a friend’s graduation, and it was surprisingly delightful. If you want to switch up the assembly, try making a single-tier version using just the 8-inch pans for an easier start. For a quicker option, you could bake the cake layers a day ahead and assemble the next day to save time.
Serving & Storage Suggestions
This two-tier vanilla buttercream graduation cake tastes best served at room temperature. Take it out of the fridge about 30 minutes before slicing to let the buttercream soften slightly. A sharp serrated knife works best for clean slices.
Pair it with a light beverage like iced tea, lemonade, or even a sparkling mocktail to balance the sweetness. For a party spread, you might want to serve alongside some lighter treats like the snowball cookies or the cranberry orange bread for a nice mix of flavors.
Leftovers can be stored in an airtight container in the refrigerator for up to 4 days. To freeze, wrap the cake tightly in plastic wrap and foil, then freeze for up to 2 months. Thaw overnight in the fridge before serving. When reheating slices, a few seconds in the microwave (about 10-15 seconds) helps soften the frosting without melting it completely.
Over time, the flavors mellow and the cake becomes even more moist—if you can wait that long! But honestly, this cake rarely lasts that long in our house.
Nutritional Information & Benefits
Each slice of this vanilla buttercream graduation cake delivers about 450 calories, depending on slice size. It’s rich in carbs and fats, primarily from sugar and butter, so it’s definitely a treat to enjoy in moderation.
The cake includes wholesome ingredients like eggs and milk, which provide protein and calcium. Using real vanilla extract adds a natural flavor without artificial additives. If you choose dairy-free or gluten-free substitutions, the recipe can accommodate many dietary needs, but be mindful of allergens like nuts if adding flavor variations.
While this cake isn’t a health food, sharing it during special moments brings joy and connection, which I believe is a key ingredient in any good recipe.
Conclusion
This easy two-tier vanilla buttercream graduation cake is a perfect project for beginners wanting to create something memorable without the stress. It’s forgiving, straightforward, and delicious—an honest recipe that’s as much about the experience as the result.
Feel free to tweak it to your own taste, try the variations, or add your personal flair with decorations or fillings. I love this cake because it’s proof that even a novice baker can pull off a stunning centerpiece with a little patience and care.
Give it a shot, and if you do, I’d love to hear how your cake turned out—drop a comment or share your photos! Celebrations deserve a homemade touch, and this cake makes that both achievable and enjoyable.
FAQs
Can I use cake mix instead of making the cake from scratch?
Yes, you can substitute with a high-quality vanilla cake mix to save time. Just make sure to adjust baking times as per the package instructions and use a homemade buttercream to keep that fresh flavor.
How do I keep the two tiers from sliding?
Level your cake layers carefully and apply a thin crumb coat before the final frosting. Chilling the cake between frosting layers firms up the buttercream, providing stability. For extra support, you can insert dowels or straws inside the bottom tier.
Can I make this cake ahead of time?
Absolutely! Bake the layers up to two days ahead and store them wrapped tightly at room temperature. Assemble and frost the cake the day of your event for best freshness.
What if my buttercream is too soft or too stiff?
If it’s too soft, chill it in the fridge for 10-15 minutes and then rewhip before frosting. If it’s too stiff, add a tablespoon of milk or cream at a time until you reach the desired consistency.
How do I get a smooth finish on the buttercream?
Use an offset spatula and smooth the frosting by turning the cake on a turntable if you have one. Applying a crumb coat and chilling before the final coat helps achieve a cleaner finish. Warm your spatula slightly by dipping it in hot water and wiping dry for extra smoothness.
Pin This Recipe!
Easy Two-Tier Vanilla Buttercream Graduation Cake Recipe for Beginners

A beginner-friendly, easy two-tier vanilla buttercream cake perfect for graduation celebrations, featuring fluffy layers and smooth, creamy frosting.
- Prep Time: 20 minutes
- Cook Time: 35 minutes
- Total Time: 2 hours
- Yield: 12 servings 1x
- Category: Dessert
- Cuisine: American
Ingredients
- 3 cups (360g) all-purpose flour, sifted
- 1 tablespoon (15g) baking powder
- ½ teaspoon (3g) salt
- 1 cup (227g) unsalted butter, softened
- 2 cups (400g) granulated sugar
- 4 large eggs, room temperature
- 2 teaspoons (10ml) pure vanilla extract
- 1 cup (240ml) whole milk, room temperature
- 1 cup (227g) unsalted butter, softened (for frosting)
- 4 cups (480g) powdered sugar, sifted
- 2 teaspoons (10ml) pure vanilla extract (for frosting)
- 2–4 tablespoons (30-60ml) heavy cream or whole milk (for frosting)
- Pinch of salt (for frosting)
Instructions
- Preheat oven to 350°F (175°C). Grease and flour 6-inch and 8-inch cake pans or line with parchment paper.
- In a medium bowl, whisk together sifted flour, baking powder, and salt. Set aside.
- Using an electric mixer, beat softened butter and granulated sugar on medium-high speed until light and fluffy, about 3-5 minutes.
- Beat in eggs one at a time, fully incorporating each before adding the next. Stir in vanilla extract.
- Reduce mixer speed to low. Add dry ingredients in three additions, alternating with milk, starting and ending with flour. Mix just until combined.
- Divide batter evenly into prepared pans. Tap pans gently to release air bubbles.
- Bake for 30-35 minutes or until a toothpick inserted in the center comes out clean. Cakes should spring back when lightly pressed.
- Cool cakes in pans for 10 minutes, then turn out onto wire racks to cool completely (1-2 hours).
- For frosting, beat softened butter on medium speed until creamy. Gradually add sifted powdered sugar, mixing slowly at first, then medium speed.
- Add vanilla extract, heavy cream or milk, and a pinch of salt. Beat for 3-5 minutes until light and fluffy.
- Level the cakes by trimming domes off the tops with a serrated knife or cake leveler.
- Place the 8-inch cake layer on serving plate. Spread about ½ inch (1.3 cm) thick layer of buttercream on top.
- Carefully place the 6-inch cake layer on top. Apply a thin crumb coat over the entire cake and chill for 20 minutes.
- Apply a generous final coat of buttercream using an offset spatula. Smooth sides and top as best as possible.
- Chill again for 15 minutes if needed before serving.
Notes
Use room temperature ingredients for best results. Sift flour and powdered sugar to avoid lumps. Chill cake between frosting steps to firm buttercream and improve stability. If buttercream is too stiff, add milk; if too soft, chill before frosting. Level cake layers for stable stacking. Dowels or straws can be added for extra tier support.
Nutrition
- Serving Size: 1 slice (1/12 of cak
- Calories: 450
- Sugar: 45
- Sodium: 220
- Fat: 22
- Saturated Fat: 14
- Carbohydrates: 60
- Fiber: 1
- Protein: 4
Keywords: vanilla cake, two-tier cake, buttercream frosting, graduation cake, beginner cake recipe, celebration cake, easy cake recipe


