It was one of those chilly February mornings when the idea of breakfast felt more like a chore than a treat. I had barely managed to get the coffee started before the kids were already clamoring for something fun and festive. Honestly, I wasn’t aiming for anything fancy—just something quick. But then I remembered a half-forgotten bag of cocoa powder and a splash of red food coloring lurking in the back of the pantry. That’s when the fluffy heart-shaped red velvet pancakes with cream cheese glaze came to life, almost by accident.
I was skeptical at first—heart-shaped pancakes? Red velvet in breakfast? But as the batter sizzled and the kitchen filled with that warm, cocoa-y aroma, I found myself grinning. The glaze, tangy and sweet, was an afterthought that turned out to be the real star. By the time the pancakes were stacked high and drizzled with that luscious cream cheese glaze, even my picky eater was all smiles.
There’s something quietly satisfying about making a simple morning feel special without fuss. These pancakes stuck with me because they’re not just cute—they’re genuinely delicious and surprisingly easy. They carry just enough sweetness and a hint of cocoa to feel indulgent without tipping into dessert territory. I guess that’s why I keep coming back to this recipe, especially when I want to share a little love without the stress.
Why You’ll Love This Recipe
- Quick & Easy: Whips up in about 20 minutes, perfect for busy Valentine’s mornings or whenever you want a special breakfast without the wait.
- Simple Ingredients: Uses pantry staples like cocoa powder, buttermilk, and a touch of red food coloring—nothing too fancy or hard to find.
- Perfect for Valentine’s Day: The heart shapes and red velvet flavor make it a charming way to say “I love you” over breakfast.
- Crowd-Pleaser: Kids and adults both adore the soft texture and the creamy glaze—no leftovers, I promise!
- Unbelievably Delicious: The subtle cocoa flavor combined with the tangy cream cheese glaze is pure comfort food with a romantic twist.
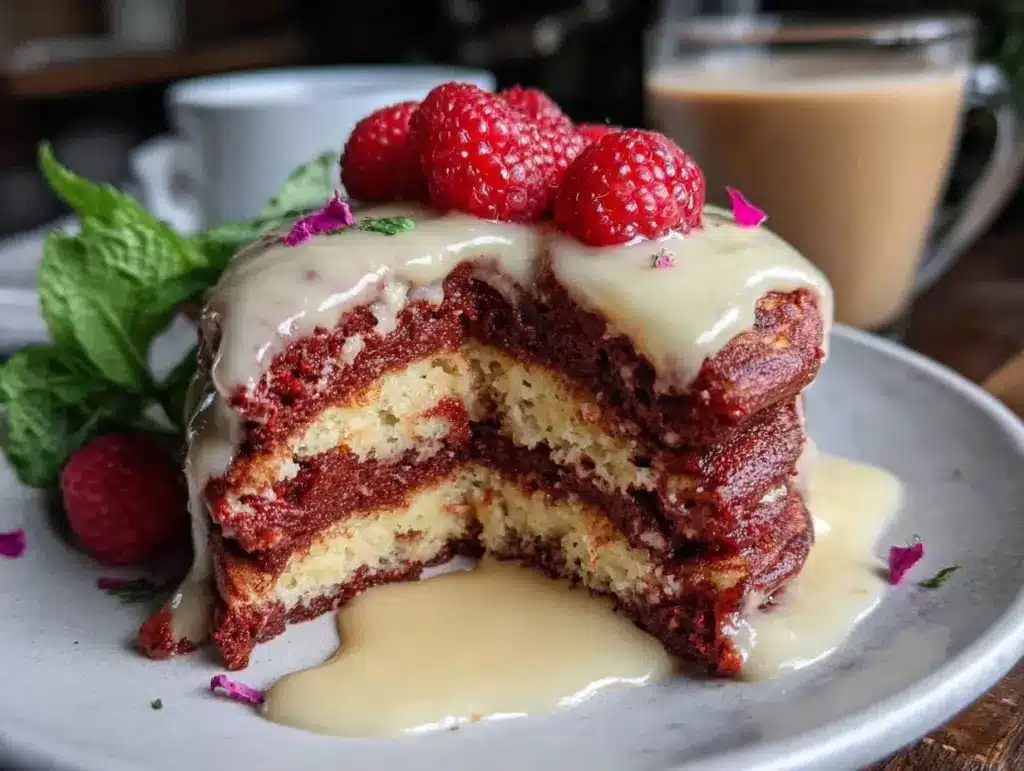
- This recipe isn’t your average pancake—it’s the one I’ve tweaked after several tries to get the fluffiest texture and the perfect glaze consistency. The batter is just thick enough to hold those heart shapes without running all over the griddle, and the glaze is smooth and spreadable, not too sweet.
- It’s like the pancakes close their eyes and sigh contentedly after the first bite—and honestly, that’s the kind of breakfast worth waking up for.
What Ingredients You Will Need
This recipe uses simple, wholesome ingredients to deliver bold flavor and satisfying texture without the fuss. Most of these are pantry staples, and you can find substitutions easily if needed.
- All-purpose flour: 1 1/2 cups (180g), for the pancake base
- Cocoa powder: 2 tablespoons unsweetened (I like Hershey’s for a rich flavor)
- Baking powder: 1 1/2 teaspoons, to keep pancakes fluffy
- Baking soda: 1/2 teaspoon, helps with rise and texture
- Salt: 1/4 teaspoon, balances sweetness
- Granulated sugar: 1/4 cup (50g), adds mild sweetness
- Buttermilk: 1 1/4 cups (300ml), room temperature (if unavailable, mix milk with 1 tablespoon vinegar for 5 minutes)
- Egg: 1 large, room temperature
- Unsalted butter: 3 tablespoons, melted plus extra for the pan (I use Kerrygold for richness)
- Vanilla extract: 1 teaspoon, for warm flavor notes
- Red food coloring: 1 tablespoon (gel or liquid works fine to get that signature red velvet hue)
For the cream cheese glaze:
- Cream cheese: 4 ounces (115g), softened to room temperature
- Powdered sugar: 3/4 cup (90g), sifted for smoothness
- Milk: 2-3 tablespoons, to thin the glaze as needed (whole milk or cream works best)
- Vanilla extract: 1/2 teaspoon, adds gentle aroma
Substitution tips: Use almond or oat milk to make the glaze dairy-free, and swap all-purpose flour with gluten-free blend for a gluten-free option. For a natural color boost, beet powder can replace food coloring.
Equipment Needed
- Non-stick skillet or griddle: Essential for even cooking and easy flipping (I prefer cast iron for heat retention, but a non-stick pan is fine).
- Heart-shaped pancake mold or ring: Optional but helpful for neat, consistent shapes. You can also freehand pour if you’re feeling confident.
- Mixing bowls: One large for dry ingredients, one for wet.
- Whisk or electric mixer: For smooth batter and glaze mixing.
- Measuring cups and spoons: Accuracy helps maintain fluffiness and flavor balance.
- Spatula: Flexible, heat-resistant for flipping pancakes gently.
- Sifter or fine mesh sieve: To avoid lumps in dry ingredients and powdered sugar.
If you don’t have a pancake mold, no worries. Pour the batter slowly into heart shapes using a spoon or small ladle, and use a toothpick to nudge shapes into place. My old silicone molds have lasted years with simple hand-washing, so don’t stress about fancy gear.
Preparation Method
- Mix dry ingredients: In a large bowl, sift together 1 1/2 cups (180g) all-purpose flour, 2 tablespoons cocoa powder, 1 1/2 teaspoons baking powder, 1/2 teaspoon baking soda, 1/4 teaspoon salt, and 1/4 cup (50g) granulated sugar. This ensures no lumps and even distribution. (Prep time: 5 minutes)
- Whisk wet ingredients: In a separate bowl, combine 1 1/4 cups (300ml) buttermilk, 1 large egg, 3 tablespoons melted unsalted butter, 1 teaspoon vanilla extract, and 1 tablespoon red food coloring. Whisk until smooth and uniform. (Prep time: 3 minutes)
- Combine wet and dry: Pour wet ingredients into the dry mix. Stir gently with a spatula until just combined—don’t overmix. The batter will be thick and slightly lumpy, which is perfect. (Prep time: 2 minutes)
- Preheat skillet: Warm your non-stick pan or griddle over medium heat. Brush lightly with butter. (Prep time: 2 minutes)
- Form heart shapes: If using molds, place them on the skillet and pour about 1/4 cup (60ml) batter into each. If freehanding, carefully spoon batter and use a toothpick to shape hearts. Cook for 2-3 minutes until bubbles form and edges look set. (Cooking time: 3 minutes)
- Flip pancakes: Carefully remove molds if used, then flip pancakes gently using a spatula. Cook for another 2 minutes until cooked through and springy to the touch. (Cooking time: 2 minutes)
- Keep warm and repeat: Transfer finished pancakes to a warm plate or low oven while cooking remaining batter. Lightly butter the skillet between batches if needed.
- Prepare cream cheese glaze: In a bowl, beat 4 ounces (115g) softened cream cheese until smooth. Gradually add 3/4 cup (90g) powdered sugar, then 1/2 teaspoon vanilla extract. Thin with 2-3 tablespoons milk until pourable but thick enough to coat. (Prep time: 5 minutes)
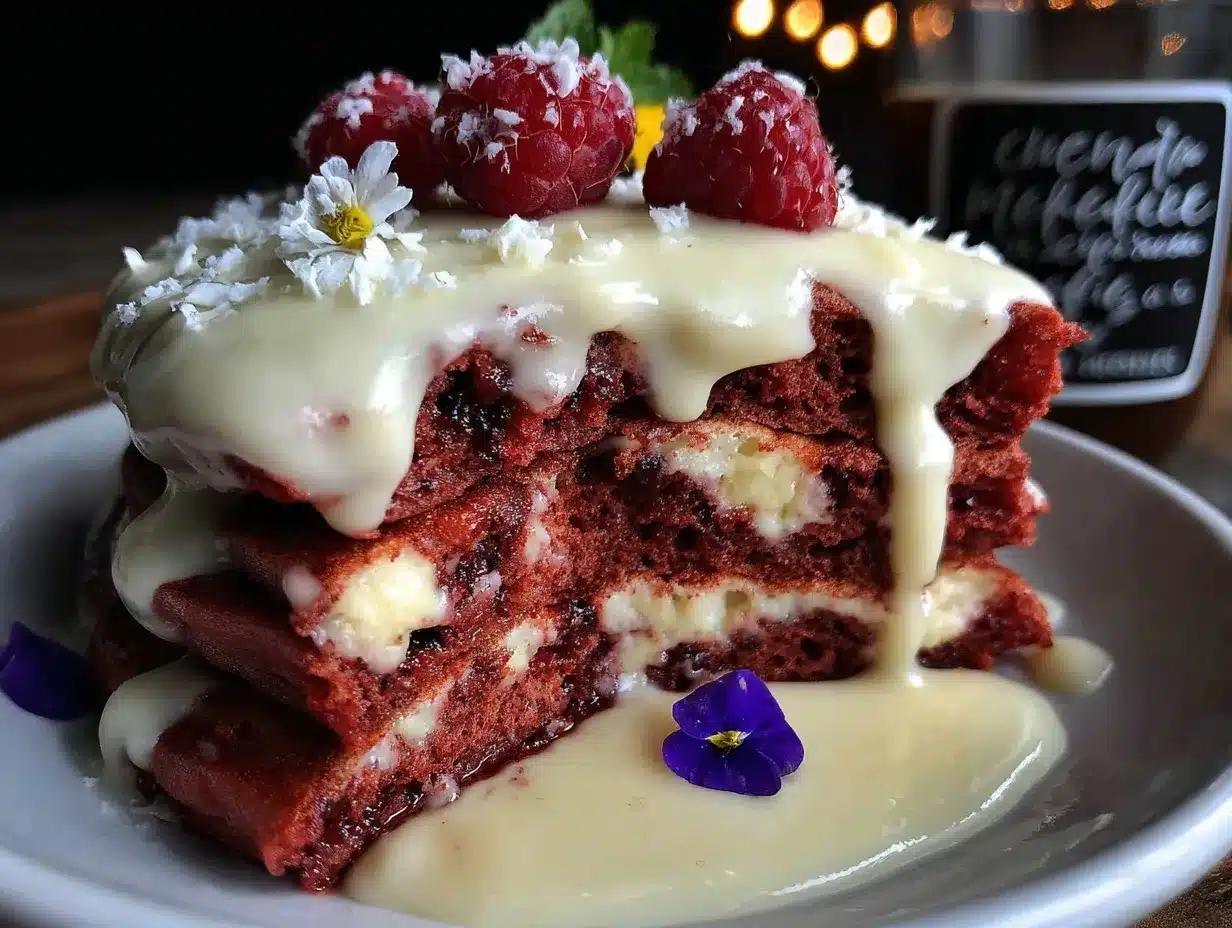
- Serve: Stack pancakes, drizzle generously with cream cheese glaze, and (if you want) sprinkle with a few fresh berries or chopped nuts for texture. (Serving time: immediate)
- Troubleshooting: If pancakes are flat, check your baking powder freshness. If batter is too thick to pour, add a splash of buttermilk. If glaze is too runny, add more powdered sugar a teaspoon at a time.
Cooking Tips & Techniques
One thing I learned the hard way is that batter temperature matters. Cold batter straight from the fridge can lead to uneven cooking and less fluffiness. Honestly, letting the batter rest at room temp for 10 minutes before cooking makes a difference you can taste.
When pouring the batter, patience is key. Pour slowly and let the batter settle before shaping. That’s why I like using a silicone mold for the heart shapes—it keeps things tidy and consistent. If you’re free-handing, a toothpick is your best friend for nudging the batter edges.
Flipping pancakes too early is a rookie mistake. Wait for bubbles all over and edges that look set but not dry. Flip gently to avoid deflating the fluff. And don’t press down on the pancakes—that squashes all that lovely air you worked for.
As for the glaze, make sure your cream cheese is properly softened to avoid lumps. If you want a thinner glaze, add milk gradually; too much at once can make it runny fast. I usually keep a little extra powdered sugar on hand to thicken it back up if needed.
Lastly, multitasking helps—while pancakes cook, whip up the glaze. This way, everything comes together hot and fresh. I often keep pancakes warm in a low oven (around 200°F / 90°C) to avoid that “cold pancake” disappointment.
Variations & Adaptations
- Dietary Swap: Use almond flour or a gluten-free blend to make these pancakes gluten-free. Swap dairy buttermilk for almond or oat milk mixed with lemon juice for a dairy-free buttermilk alternative.
- Flavor Boost: Add a pinch of cinnamon or a teaspoon of espresso powder to the batter to deepen the flavor profile. A touch of orange zest in the glaze adds a fresh zing that pairs beautifully with the cocoa.
- Seasonal Twist: Mix fresh or frozen raspberries into the batter for bursts of tartness. Or sprinkle chopped pecans on the pancakes just after flipping for a lovely crunch.
- Cooking Method: Try making mini pancakes without molds for a more casual stack. Or bake the batter in a greased muffin tin for red velvet pancake muffins.
- One variation I adore is swapping the cream cheese glaze for a whipped mascarpone with a drizzle of honey. It’s luxurious and slightly lighter, perfect for a brunch that needs to feel special but not heavy.
Serving & Storage Suggestions
Serve these fluffy heart-shaped red velvet pancakes warm, straight from the griddle, with a generous drizzle of cream cheese glaze. A scattering of fresh strawberries or raspberries adds a pop of color and a tart contrast.
They pair wonderfully with a cup of strong black coffee or a creamy chai latte. For a more festive feel, a glass of sparkling rosé or a berry mocktail makes a fun accompaniment.
Leftovers can be stored in the refrigerator, tightly wrapped, for up to 2 days. Reheat in a toaster oven or on a non-stick skillet over low heat to keep them from drying out.
If you want to freeze them, separate each pancake with parchment paper in an airtight container or freezer bag. Freeze for up to 1 month. Reheat gently in the microwave or oven, then add fresh glaze before serving.
Flavors actually mellow and blend a bit after resting, so sometimes I prefer making the batter the night before and cooking pancakes fresh the next morning. The red velvet flavor deepens, and the texture stays just as fluffy.
Nutritional Information & Benefits
Each serving (about 3 pancakes with glaze) contains approximately 320 calories, 12g fat, 40g carbohydrates, and 6g protein. The use of buttermilk adds calcium and probiotics, supporting digestion and bone health.
Cocoa powder brings antioxidants, while the cream cheese glaze provides a source of calcium and vitamin A. This recipe is moderate in sugar compared to traditional red velvet cakes, making it a more balanced indulgence.
For those monitoring allergens, this recipe contains gluten, dairy, and eggs but can be adapted to be gluten-free and dairy-free with substitutions. It’s a treat that fits well into a balanced diet when enjoyed occasionally.
Personally, I appreciate how this recipe brings a little joy without the heaviness—breakfast that feels festive but doesn’t weigh you down for the day ahead.
Conclusion
These fluffy heart-shaped red velvet pancakes with cream cheese glaze have become my go-to for making mornings feel a bit more special. Whether it’s Valentine’s Day or a random Tuesday, they bring smiles and a comforting sweetness that lasts beyond the plate.
Feel free to play around with the shape, swap ingredients to fit your needs, or add your own toppings. The best part about this recipe is how easy it is to make your own.
For me, it’s not just about the taste—it’s the small ritual of mixing, pouring, and sharing something homemade that makes these pancakes stick in my heart.
I’d love to hear how you customize yours—drop a comment or share your twists. Here’s to cozy mornings filled with simple love and a little bit of red velvet magic.
FAQs
Can I make the batter ahead of time?
Yes, you can prepare the batter the night before and refrigerate it. Just give it a gentle stir before cooking. The pancakes might be slightly denser but still delicious.
What if I don’t have red food coloring?
You can substitute with beet juice or beet powder for natural coloring. The flavor will be similar, but the pancakes might be less vibrant red.
How do I keep pancakes warm without drying them out?
Place cooked pancakes on a baking sheet in a low oven set to 200°F (90°C). Cover loosely with foil to retain moisture.
Can I freeze these pancakes?
Absolutely! Freeze in a single layer with parchment paper between each pancake. Reheat in the toaster or oven when ready to eat.
Is there a vegan version of this recipe?
You can try using plant-based milk with vinegar as buttermilk, flax or chia eggs instead of regular eggs, and vegan cream cheese for the glaze. The texture will vary, but it’s a tasty alternative.
Pin This Recipe!
Fluffy Heart-Shaped Red Velvet Pancakes Recipe with Cream Cheese Glaze Perfect for Valentines

These fluffy heart-shaped red velvet pancakes with a tangy cream cheese glaze are perfect for a special Valentine’s Day breakfast or any festive morning. They combine a subtle cocoa flavor with a soft texture and a luscious glaze that delights kids and adults alike.
- Prep Time: 17 minutes
- Cook Time: 5 minutes
- Total Time: 22 minutes
- Yield: About 12 pancakes (3 pancakes per serving, serves 4) 1x
- Category: Breakfast
- Cuisine: American
Ingredients
- 1 1/2 cups (180g) all-purpose flour
- 2 tablespoons unsweetened cocoa powder
- 1 1/2 teaspoons baking powder
- 1/2 teaspoon baking soda
- 1/4 teaspoon salt
- 1/4 cup (50g) granulated sugar
- 1 1/4 cups (300ml) buttermilk, room temperature
- 1 large egg, room temperature
- 3 tablespoons unsalted butter, melted plus extra for the pan
- 1 teaspoon vanilla extract
- 1 tablespoon red food coloring (gel or liquid)
- For the cream cheese glaze:
- 4 ounces (115g) cream cheese, softened to room temperature
- 3/4 cup (90g) powdered sugar, sifted
- 2–3 tablespoons milk (whole milk or cream preferred)
- 1/2 teaspoon vanilla extract
Instructions
- In a large bowl, sift together all-purpose flour, cocoa powder, baking powder, baking soda, salt, and granulated sugar to ensure no lumps and even distribution.
- In a separate bowl, whisk together buttermilk, egg, melted unsalted butter, vanilla extract, and red food coloring until smooth and uniform.
- Pour the wet ingredients into the dry ingredients and stir gently with a spatula until just combined; the batter should be thick and slightly lumpy.
- Preheat a non-stick skillet or griddle over medium heat and brush lightly with butter.
- If using heart-shaped molds, place them on the skillet and pour about 1/4 cup batter into each. If freehanding, spoon batter carefully and use a toothpick to shape hearts.
- Cook pancakes for 2-3 minutes until bubbles form and edges look set.
- Remove molds if used, then flip pancakes gently and cook for another 2 minutes until cooked through and springy to the touch.
- Transfer finished pancakes to a warm plate or low oven while cooking remaining batter, lightly buttering the skillet between batches if needed.
- To prepare the cream cheese glaze, beat softened cream cheese until smooth. Gradually add powdered sugar, then vanilla extract. Thin with milk until pourable but thick enough to coat.
- Stack pancakes, drizzle generously with cream cheese glaze, and optionally sprinkle with fresh berries or chopped nuts before serving.
Notes
Let the batter rest at room temperature for 10 minutes before cooking for better fluffiness. Pour batter slowly and use a toothpick to shape hearts if freehanding. Flip pancakes only when bubbles form and edges look set to avoid deflating. Keep cream cheese softened to avoid lumps in glaze. Keep pancakes warm in a low oven (200°F/90°C) while cooking remaining batter. For dairy-free or gluten-free options, substitute ingredients as suggested in the blog.
Nutrition
- Serving Size: 3 pancakes with crea
- Calories: 320
- Fat: 12
- Carbohydrates: 40
- Protein: 6
Keywords: red velvet pancakes, heart-shaped pancakes, cream cheese glaze, Valentine's Day breakfast, fluffy pancakes, cocoa pancakes, festive breakfast


