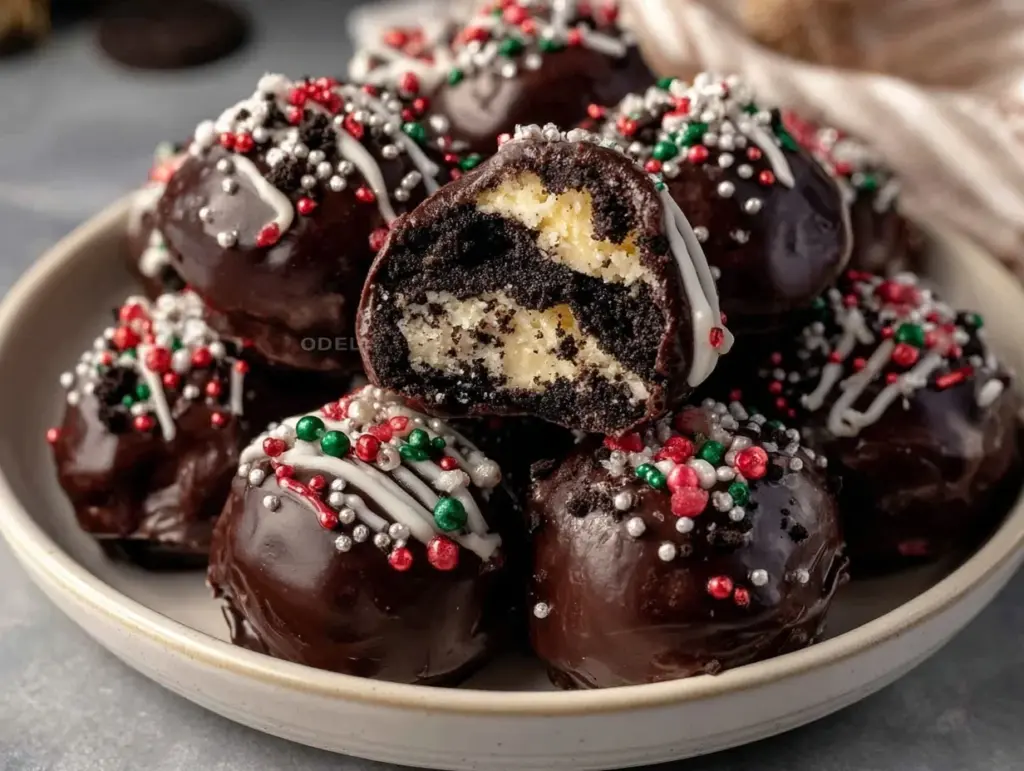
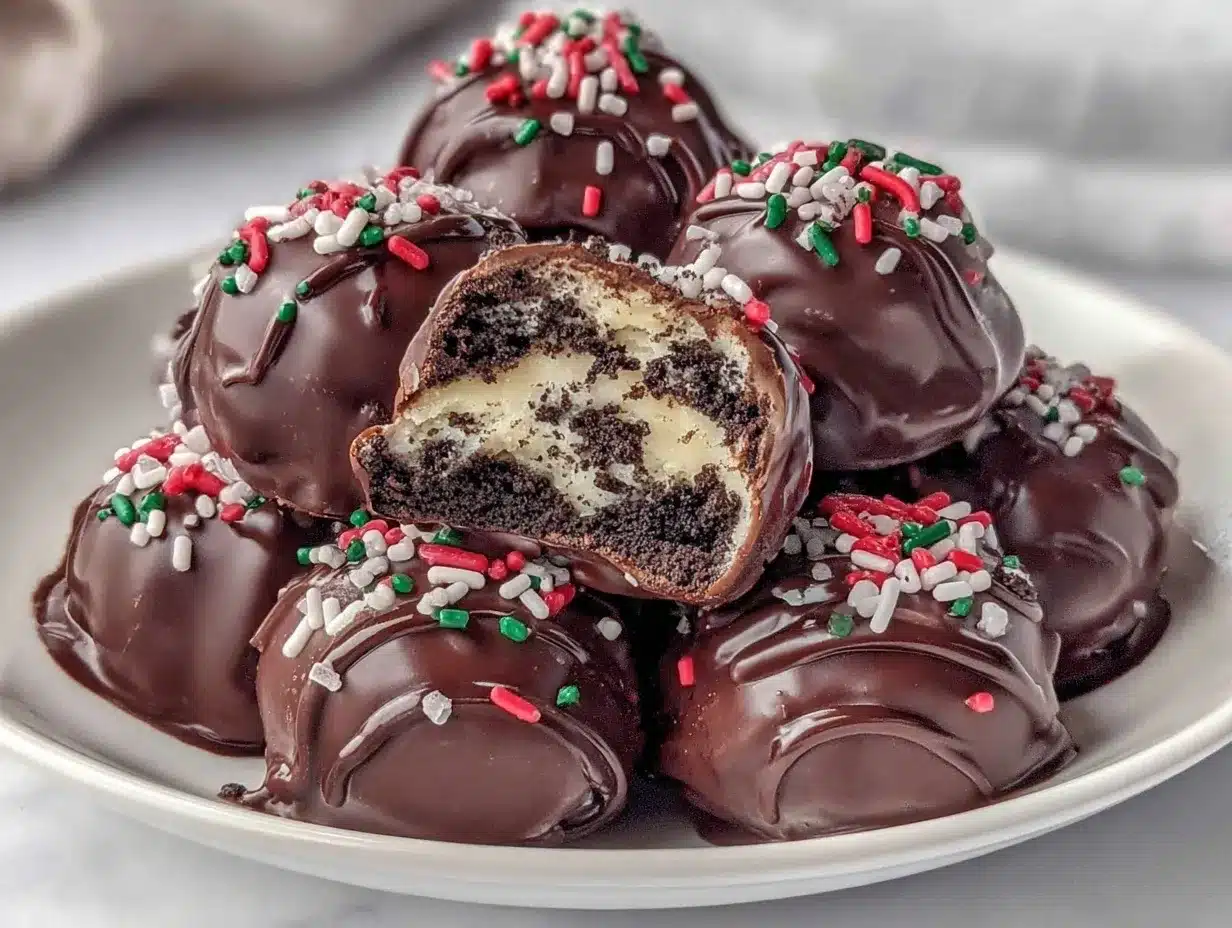
Let me paint you a picture—the sweet, chocolatey aroma of crushed Oreo cookies swirling together with smooth cream cheese, all wrapped up in a shell of glossy chocolate and jeweled with holiday sprinkles. That’s the magic of Oreo truffles, and let me tell you, these festive treats are dangerously easy to make and totally irresistible. The first time I rolled these little gems, it was one of those kitchen moments that stops you in your tracks. I took a bite, closed my eyes, and just smiled. It was pure, nostalgic comfort—like the best parts of childhood wrapped in chocolate.
Years ago, when I was knee-high to a grasshopper, my grandma would make fudge for every holiday. But honestly, once I stumbled upon Oreo truffles at a bake sale (thanks, random PTA mom!)—I wish I’d known about them sooner. They’re even easier than fudge, and the creamy-chocolate combo is a total crowd-pleaser. My family can’t resist sneaking them off the cooling rack (and I can’t really blame them). Whether it’s a snowy weekend, a last-minute party, or just a need for a little cheer, these truffles deliver every time.
The best part? You don’t need fancy ingredients or a pastry chef’s skill set. Just Oreos, cream cheese, chocolate, and sprinkles. That’s it! And the decorating possibilities are endless—think red and green sprinkles for Christmas, pastel colors for Easter, or classic chocolate drizzle for any occasion. Perfect for potlucks, gifting, or just brightening up your Pinterest holiday board. I’ve tested this Oreo truffles recipe more times than I care to admit (in the name of research, of course), and it’s now a staple at every family gathering. Trust me, you’re going to want to bookmark this one—it feels like a warm, chocolatey hug every time.
Why You’ll Love This Oreo Truffles Recipe
If you’ve been hunting for an easy holiday treat that checks every box, stop right here—Oreo truffles with festive sprinkles are the answer. After years of recipe testing (and more failed batches than I’d like to admit), I can honestly say these are a home run every single time. Here’s why they stand out:
- Quick & Easy: Comes together in under 45 minutes—no baking required! Perfect for busy holiday schedules or those “oops, I forgot” moments.
- Simple Ingredients: Just Oreos, cream cheese, chocolate, and sprinkles. You probably already have everything in your pantry.
- Perfect for Gifting & Parties: These look gorgeous on a cookie tray and make adorable homemade gifts. Dress them up with festive sprinkles or colored chocolate for any holiday.
- Crowd-Pleaser: Kids, teens, adults—everyone swoons for these. I’ve seen people sneak seconds (and thirds) at every party.
- Unbelievably Delicious: Creamy inside, with a rich chocolate shell and that little crunch from sprinkles. It’s a texture-and-flavor dream.
Here’s what makes my Oreo truffles recipe different: I use a little less cream cheese than most recipes, so the filling stays firm and not too gooey. Plus, I chill the truffles twice to get that perfect snap on the chocolate. If you’ve tried other recipes and ended up with runny centers or cracked chocolate, this one solves those problems. The balance of crushed cookies and cream cheese is just right, and the festive sprinkles add a cheerful crunch (and let’s face it, they look so cute!).
This is more than just a good treat—it’s the kind of recipe that makes you pause and savor the moment. Comfort food, but with a little holiday sparkle. Whether you’re impressing guests or just treating yourself, these Oreo truffles turn a simple sweet into something memorable, every single time.
What Ingredients You Will Need
Oreo truffles are all about simple, bold flavors using pantry staples. You won’t need a grocery list as long as your arm—just a few trusty items that come together for the ultimate holiday treat. Here’s what you’ll need (and a few tips I’ve learned along the way):
- For the Filling:
- 36 Oreo cookies (about 1 standard package; any flavor works—classic chocolate is my go-to)
- 8 oz (225 g) cream cheese, softened (full-fat for the creamiest texture; you can use low-fat, but the truffles will be a little softer)
- For the Coating:
- 12 oz (340 g) semisweet or milk chocolate chips (use high-quality chocolate for a smooth shell; I’m partial to Guittard or Ghirardelli)
- 1 tbsp (15 ml) coconut oil or vegetable shortening (optional, helps thin the chocolate for easier dipping)
- For Decorating:
- Holiday sprinkles (red, green, white, gold—go wild! Jimmies, nonpareils, or sanding sugar all work)
- White chocolate chips or candy melts (optional, for drizzling or extra flair)
Ingredient Tips:
- Oreos: You can use any flavor—peppermint for Christmas, golden for spring. Gluten-free Oreos work beautifully, too.
- Cream Cheese: Let it come to room temp for easy blending. For dairy-free, use plant-based cream cheese (I’ve tried Kite Hill, and it works!).
- Chocolate: If you’re feeling fancy, use couverture chocolate. For a nutty twist, try adding a tablespoon of peanut butter to the filling.
- Sprinkles: The more colors, the merrier. I stock up after every holiday for next year’s batch!
Honestly, you can swap and switch the ingredients to suit your taste or dietary needs. Almond flour Oreos? Check. Vegan cream cheese? Double check. In summer, swap holiday sprinkles for crushed freeze-dried berries—it’s a fun twist. This recipe is all about flexibility, but the classic combo is always a winner.
Equipment Needed
You don’t need a fancy kitchen setup for Oreo truffles—just a couple of basics and maybe a few helpful extras. Here’s what’s tried and true in my kitchen:
- Food processor or blender (for crushing Oreos—if you don’t have one, pop them in a zip-top bag and smash with a rolling pin)
- Mixing bowl (medium size works great)
- Rubber spatula (for scraping down every last bit of filling)
- Baking sheet or tray (lined with parchment paper for mess-free chilling)
- Small cookie scoop or tablespoon (for portioning—makes things much easier)
- Forks or dipping tools (for coating truffles in melted chocolate)
- Microwave-safe bowl or double boiler (for melting chocolate)
- Wire rack (optional, but handy for letting excess chocolate drip off)
If you’re on a budget, don’t worry—a simple bowl and spoon will do the trick. I’ve made these with nothing but a plastic bag and a wooden spoon, and they still turn out great. Just clean your equipment well (chocolate can be a little sticky), and you’ll be set for batch after batch. If you use a food processor, pulse in short bursts—it keeps the filling nice and crumbly.
Preparation Method
Ready to make the ultimate Oreo truffles with holiday sprinkles? Here’s the step-by-step method I trust (with all my little tricks built in):
-
Crush the Oreos:
- Place 36 Oreo cookies (about 400 g) in a food processor. Pulse until you get fine crumbs. If using a bag and rolling pin, smash until there are no big chunks left.
- Set aside 2 tablespoons (about 16 g) of crumbs for decorating, if you like.
-
Mix the Filling:
- Add 8 oz (225 g) softened cream cheese to the crushed Oreos. Blend or mix until fully combined—no streaks of cream cheese should remain.
- The mixture will be thick and slightly sticky (don’t worry, this is normal!).
-
Shape the Truffles:
- Use a small cookie scoop or tablespoon to portion the mixture into balls, about 1-inch (2.5 cm) in diameter.
- Roll between your palms to smooth. Place on a parchment-lined tray.
- You should get about 24 truffles.
-
Chill:
- Refrigerate the shaped truffles for 30 minutes (or freeze for 15 minutes if you’re short on time). This helps them hold their shape and makes dipping easier.
- If you skip this step, the truffles may fall apart when coated.
-
Melt the Chocolate:
- In a microwave-safe bowl, melt 12 oz (340 g) chocolate chips with 1 tbsp (15 ml) coconut oil or shortening. Microwave in 30-second bursts, stirring between each, until smooth and glossy.
- Alternatively, melt chocolate in a double boiler over gently simmering water.
- If the chocolate is too thick, add a little more coconut oil.
-
Dip the Truffles:
- Using forks or dipping tools, lower each chilled truffle into the melted chocolate. Turn to coat evenly.
- Lift out, letting excess chocolate drip off, then place back on the parchment.
- Work quickly—if the truffles start to soften, pop them back in the fridge for a few minutes.
-
Decorate:
- Immediately sprinkle each truffle with holiday sprinkles or reserved Oreo crumbs before the chocolate sets.
- For extra flair, drizzle with melted white chocolate using a fork.
-
Chill Again:
- Refrigerate the decorated truffles for at least 15 minutes to fully set the chocolate.
- The shell should feel firm and look shiny.
-
Serve or Store:
- Once set, transfer truffles to a serving plate or airtight container.
- Enjoy immediately, or store for later (see my tips below!).
Notes: If your kitchen is warm, keep the truffles chilled until serving. For best results, use a high-quality chocolate—it makes dipping easier and gives a smoother finish. If the coating cracks, the truffles were likely too cold—let them sit at room temp for a few minutes before dipping.
Cooking Tips & Techniques
Making perfect Oreo truffles is all about little details. Over the years, I’ve learned a few tricks that make every batch a success (and avoid some classic mistakes):
- Room Temp Cream Cheese: Don’t rush it! Softened cream cheese blends smoother, so you won’t end up with lumpy filling.
- Crushing Oreos: Pulse gently in a food processor to avoid turning them into paste. If you use a bag, double-bag it to prevent crumbs busting out everywhere (learned that the hard way).
- Chilling: Chilling the truffles twice—once before dipping, once after—gives you a firmer, less sticky result. If you skip this, truffles can get mushy or messy.
- Chocolate Coating: Add coconut oil or shortening to the chocolate for a thinner, shinier shell. Don’t overheat—chocolate scorches easily.
- Dipping: Use a fork or dipping tool for the cleanest finish. Tap off excess chocolate gently—otherwise, you’ll get puddles.
- Sprinkles: Decorate fast! The chocolate sets quickly. If you wait too long, sprinkles won’t stick.
- Timing: Multitask by melting chocolate while the truffles chill. This saves time and keeps things moving.
- Consistency: If your filling feels too soft, add a few more crushed Oreos. If too dry, a touch more cream cheese fixes it.
My biggest failure? Not chilling long enough—ended up with lopsided, sticky messes. Now I always set a timer. And honestly, don’t stress about perfection. Each truffle is a little different, and that’s part of the charm!
Variations & Adaptations
The beauty of Oreo truffles is how easy they are to customize. Whether you need to adapt for allergies, switch up flavors, or just want to get creative, here are my favorite ways to make this recipe your own:
- Dietary Variations:
- Use gluten-free Oreo cookies and dairy-free cream cheese for allergy-friendly truffles. I’ve made these for friends with food sensitivities, and no one can tell the difference!
- Swap regular chocolate for vegan chocolate chips if needed.
- Seasonal Flavors:
- Peppermint Oreos and crushed candy cane sprinkles for Christmas.
- Golden Oreos with pastel sprinkles for spring or Easter.
- Spiced Oreos and cinnamon drizzle for autumn.
- Flavor Twists:
- Add a tablespoon (15 ml) of peanut butter or Nutella to the filling for a richer taste.
- Mix in a pinch of sea salt to the chocolate before dipping for a sweet-salty hit.
- Try rolling finished truffles in cocoa powder or toasted coconut instead of sprinkles.
One of my favorite personal adaptations: I once made these with lemon-flavored Oreos and a lemon zest white chocolate drizzle—surprisingly bright and fresh! When customizing, just keep the filling ratio similar for best texture. Don’t be afraid to experiment; sometimes the best recipes come from happy accidents.
Serving & Storage Suggestions
Oreo truffles are best served chilled—straight from the fridge, the chocolate shell has a satisfying snap. Arrange them on a pretty platter with extra sprinkles or edible glitter for a festive touch (Pinterest boards love these!). For parties, stick each truffle with a toothpick or mini skewer for easy grabbing.
These pair perfectly with coffee, hot chocolate, or even a glass of milk. For a dessert spread, serve alongside fruit, cheesecake bars, or holiday cookies. They also look adorable in mini cupcake liners for gifting.
To store, keep truffles in an airtight container in the refrigerator for up to 10 days. (Honestly, they rarely last more than a few days at my house!) For longer storage, freeze in a single layer, then transfer to a zip-top bag for up to 2 months. To thaw, place in the fridge overnight. If you want to refresh the chocolate shell, let truffles sit at room temperature for 10 minutes before serving. Over time, the flavors mingle even more, and the filling gets creamier.
Nutritional Information & Benefits
Each Oreo truffle (1 out of 24) contains approximately:
- Calories: 110
- Fat: 6g
- Carbohydrates: 13g
- Sugar: 9g
- Protein: 1g
Oreos and cream cheese aren’t exactly health food, but these truffles are bite-sized—so you get all the flavor in a sensible portion. Using gluten-free or vegan ingredients makes them suitable for most diets. Be mindful of allergens: contains wheat, dairy, and may contain traces of soy depending on your chocolate. From a wellness perspective, making your own treats means you control the ingredients (and can sneak in a little extra fiber by using whole grain or alternative cookies!).
Conclusion
Oreo truffles with holiday sprinkles are the kind of treat that brings pure happiness to any gathering. They’re easy, festive, and just plain fun to make. Whether you stick to the classic recipe or get creative with flavors and colors, these truffles always deliver smiles.
I love how they turn simple ingredients into something special—no fancy skills required. Honestly, they’re my go-to for last-minute parties, homemade gifts, and cozy family nights. Give them a try, and don’t be afraid to add your own twist. I’d love to hear how you make them yours! Drop a comment below, share your results, or tag your creations online. Here’s to sweet memories and even sweeter treats—happy holidays!
Frequently Asked Questions
How far in advance can I make Oreo truffles?
You can make Oreo truffles up to 10 days in advance and store them in the refrigerator. They also freeze well for up to 2 months.
Can I use different flavors of Oreos?
Absolutely! Peppermint, golden, or lemon Oreos all work well for fun flavor twists. Just keep the proportions the same.
How do I keep the chocolate coating smooth?
Add a tablespoon of coconut oil or shortening to your chocolate before melting. Melt gently, and make sure truffles are chilled before dipping.
Can I make these gluten-free or vegan?
Yes! Use gluten-free Oreo-style cookies and dairy-free cream cheese and chocolate. They taste just as good, promise.
Why did my truffles crack after coating?
If the truffles are too cold, the chocolate shell may crack as it sets. Let them sit at room temp for a few minutes before dipping for best results.
Pin This Recipe!
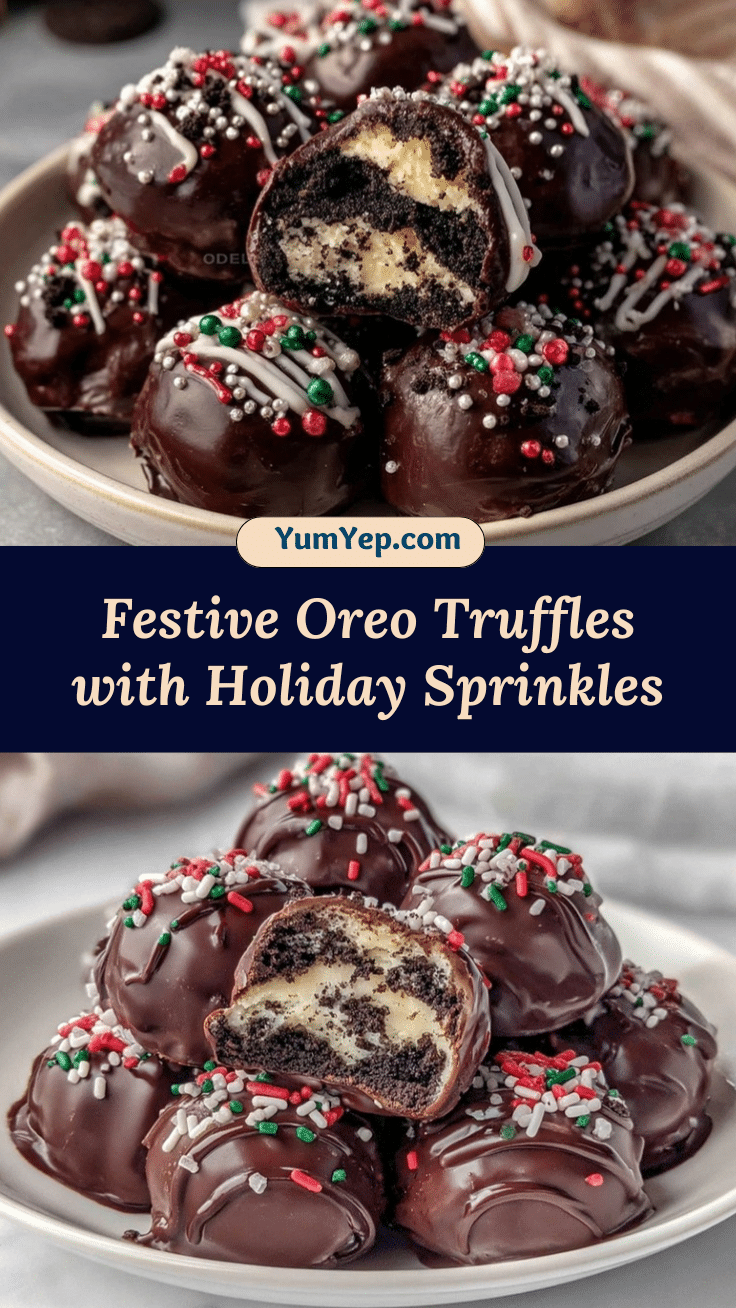
Oreo Truffles Recipe Easy Holiday Treats with Festive Sprinkles

These Oreo truffles are a quick, no-bake holiday treat featuring crushed Oreo cookies, creamy filling, a glossy chocolate shell, and festive sprinkles. Perfect for parties, gifting, or cozy family nights, they’re irresistibly delicious and easy to customize for any occasion.
- Prep Time: 15 minutes
- Cook Time: 0 minutes
- Total Time: 45 minutes
- Yield: 24 truffles 1x
- Category: Dessert
- Cuisine: American
Ingredients
- 36 Oreo cookies (about 1 standard package, any flavor)
- 8 oz cream cheese, softened (full-fat recommended)
- 12 oz semisweet or milk chocolate chips
- 1 tbsp coconut oil or vegetable shortening (optional, for thinning chocolate)
- Holiday sprinkles (red, green, white, gold, etc.)
- White chocolate chips or candy melts (optional, for drizzling)
Instructions
- Place Oreo cookies in a food processor and pulse until fine crumbs form. Alternatively, crush in a zip-top bag with a rolling pin.
- Set aside 2 tablespoons of crumbs for decorating, if desired.
- Add softened cream cheese to the Oreo crumbs and blend until fully combined and no streaks remain.
- Use a small cookie scoop or tablespoon to portion the mixture into 1-inch balls. Roll between palms to smooth and place on a parchment-lined tray.
- Chill the shaped truffles in the refrigerator for 30 minutes (or freeze for 15 minutes).
- Melt chocolate chips with coconut oil or shortening in a microwave-safe bowl (30-second bursts, stirring between each) or in a double boiler until smooth.
- Using forks or dipping tools, dip each chilled truffle into the melted chocolate, turning to coat evenly. Let excess chocolate drip off and place back on parchment.
- Immediately decorate with sprinkles or reserved Oreo crumbs before the chocolate sets. Optionally, drizzle with melted white chocolate.
- Refrigerate decorated truffles for at least 15 minutes to set the chocolate shell.
- Serve chilled or store in an airtight container in the refrigerator for up to 10 days.
Notes
For best results, use high-quality chocolate for a smooth shell. Chill truffles twice for a firm texture and shiny coating. If the chocolate cracks, let truffles sit at room temperature before dipping. Gluten-free and vegan adaptations work well with alternative cookies and cream cheese. Store truffles chilled and serve straight from the fridge for the best snap.
Nutrition
- Serving Size: 1 truffle
- Calories: 110
- Sugar: 9
- Sodium: 65
- Fat: 6
- Saturated Fat: 3
- Carbohydrates: 13
- Fiber: 1
- Protein: 1
Keywords: Oreo truffles, holiday treats, no-bake dessert, festive sprinkles, easy truffles, Christmas dessert, party sweets, homemade gifts


