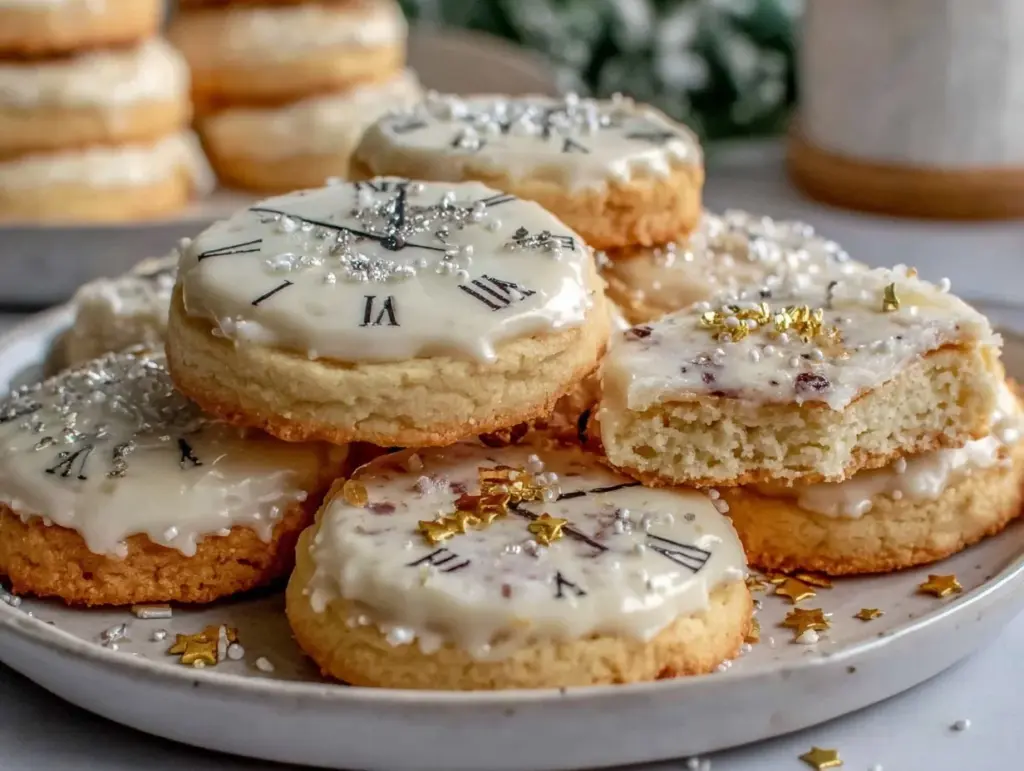
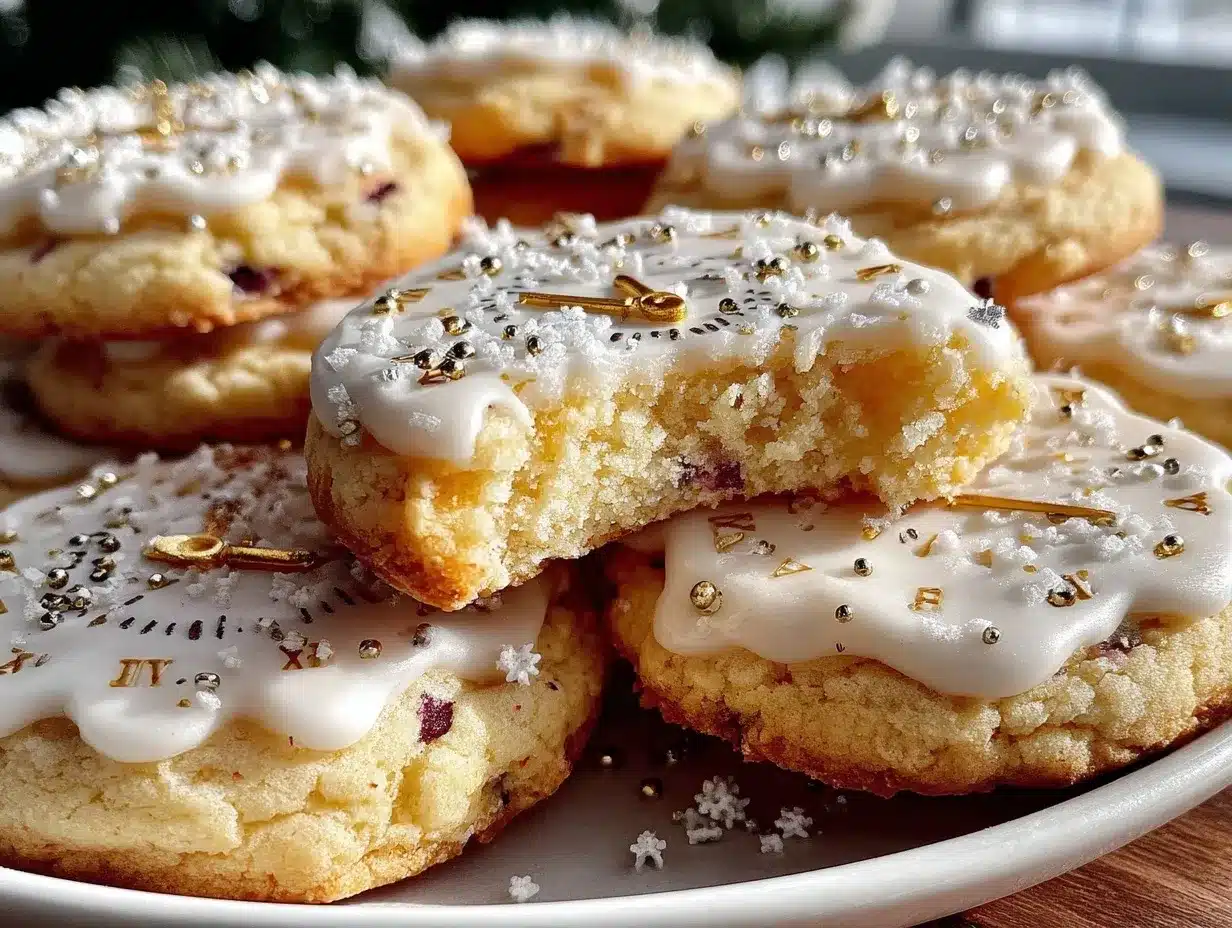
Let me set the scene: the aroma of vanilla and butter fills the kitchen, holiday music is playing softly, and there’s laughter as little hands sneak cookie dough from the bowl. That moment when you pull a tray of golden, crisp cookies out of the oven—decorated like tiny clocks about to strike midnight—well, it’s pure magic. The first time I made these Perfect Clock Countdown Cookies, my kitchen turned into a celebration zone. I remember pausing, just soaking in the joy (and a little bit of flour on my cheek), thinking, “Wow, this is something special.”
Back when I was knee-high to a grasshopper, my grandma used to let me help her bake sugar cookies for New Year’s Eve. We’d decorate them with whatever sprinkles we could find, but I always wanted them to look like the fancy clock cookies I saw in magazines. Years later, on a rainy December weekend, I tried to recreate those memories—and stumbled upon the idea of making my own clock countdown cookies. Honestly, I wish I’d thought of this sooner because they’ve become a staple for every festive gathering since.
My family couldn’t resist sneaking them off the cooling rack. You know how it goes—one cookie turns into three, and suddenly, you’re making a double batch “just in case.” These cookies are dangerously easy to make and bring pure, nostalgic comfort. They’re perfect for potlucks, sweet treats for your kids, or to brighten up your Pinterest cookie board. Whether you’re ringing in the New Year or celebrating a birthday, these clock countdown cookies add that playful, whimsical touch. After testing the recipe more times than I’ll admit (in the name of research, of course), I can safely say this is the cookie recipe you’re going to want to bookmark. Every bite feels like a warm hug, and honestly, isn’t that what festive baking is all about?
Why You’ll Love This Recipe
Let’s face it—holiday baking should be fun, not stressful. These Perfect Clock Countdown Cookies hit the sweet spot, literally and figuratively. I’ve made them for years, tweaking the recipe to get just the right balance of crisp edges and tender centers (my kids are picky, you know), and they never disappoint. Here’s why you’ll be hooked:
- Quick & Easy: Ready in under 40 minutes from start to finish—perfect for last-minute festive fun or spontaneous celebrations.
- Simple Ingredients: You probably have everything on hand; no fancy grocery runs required.
- Perfect for Festive Gatherings: Whether it’s New Year’s Eve, birthday parties, or countdown-themed events, these cookies steal the show.
- Crowd-Pleaser: Kids and adults alike rave about the playful design and buttery flavor (my neighbor once requested a dozen for her own party!).
- Unbelievably Delicious: The blend of vanilla, butter, and a hint of almond extract delivers classic comfort in every bite.
What really sets these cookies apart is the decorating method. Instead of complicated royal icing, you use a simple glaze and edible markers—trust me, it’s way less messy and much more fun. The cookies don’t just look cute; they taste genuinely amazing. I’ve tried dozens of sugar cookie recipes, but this one holds its shape beautifully (so your clock faces stay crisp and clear), and the flavor is just right—not too sweet, not too bland.
The best part? They’re endlessly adaptable. You can make them gluten-free, dairy-free, or jazz them up with sprinkles. When you bite into one, you get that soul-soothing satisfaction—like all is right with the world. Perfect for impressing guests without breaking a sweat or turning a simple evening into a memorable countdown celebration. So, if you want a festive treat that’s as fun to make as it is to eat, you’re in for a treat with these Perfect Clock Countdown Cookies.
What Ingredients You Will Need
This recipe uses simple, wholesome ingredients to deliver bold flavor and satisfying texture—no complicated stuff here! Most are pantry staples, and you can easily make substitutions if needed. Here’s what you’ll need:
- For the Cookie Dough:
- 2 ¾ cups (340g) all-purpose flour (use gluten-free blend if needed)
- 1 cup (226g) unsalted butter, softened (room temperature is best)
- 1 cup (200g) granulated sugar
- 1 large egg (50g), room temperature
- 2 teaspoons pure vanilla extract (I love Nielsen-Massey for deep flavor)
- ½ teaspoon almond extract (optional, but adds a dreamy aroma)
- ½ teaspoon baking powder
- ¼ teaspoon salt
- For the Simple Glaze:
- 1 cup (120g) powdered sugar
- 2-3 tablespoons milk (whole, skim, or non-dairy—your call)
- ½ teaspoon vanilla extract
- For Decoration:
- Edible food markers (black, gold, red—choose your favorite clock colors)
- Sprinkles or colored sugar (optional)
- Mini chocolate chips or pearls (for clock “hands”)
Ingredient Tips: Use real butter for richness, but margarine can work in a pinch. For a dairy-free option, swap in plant-based butter and non-dairy milk. If you’re baking for folks with egg allergies, try a flaxseed egg (1 tbsp ground flax + 3 tbsp water). I usually grab King Arthur’s gluten-free flour if someone in my circle needs a gluten-free treat—works like a charm.
Seasonally, you can swap almond extract for orange or lemon zest for a fresh twist. In summer, I use pastel sprinkles; for winter, gold and silver edible glitter totally ups the festive vibe. If you want a richer cookie, add an extra egg yolk—the texture gets softer, almost cake-like. Honestly, you can’t really mess these up (unless you forget the sugar, which…don’t ask me how I know!).
For best results, measure your flour by spooning it into the cup and leveling off—too much flour makes cookies dry. If you’re a stickler for organic ingredients, Bob’s Red Mill is my go-to for flour and sugar. Whatever you choose, these ingredients come together for cookies that taste as good as they look.
Equipment Needed
- Large mixing bowl (sturdy enough for enthusiastic stirring)
- Electric mixer or hand whisk (stand mixer makes it a breeze)
- Measuring cups and spoons (preferably metal for accuracy)
- Rolling pin (wooden or silicone works—mine is an old family heirloom!)
- Cookie cutters (round, about 2–3 inches diameter; a drinking glass works too)
- Baking sheet (rimmed is safest for kids helping out)
- Parchment paper or silicone baking mat (prevents sticking)
- Wire cooling rack (helps cookies set evenly)
- Small bowls for glaze and decorations
- Edible food markers (Wilton and AmeriColor are reliable)
If you don’t have a rolling pin, I’ve used a clean wine bottle—works in a pinch! For the cookie cutters, anything round will do, even a biscuit cutter or upside-down mug. Parchment paper is a lifesaver for cleanup (trust me, you want this). If you’re on a budget, check thrift stores for mixing bowls and racks; they last forever. For the food markers, just wipe tips clean after each use—keeps the colors sharp for next time.
Preparation Method
-
Prep the Dough:
In your large mixing bowl, cream together 1 cup (226g) unsalted butter and 1 cup (200g) granulated sugar until light and fluffy (about 2–3 minutes). Add 1 large egg, 2 tsp vanilla extract, and ½ tsp almond extract. Beat until well combined.
Tip: If the butter isn’t soft, microwave for 10 seconds—just don’t melt it! -
Mix Dry Ingredients:
In a separate bowl, whisk together 2 ¾ cups (340g) flour, ½ tsp baking powder, and ¼ tsp salt. Gradually add dry ingredients to wet mixture, mixing on low. Dough should be soft but not sticky.
Warning: Don’t overmix, or cookies can get tough. -
Chill the Dough:
Shape dough into a disk, wrap in plastic, and refrigerate for 30 minutes. (If you’re short on time, 15 minutes in the freezer does the trick.)
Sensory cue: Dough should be cool, firm, and easy to roll. -
Roll & Cut:
On a lightly floured surface, roll dough to ¼ inch (6mm) thick. Cut out circles using your cookie cutter (or glass). Place cookies 1 inch apart on parchment-lined baking sheet.
Personal tip: Dip cutter in flour to prevent sticking. -
Bake:
Preheat oven to 350°F (175°C). Bake cookies for 10–12 minutes—edges should be just golden. Rotate sheet halfway for even baking.
Troubleshooting: Pale cookies mean underbaked; dark edges mean too thin or overbaked. -
Cool:
Transfer cookies to wire rack. Cool completely before decorating (warm cookies melt the glaze!).
Sensory cue: They should feel firm and slightly springy. -
Make the Glaze:
In a small bowl, whisk 1 cup (120g) powdered sugar with 2–3 tbsp milk and ½ tsp vanilla. Glaze should be pourable but not runny—add milk slowly.
Prep note: If it’s too thin, add more sugar; too thick, add a drop of milk. -
Decorate:
Spread glaze over cooled cookies with a spoon or offset spatula. Let set for 10 minutes, then use edible markers to draw clock faces (set to midnight or any time you like). Add sprinkles or mini chocolate chips for clock hands.
Tip: Kids love helping with this part—just expect some creative “interpretations”!
For best results, decorate in batches so glaze sets nicely. If cookies break during transfer, don’t worry—crumbled cookies make excellent ice cream toppings (learned that the hard way!). Efficiency tip: prep dough the night before, then bake and decorate the next day. You’ll get crisp, picture-perfect cookies every time.
Cooking Tips & Techniques
Here’s the thing—making Perfect Clock Countdown Cookies is both art and science. I’ve had my fair share of cookie fails (too hard, too soft, you name it), but these tips keep things foolproof:
- Chill the Dough: Always chill for at least 30 minutes. This helps cookies hold their shape and prevents spreading.
- Even Rolling: Use guide rings on your rolling pin or stack two chopsticks on either side—dough rolls out evenly, so every cookie bakes the same.
- Don’t Overbake: Remove cookies when edges are just set. They’ll finish firming up on the rack. Overbaked cookies get dry, and nobody wants that.
- Glaze Consistency: Test glaze by drizzling a little on a plate; it should set in 2–3 minutes but not crack.
- Decorating with Kids: Lay out parchment, give each kid their own marker, and don’t stress about perfection. The fun is in the making!
I learned (the hard way) that skipping the chilling step leads to blobs instead of clocks—so don’t rush that part. If decorating, do it on a wire rack over parchment to catch drips. For multitasking, prep glaze while cookies bake, and set up decorations while they cool. If you want consistent results, use a scale for flour and sugar. These tiny tweaks make a big difference, trust me.
Variations & Adaptations
One of my favorite things about Perfect Clock Countdown Cookies is how easily you can switch things up. Here are a few tried-and-true variations you’ll love:
- Gluten-Free: Swap all-purpose flour for a 1:1 gluten-free blend (like King Arthur). They come out just as crisp!
- Dairy-Free: Use plant-based butter and non-dairy milk. Almond or oat milk works great for the glaze.
- Chocolate Lovers: Add ¼ cup (25g) cocoa powder to the dough and use white glaze for striking contrast.
- Seasonal Twist: Mix in 1 tbsp orange or lemon zest for a fresh, citrusy kick. Perfect for spring celebrations!
- Allergen-Friendly: For egg-free, use 1 flaxseed egg (1 tbsp ground flax + 3 tbsp water). Works like a charm.
I once made a batch using matcha powder for a green New Year’s theme—looked super festive and tasted lightly earthy. If you prefer more sweetness, drizzle melted chocolate instead of glaze. For birthdays, swap clock faces for numbers or initials. You can even change the size—mini cookies for snacks or jumbo ones as edible party favors. The options are endless, so let your creativity lead the way!
Serving & Storage Suggestions
Serve these cookies at room temperature for best flavor and texture. Arrange on a pretty platter with clock faces pointing to midnight—trust me, your guests will be impressed. Pair with sparkling cider, hot cocoa, or even a festive cocktail.
Store leftover cookies in an airtight container at room temperature for up to 5 days. If you’re planning ahead, freeze undecorated cookies for up to 2 months, then thaw and decorate before serving. Glazed cookies can be refrigerated for 3–4 days, but let them come to room temp before enjoying (the glaze softens a bit in the fridge).
To reheat, pop cookies in a 300°F (150°C) oven for 2–3 minutes—just enough to revive freshness. Flavors develop and deepen overnight, so don’t worry if you’re baking a day ahead. Honestly, they taste even better the next day!
Nutritional Information & Benefits
Each cookie (about 35g) contains roughly:
- Calories: 110
- Fat: 5g
- Carbs: 15g
- Protein: 1g
- Sugar: 8g
Butter provides healthy fats, while eggs add a touch of protein. If you choose almond flour, you’ll get extra fiber and lower carbs. You can adjust sugar for a lighter treat, and the dairy-free option makes it suitable for most diets. Be aware: contains gluten, dairy, and eggs unless you use the suggested swaps. Personally, I love that these cookies offer a festive treat without being overly decadent—perfect for enjoying a few guilt-free.
Conclusion
So, why try these Perfect Clock Countdown Cookies? They’re easy, festive, and bring people together in the sweetest way. Whether you’re baking for a crowd or just a cozy night in, they add that special touch to any celebration. You can customize them to suit your tastes, dietary needs, or favorite colors—honestly, there’s no wrong way to make them.
I love this recipe because it’s a blend of nostalgia and creativity, plus it’s just plain fun to decorate (and eat!). If you make these cookies, share your own twists in the comments—I’d love to see your creations! Bookmark this recipe, pin it to your holiday board, and spread the cookie joy. Here’s to more countdowns, more smiles, and more sweet moments together!
FAQs
Can I make the dough ahead of time?
Yes! You can prep the dough up to 2 days in advance and keep it in the fridge. Just let it warm up slightly before rolling out.
What if I don’t have edible food markers?
No problem! Use melted chocolate in a piping bag or toothpick to draw clock faces. Sprinkles and colored icing work too.
Can these be made gluten-free?
Absolutely. Use a 1:1 gluten-free flour blend—King Arthur or Bob’s Red Mill are my go-tos.
How do I freeze the cookies?
Freeze undecorated cookies in a single layer, then store in a freezer bag. Thaw at room temp and decorate as needed.
How do I avoid cookies spreading?
Make sure to chill the dough well before baking and don’t over-cream the butter and sugar. Using parchment paper also helps keep their shape.
Pin This Recipe!

Perfect Clock Countdown Cookies

These festive sugar cookies are decorated to look like tiny clocks, perfect for New Year’s Eve or any countdown celebration. Crisp edges, tender centers, and a simple glaze make them easy and fun for kids and adults alike.
- Prep Time: 20 minutes
- Cook Time: 12 minutes
- Total Time: 40 minutes
- Yield: 24 cookies 1x
- Category: Dessert
- Cuisine: American
Ingredients
- 2 ¾ cups all-purpose flour (or gluten-free blend)
- 1 cup unsalted butter, softened
- 1 cup granulated sugar
- 1 large egg
- 2 teaspoons pure vanilla extract
- ½ teaspoon almond extract (optional)
- ½ teaspoon baking powder
- ¼ teaspoon salt
- 1 cup powdered sugar
- 2–3 tablespoons milk (whole, skim, or non-dairy)
- ½ teaspoon vanilla extract (for glaze)
- Edible food markers (black, gold, red)
- Sprinkles or colored sugar (optional)
- Mini chocolate chips or pearls (for clock hands)
Instructions
- In a large mixing bowl, cream together butter and granulated sugar until light and fluffy (about 2–3 minutes).
- Add egg, vanilla extract, and almond extract. Beat until well combined.
- In a separate bowl, whisk together flour, baking powder, and salt.
- Gradually add dry ingredients to wet mixture, mixing on low until a soft dough forms.
- Shape dough into a disk, wrap in plastic, and refrigerate for 30 minutes (or 15 minutes in the freezer if short on time).
- On a lightly floured surface, roll dough to ¼ inch thick. Cut out circles using a cookie cutter or glass.
- Place cookies 1 inch apart on a parchment-lined baking sheet.
- Preheat oven to 350°F. Bake cookies for 10–12 minutes, rotating sheet halfway through, until edges are just golden.
- Transfer cookies to a wire rack and cool completely before decorating.
- For the glaze: In a small bowl, whisk powdered sugar with milk and vanilla until pourable but not runny.
- Spread glaze over cooled cookies with a spoon or offset spatula. Let set for 10 minutes.
- Use edible markers to draw clock faces. Add sprinkles or mini chocolate chips for clock hands.
Notes
Chill dough for best results. For gluten-free or dairy-free adaptations, use suggested swaps. Decorate cookies only when fully cooled. Prep dough ahead for convenience. If you don’t have edible markers, use melted chocolate or colored icing. Store in airtight container for up to 5 days.
Nutrition
- Serving Size: 1 cookie (about 35g)
- Calories: 110
- Sugar: 8
- Sodium: 40
- Fat: 5
- Saturated Fat: 3
- Carbohydrates: 15
- Protein: 1
Keywords: New Year's Eve cookies, countdown cookies, festive sugar cookies, decorated cookies, holiday baking, easy sugar cookies, kid-friendly cookies, party treats


