That first poke into the cake — the gentle, satisfying resistance giving way to soft crumb — still pulls me back to sun-warmed picnic blankets on a lazy Fourth of July afternoon. The way the red and blue juices seep into the pale yellow cake, pooling in little lakes of sweetness, always made me think of childhood summers where time stretched and fireworks colored the night sky. Honestly, the Perfect Red White & Blue Poke Cake with Whipped Topping wasn’t something I planned on mastering at first. I was chasing a memory of a dessert my grandmother made, something simple but festive. The whipped topping, light as a cloud, felt like the soft breeze that carried those distant fireworks sounds. It’s not just a cake; it’s a feeling of slow, easy days, where the hum of laughter mingled with the scent of freshly cut grass.
Every bite brings that quiet joy back. The layers of flavors — the moist cake, the bursts of berries, and that pillowy whipped topping — somehow feel like a celebration without the fuss. After many tries, tweaking the poke technique and the whipped topping’s sweetness, this recipe stuck around because it’s forgiving, approachable, and honest. The kind of dessert you can make without stress but still impress everyone on your porch or picnic table. And that’s what keeps me coming back to this red white and blue poke cake recipe — it’s reliable, joyful, and quietly patriotic in the best way.
Why You’ll Love This Recipe
Over the years, perfecting the Perfect Red White & Blue Poke Cake with Whipped Topping has been a delightful journey, filled with trial, error, and a lot of berry-stained fingers. This recipe has earned its place in my kitchen for plenty of reasons:
- Quick & Easy: Comes together in under 45 minutes, making it a go-to for unexpected guests or last-minute holiday gatherings.
- Simple Ingredients: No need for fancy or hard-to-find items — just pantry basics and fresh or frozen berries.
- Perfect for Patriotic Celebrations: Whether it’s the Fourth of July, Memorial Day, or any summer barbecue, this poke cake steals the show.
- Crowd-Pleaser: Kids and adults alike rave about the moist texture and the blend of fresh berry flavors paired with whipped topping.
- Unbelievably Delicious: The magic lies in the poke step that lets the berry juices soak in, making every slice juicy and flavorful — unlike any ordinary cake.
This isn’t just another poke cake — the balance of tartness from the berries and the creamy whipped topping sets it apart. And, honestly, the whipped topping is whipped just right — not too sweet, with a hint of vanilla that rounds out the berries’ punch perfectly. If you’ve ever tried snowball cookies or cranberry orange bread, you’ll appreciate how this cake similarly combines simple ingredients into something special and memorable.
What Ingredients You Will Need
This recipe uses straightforward, wholesome ingredients to create a vibrant, tender poke cake that’s as visually stunning as it is tasty. Most of these are pantry staples, with fresh or frozen berries adding seasonal charm.
- Yellow Cake Mix (about 15.25 oz box) – Choose your favorite brand; I prefer one with a moist crumb and buttery notes.
- Eggs (3 large, room temperature) – They help the cake rise and bind everything together.
- Vegetable Oil (1/2 cup / 120 ml) – Keeps the cake tender and moist.
- Water (1 cup / 240 ml) – For mixing the batter.
- Mixed Berry Gelatin (1 small box, about 3 oz) – The colorful red and blue jellies soak into the cake during poking, giving it that signature patriotic look.
- Blueberries (1 cup fresh or frozen, thawed) – Adds natural sweetness and bursts of flavor.
- Raspberries (1 cup fresh or frozen, thawed) – Their tartness balances the sweetness beautifully.
- Whipped Topping (about 8 oz) – Use store-bought or homemade for that cloud-like finish. I like to gently fold in a teaspoon of vanilla extract for extra depth.
- Vanilla Extract (1 teaspoon) – Optional, but recommended to enhance the whipped topping flavor.
- Powdered Sugar (2 tablespoons) – For sweetening the whipped topping lightly.
Ingredient Tips: If you want a gluten-free version, swap the cake mix with a gluten-free yellow cake mix. For a dairy-free whipped topping, coconut whipped cream works wonderfully. In summer, fresh berries make the cake pop with freshness, but frozen works just fine any time of year.
Equipment Needed
- 9×13-inch Baking Pan: The classic size for poke cakes, perfect for even cooking and easy serving.
- Mixing Bowls: At least two — one for the cake batter, one for whipping topping if homemade.
- Electric Mixer: Helpful for mixing batter and whipping topping, but a sturdy whisk works in a pinch.
- Wooden Spoon or Spatula: For folding in the berries and mixing the batter gently.
- Toothpick or Skewer: Essential for poking holes in the cake to let the gelatin seep in beautifully.
- Measuring Cups and Spoons: Accuracy matters for the perfect cake texture.
If you don’t have a 9×13 pan, an 8×8 can work, but expect a thicker cake and adjust baking time accordingly. I’ve tried silicone pans for this, and while they’re convenient, I prefer metal for that even golden crust.
Preparation Method
- Preheat the Oven and Prepare Pan: Set your oven to 350°F (175°C). Grease your 9×13 pan lightly with butter or non-stick spray to prevent sticking. This step usually takes about 10 minutes if you include gathering ingredients.
- Mix the Cake Batter: In a large bowl, combine the yellow cake mix, 3 eggs, 1/2 cup vegetable oil, and 1 cup water. Use an electric mixer on medium for about 2 minutes, or whisk vigorously by hand until smooth. The batter should be pourable but thick enough to coat the back of a spoon.
- Pour Batter into Pan: Spread the batter evenly in the pan using a spatula, smoothing the top gently.
- Bake the Cake: Place the pan in the oven and bake for 30-35 minutes. Check doneness by inserting a toothpick in the center — it should come out clean or with a few moist crumbs. Avoid overbaking to keep the cake moist.
- Cool Slightly and Poke Holes: Let the cake cool for 10 minutes. Then, using a toothpick or skewer, poke holes all over the surface, about 1 inch apart. This allows the gelatin and berry juices to seep in and flavor the cake deeply.
- Prepare Berry Gelatin Mixture: While the cake bakes, dissolve the berry gelatin in 1 cup boiling water, stirring until completely dissolved. Let it cool to room temperature but not set.
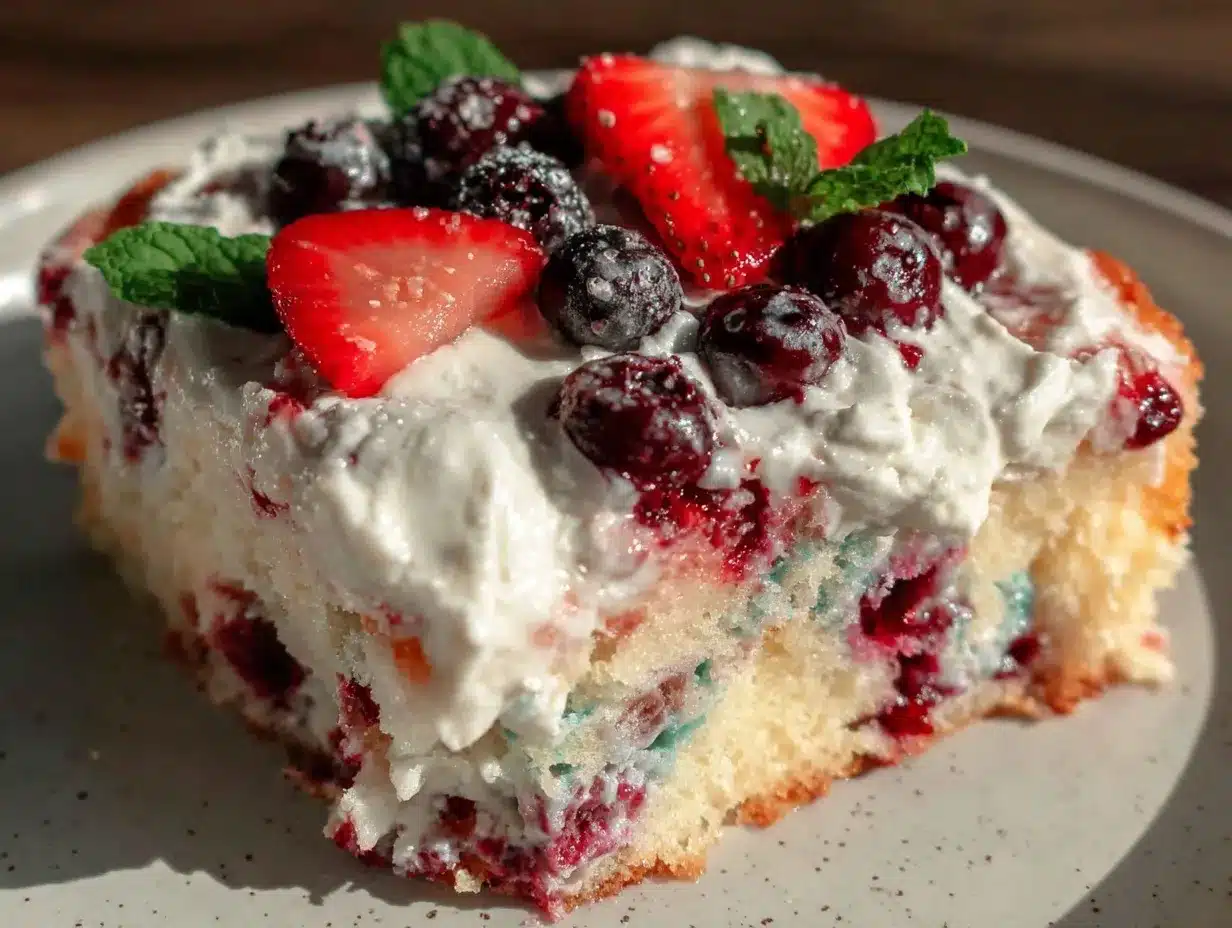
- Pour Gelatin Over Cake: Slowly pour the cooled gelatin evenly over the cake, making sure it seeps into the holes you poked. The cake will look shiny and colorful as the red and blue hues begin to saturate the crumb.
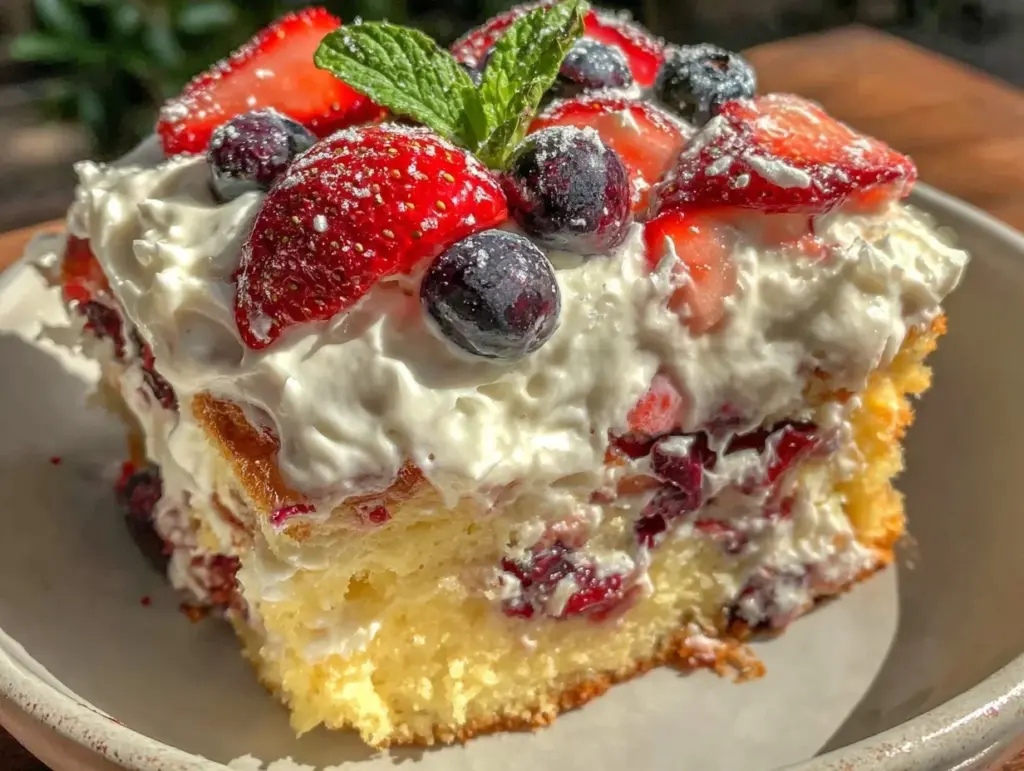
- Add Fresh Berries: Scatter the blueberries and raspberries across the top, pressing lightly so they nestle into the gelatin-soaked cake.
- Chill: Cover the cake with plastic wrap and refrigerate for at least 4 hours, or overnight if possible. This chilling step lets the gelatin set and the flavors meld beautifully.
- Prepare Whipped Topping: Just before serving, whip your topping with powdered sugar and vanilla extract until soft peaks form. Spread generously over the chilled cake, covering the berries for that classic red white and blue look.
Tip: If you notice some gelatin pools unevenly, gently tilt the pan to spread it out before chilling. And don’t rush the chilling — it really makes all the difference in texture and flavor melding.
Cooking Tips & Techniques
Making the perfect poke cake might sound simple, but there are a few tricks that make a world of difference. Here’s what I’ve learned:
- Don’t Overbake: Cake moisture is key. Overbaking dries it out, making the gelatin soak less effective. Keep a close eye on the toothpick test.
- Poke Evenly: Spread the holes uniformly for consistent berry flavor throughout. I usually start from the center and work outward.
- Gelatin Temperature: Pour the gelatin when it’s cool but still liquid. Too hot and it melts the topping; too cold and it won’t seep properly.
- Whipped Topping: Whip just until soft peaks form to avoid a stiff or overly sweet topping. Sometimes, folding in a little cream cheese adds a subtle tang that’s a nice contrast.
- Berry Choices: Mix fresh and frozen berries for texture variety. Just thaw frozen fully to prevent watery cake.
- Chill Time: Patience here pays off. Overnight chilling melds flavors and firms the cake for neat slices.
Early on, I learned that rushing the gelatin pouring or skipping the poke step left the cake dry and flavorless. It’s a lesson many poke cake newbies make — but once you get it, the results are reliably impressive.
Variations & Adaptations
This Perfect Red White & Blue Poke Cake recipe is wonderfully flexible. Here’s how I’ve played around with it to suit different tastes and occasions:
- Dietary Tweaks: Use a gluten-free yellow cake mix and coconut whipped cream for a gluten- and dairy-free option that still delivers on flavor.
- Seasonal Swaps: In winter, swap the berries for pomegranate seeds and cranberries, and try a white grape gelatin for a festive twist.
- Flavor Boosters: Add a splash of lemon juice to the gelatin for a zesty bite or fold in a handful of chopped mint leaves into the whipped topping for a fresh finish.
- Chocolate Variation: Use a white cake mix and swirl in some melted white chocolate before baking for added richness without overshadowing the berry flavors.
- Personal Fave: I once tried a version layering in sliced strawberries instead of raspberries, with a sprinkle of toasted coconut on top—it was a tropical take that wowed my friends.
Adjust cooking times slightly if you use different pan sizes or mix-ins. The poke cake technique remains the same, making these changes easy to experiment with.
Serving & Storage Suggestions
Serve this poke cake chilled, straight from the fridge — the whipped topping is at its lightest and the gelatin-set berries are perfectly refreshing. I like to slice it into generous squares and serve on simple white plates to let the colors pop.
It pairs wonderfully with a glass of iced tea or sparkling lemonade, especially on warm summer afternoons. For a festive brunch, try serving alongside a fruit salad or a batch of cinnamon roll casserole for a sweet spread.
Leftovers keep well in the refrigerator, covered tightly, for up to 3 days. The flavors actually deepen after a day, though the whipped topping may soften a bit. Re-chill before serving again. Avoid freezing as the gelatin texture can suffer.
Nutritional Information & Benefits
This poke cake is a delightful treat, balancing indulgence with some wholesome elements. Here’s a rough breakdown per serving (assuming 12 slices):
| Calories | 280-320 |
|---|---|
| Fat | 12-15g (mostly from oil and whipped topping) |
| Carbohydrates | 40-45g (from cake mix and sugars) |
| Protein | 3-4g |
| Fiber | 2-3g (thanks to berries) |
The berries provide antioxidants and vitamin C, adding some nutritional benefits beyond the cake’s sweetness. Gluten-free and dairy-free options make this dessert accessible to many diets, and the low prep time keeps it a practical choice for busy cooks wanting a festive dessert.
Conclusion
The Perfect Red White & Blue Poke Cake with Whipped Topping is more than just a pretty face at your summer party — it’s a recipe that sings of tradition, ease, and a little bit of magic hidden in those poke holes. It’s the dessert that invites you to slow down, enjoy the moment, and savor the simple joy of berries and cream on a moist, tender cake. I love how forgiving and adaptable this recipe is — you can tweak it for your family’s tastes or the season and still get that same satisfying finish.
Whether you’re making it for a holiday or just because, it’s a sweet reminder that sometimes, the best recipes are the ones that come from memories and a little bit of kitchen play. I can’t wait to hear how you make this patriotic cake your own — feel free to leave your adaptations and stories below!
FAQs
Can I use fresh berries instead of frozen?
Absolutely! Fresh berries work beautifully, especially in summer. Just be sure to wash and dry them well before adding to avoid extra moisture in the cake.
How long can I store the poke cake?
Store it covered in the refrigerator for up to 3 days. The flavors improve after a day, but avoid freezing to maintain the best texture.
Can I make the whipped topping from scratch?
Yes! Whipping heavy cream with powdered sugar and vanilla until soft peaks form creates a fresh topping that tastes fantastic on this cake.
Is this recipe suitable for gluten-free diets?
It can be! Just swap the yellow cake mix for a gluten-free version and use a dairy-free whipped topping if needed.
What’s the best way to poke the cake?
Use a toothpick or skewer to poke holes about an inch apart, spacing them evenly to let the gelatin soak through all parts of the cake.
Pin This Recipe!
Perfect Red White & Blue Poke Cake Recipe Easy Patriotic Dessert with Whipped Topping

A moist and festive poke cake featuring red and blue berry gelatin soaked into a yellow cake, topped with a light whipped topping. Perfect for patriotic celebrations like the Fourth of July.
- Prep Time: 15 minutes
- Cook Time: 35 minutes
- Total Time: 4 hours 50 minutes
- Yield: 12 servings 1x
- Category: Dessert
- Cuisine: American
Ingredients
- Yellow Cake Mix (about 15.25 oz box)
- 3 large eggs, room temperature
- 1/2 cup (120 ml) vegetable oil
- 1 cup (240 ml) water
- 1 small box (about 3 oz) mixed berry gelatin
- 1 cup blueberries, fresh or frozen (thawed)
- 1 cup raspberries, fresh or frozen (thawed)
- About 8 oz whipped topping (store-bought or homemade)
- 1 teaspoon vanilla extract (optional, for whipped topping)
- 2 tablespoons powdered sugar (for sweetening whipped topping)
Instructions
- Preheat the oven to 350°F (175°C). Lightly grease a 9×13-inch baking pan with butter or non-stick spray.
- In a large bowl, combine the yellow cake mix, 3 eggs, 1/2 cup vegetable oil, and 1 cup water. Mix with an electric mixer on medium for about 2 minutes or whisk vigorously by hand until smooth.
- Pour the batter evenly into the prepared pan and smooth the top gently with a spatula.
- Bake for 30-35 minutes. Check doneness by inserting a toothpick in the center; it should come out clean or with a few moist crumbs.
- Let the cake cool for 10 minutes. Using a toothpick or skewer, poke holes about 1 inch apart all over the cake surface.
- Dissolve the mixed berry gelatin in 1 cup boiling water, stirring until completely dissolved. Let it cool to room temperature but not set.
- Slowly pour the cooled gelatin evenly over the cake, allowing it to seep into the holes.
- Scatter the blueberries and raspberries evenly over the top, pressing lightly to nestle them into the gelatin-soaked cake.
- Cover the cake with plastic wrap and refrigerate for at least 4 hours or overnight to let the gelatin set and flavors meld.
- Just before serving, whip the topping with powdered sugar and vanilla extract until soft peaks form. Spread generously over the chilled cake, covering the berries.
Notes
[‘Do not overbake to keep the cake moist and allow gelatin to soak properly.’, ‘Poke holes evenly about 1 inch apart for consistent flavor.’, ‘Pour gelatin when cool but still liquid to avoid melting the topping.’, ‘Whip topping to soft peaks to avoid stiffness or excessive sweetness.’, ‘Mix fresh and frozen berries for texture variety; thaw frozen berries fully to prevent watery cake.’, ‘Chill cake overnight if possible for best flavor melding and texture.’, ‘For gluten-free version, use gluten-free yellow cake mix and dairy-free whipped topping like coconut whipped cream.’, ‘If using different pan sizes, adjust baking time accordingly.’, ‘Avoid freezing the cake as gelatin texture can suffer.’]
Nutrition
- Serving Size: 1 slice (1/12 of cak
- Calories: 280320
- Fat: 1215
- Carbohydrates: 4045
- Fiber: 23
- Protein: 34
Keywords: poke cake, patriotic dessert, red white and blue cake, berry gelatin cake, whipped topping, Fourth of July dessert, easy poke cake


