
There’s something downright magical about the aroma of acorn squash roasting in the oven—sweet, nutty, and just a little bit earthy, you know? Add brown butter bubbling away on the stovetop and crisp sage leaves popping, and suddenly you’ve got a sensory treat that’ll stop anyone in their tracks. The first time I tried making savory roasted acorn squash with brown butter and sage, the kitchen filled up with this toasty, caramel scent that honestly made my stomach growl (not even kidding). It was a chilly Sunday, rain tapping on the windows, and I was knee-high to a grasshopper in nostalgia—reminded of family dinners where squash was always the unsung hero on the table.
I still remember the moment I slid my fork through the tender, golden crescents of squash, the brown butter pooling underneath, and those little flecks of fried sage clinging for dear life. One bite, and I was instantly hooked—the kind of moment where you pause, take a deep breath, and just smile because you know you’re onto something truly special. This recipe is the one I wish I’d stumbled onto years ago, back when I thought squash was just for soup. Now, my family can’t resist sneaking pieces straight off the sheet pan (honestly, I can’t blame them). It’s become a staple for our holiday gatherings and lazy weeknight dinners, and I’ve tested it more times than I care to admit—in the name of research, of course! Every batch feels like a warm hug, and if you’re looking for that perfect dish to brighten up your Pinterest board or wow your potluck crowd, you’re going to want to bookmark this one.
Why You’ll Love This Savory Roasted Acorn Squash Recipe
- Quick & Easy: Comes together in under 45 minutes, making it ideal for busy weeknights or when you want something special without the stress.
- Simple Ingredients: No fancy shopping needed—just squash, butter, sage, and a handful of pantry staples. You probably have most of them already!
- Perfect for Any Occasion: Whether it’s a cozy fall dinner, your Thanksgiving spread, or a weekend brunch, this dish fits right in.
- Crowd-Pleaser: Adults love the nutty brown butter and crispy sage, while kids can’t get enough of the naturally sweet squash.
- Unbelievably Delicious: The combination of caramelized squash, rich brown butter, and aromatic sage delivers next-level comfort food.
What sets this savory roasted acorn squash apart? It’s all about the brown butter—letting it cook until it’s perfectly golden and nutty (not just melted!) is a game-changer. Pair that with the crispy sage leaves, and you’ve got a flavor combo that makes you close your eyes with every bite. I’ve tried dozens of squash recipes, but this one nails that “just right” balance between sweet, savory, and earthy. It’s comfort food without the heaviness, and honestly, it’s the kind of dish you’ll be proud to serve guests or just enjoy on a quiet night in. Whether you’re chasing nostalgia or want something new for your table, this is my best version—simple, foolproof, and absolutely delicious.
What Ingredients You Will Need
This recipe uses simple, wholesome ingredients to deliver bold flavor and a satisfying, tender texture—no fancy extras or complicated steps. Most are pantry staples, and you can easily swap a few if you’re feeling adventurous or need to cater to dietary needs.
- For the Squash:
- 2 medium acorn squash (about 2½ lbs / 1.1 kg total), washed and halved
- 2 tablespoons olive oil (extra virgin preferred, for roasting)
- 1 teaspoon kosher salt (or to taste)
- ½ teaspoon freshly ground black pepper
- 1 tablespoon maple syrup (optional, for a touch of sweetness)
- For the Brown Butter Sage Sauce:
- 6 tablespoons unsalted butter (85 g; quality matters—Kerrygold or similar recommended)
- 12-15 fresh sage leaves (washed and patted dry)
- ½ teaspoon flaky sea salt (for finishing, optional)
- Pinch red pepper flakes (optional, for a little kick)
Ingredient notes and swaps:
- Squash: If you can’t find acorn squash, delicata or butternut squash work well (just adjust baking time).
- Butter: For a dairy-free version, use a good-quality plant-based butter. The browning will be slightly different but still tasty.
- Sage: Dried sage doesn’t crisp up the same way—stick with fresh for best results. Substitute with rosemary or thyme for a different vibe.
- Maple Syrup: Totally optional, but a drizzle before roasting adds subtle sweetness. You can use honey or skip entirely for a more savory profile.
- Olive Oil: Avocado oil is a great alternative if you prefer it. Both help the squash caramelize and crisp up.
Most of these ingredients are easy to find year-round, but if you happen to snag local squash at the farmer’s market, you’re in for a treat. In summer, swap the sage for basil and serve the squash at room temperature as a salad—so good!
Equipment Needed
- Large Baking Sheet: For roasting the squash. I like to use a rimmed sheet to catch any caramelized edges (trust me, you don’t want those drippings on the oven floor).
- Sharp Chef’s Knife: For safely halving and slicing the squash. A sturdy, well-maintained knife makes all the difference.
- Cutting Board: Preferably wood or plastic—just make sure it’s big enough for easy slicing.
- Small Saucepan: For browning the butter and frying the sage. Stainless steel or nonstick works fine; just keep an eye on the color changes.
- Mixing Bowl: For tossing the squash with oil and seasonings. Any medium bowl will do.
- Spatula or Tongs: For flipping the squash halfway through roasting (helps get those crispy edges!).
If you don’t have a baking sheet, you can use a large casserole dish—it’ll work in a pinch, though you might miss out on a little crispy surface area. Budget-friendly tip: Pick up a sturdy baking sheet at a discount store; you don’t need anything fancy. Just avoid overcrowding—roasting works best when the squash has space.
Preparation Method

-
Preheat Your Oven:
Set oven to 425°F (220°C). Line your baking sheet with parchment paper for easy cleanup (optional, but makes your life easier). -
Prep the Squash:
Slice acorn squash in half from stem to tip. Scoop out seeds with a spoon (kids love helping with this part, but watch those little hands!). Slice halves into ¾-inch (2 cm) crescents. If your squash is wobbly, trim a little off the bottom—safer and steadier for slicing. -
Toss and Season:
In your mixing bowl, combine squash slices, olive oil, salt, pepper, and maple syrup if using. Toss until all pieces are lightly coated. (Squash should look shiny, not drenched.) -
Arrange for Roasting:
Spread squash in a single layer on your baking sheet. Make sure slices aren’t overlapping—crowding prevents caramelization. -
Roast:
Place baking sheet on the middle rack. Roast for 20 minutes, then flip slices with your spatula or tongs. Roast another 15-20 minutes until golden and fork-tender. (Squash should be caramelized on the edges, and you’ll smell that sweet nuttiness—don’t be tempted to pull it early!) -
Brown the Butter:
While squash is roasting, add butter to your small saucepan over medium heat. Stir occasionally; watch for butter to foam, then turn golden and smell nutty—about 5-6 minutes. (Don’t walk away—brown butter goes from perfect to burnt in seconds.) -
Crisp the Sage:
Add sage leaves to the bubbling brown butter. Fry for 30-45 seconds until crisp and dark green. Remove sage leaves and set on a paper towel. -
Finish and Serve:
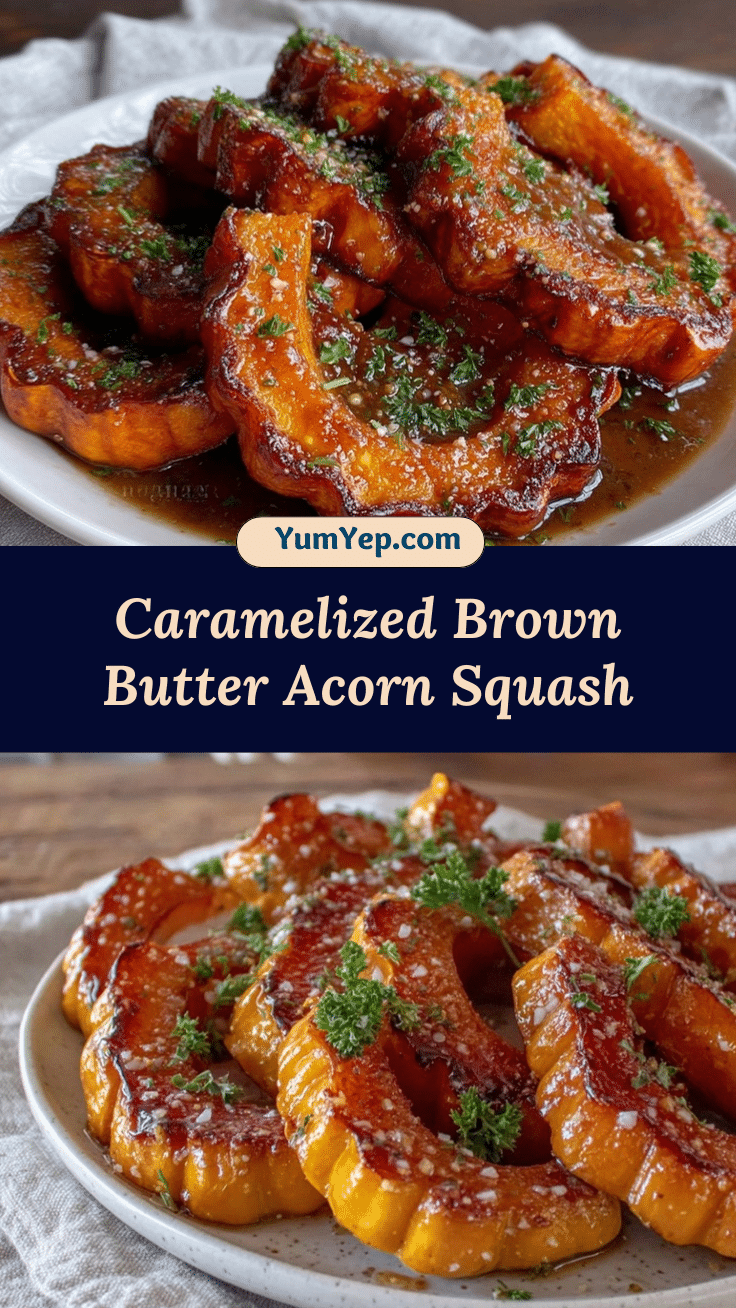
Arrange roasted squash on a platter. Drizzle with warm brown butter, scatter crispy sage leaves, and sprinkle with flaky sea salt and red pepper flakes if desired. Serve immediately for best flavor and texture.
Prep notes: If your squash is extra large, you may need a second baking sheet or roast in batches. For troubleshooting, if squash seems undercooked, add 5-10 minutes and check again—it should be easily pierced with a fork. Overcrowded pan? No worries, just split into two sheets for even roasting.
Personal tip: I like to keep a little extra brown butter on the side—sometimes I sneak a drizzle on leftovers for lunch. If you want to prep ahead, roast squash up to a day before and reheat with fresh sage.
Cooking Tips & Techniques
Let’s face it, roasting squash sounds easy, but a few little tricks make all the difference. First—don’t peel acorn squash! The skin softens and gets slightly chewy, adding texture (and saves time). Try to slice crescents as evenly as possible so they cook at the same rate. If you go too thin, they’ll burn before they caramelize.
Brown butter is the star, but it can turn on you fast. Keep the heat medium and stir often. The moment it smells nutty and turns deep gold, take it off the heat. I’ve burned my share of butter out of distraction—lesson learned. You’ll see little brown bits at the bottom; those are flavor gold, so pour everything over the squash.
Crispy sage is worth the extra step. Make sure leaves are dry before adding to hot butter, or they’ll splatter. Use tongs to remove them and drain on paper towels. If you want extra crunch, fry a few more leaves and toss on top. For multitasking, brown the butter and fry sage while squash is roasting—just don’t forget to check your oven halfway!
Consistency tip: If you want every slice perfectly caramelized, flip them at the halfway point and rotate your pan for even roasting. And honestly, don’t be afraid of a few imperfect edges; those bits taste incredible.
Variations & Adaptations
-
Dietary Variations:
For vegan or dairy-free: Swap the butter for plant-based versions, and try nutritional yeast for a savory kick in place of brown butter flavor. -
Flavor Twists:
Add a sprinkle of grated parmesan or pecorino over the squash before serving for cheesy depth. Try toasted walnuts or pumpkin seeds for crunch. -
Seasonal Adaptations:
In spring, swap sage for fresh thyme or basil. In winter, add a pinch of cinnamon or smoked paprika for warmth.
For different cooking methods, you can air fry the squash at 400°F (200°C) for 15-20 minutes—just watch for crispness. If you prefer grilling, brush slices with oil and grill for 3-4 minutes per side; finish with brown butter and sage.
Allergen substitutions: Use gluten-free, dairy-free butter for sensitive diets. Sage can be replaced with rosemary or parsley if allergies are a concern. My personal favorite twist? A dash of lemon zest in the brown butter for a fresh pop—so good!
Serving & Storage Suggestions
Serve savory roasted acorn squash warm, straight out of the oven, for the best texture and flavor. Arrange slices on a rustic platter, drizzle generously with brown butter, and scatter crispy sage on top—it looks beautiful and tastes even better.
This dish pairs perfectly with roasted chicken, pork chops, or a hearty grain salad. For brunch, serve alongside eggs and crusty bread. If you’re in the mood for wine, a crisp white or earthy pinot noir complements the flavors.
To store leftovers, let the squash cool completely, then transfer to an airtight container. Keep in the refrigerator for up to 3 days. For longer storage, freeze roasted squash slices in a single layer, then transfer to a zip-top bag—good for 2 months. Reheat in a 350°F (175°C) oven for 10-15 minutes or microwave in short bursts. The flavors actually deepen after a night in the fridge, so don’t be shy about making extra!
Nutritional Information & Benefits
Each serving of savory roasted acorn squash with brown butter and sage (about 1 cup or 150 g) offers approximately:
- Calories: 180
- Fat: 9 g
- Carbohydrates: 29 g
- Fiber: 4 g
- Protein: 2 g
Acorn squash is high in vitamin C, potassium, and antioxidants—great for immune support and heart health. Sage is rich in vitamin K and can help with digestion. Brown butter brings healthy fats and deep flavor, though if you’re watching saturated fat, using less or a plant-based alternative works well. This recipe is naturally gluten-free and can be adapted for dairy-free diets. Allergens include butter; swap as needed for sensitivities. Personally, I love that it’s a comfort food with real wellness benefits—nourishing and satisfying!
Conclusion
If you’re craving a cozy, crowd-pleasing dish that’s equal parts simple and memorable, this savory roasted acorn squash recipe with brown butter and sage checks every box. It’s the kind of recipe you’ll come back to every season—easy to adapt, always delicious, and packed with comforting flavors. Don’t be afraid to tweak it to your taste, whether you want more herbs, a cheesy topping, or a hint of spice.
I love how this dish brings people together, whether it’s at a holiday table or a laid-back weeknight dinner. It’s warm, inviting, and just a little bit nostalgic. If you try it, let me know what you think! Drop a comment, share your own twists, or pin it to your Pinterest board for safe keeping. Here’s to simple pleasures and big flavors—happy cooking!
Frequently Asked Questions
Can I prepare savory roasted acorn squash ahead of time?
Absolutely! You can roast the squash up to a day in advance and reheat in the oven. The brown butter and sage are best made fresh, but leftovers reheat beautifully.
Do I need to peel acorn squash before roasting?
Nope! The skin softens during roasting and is totally edible. Plus, it saves a ton of time (and keeps the slices intact).
Can I use other types of squash for this recipe?
Definitely. Delicata or butternut squash work well—just slice to similar thickness and adjust roasting time as needed.
How do I know when brown butter is ready?
Brown butter is ready when it turns a deep golden color and smells nutty. Watch closely—it can burn quickly, so pull it from the heat as soon as you see tiny brown bits forming.
What if I don’t have fresh sage?
You can substitute fresh thyme, rosemary, or even parsley for a twist. Dried sage won’t crisp up the same way, but it’ll still add flavor.
Pin This Recipe!
Savory Roasted Acorn Squash Recipe with Brown Butter Sage

Tender, caramelized acorn squash crescents are roasted until golden and finished with nutty brown butter and crispy sage leaves for a comforting, crowd-pleasing side dish. This easy recipe is perfect for holidays or cozy weeknight dinners.
- Prep Time: 15 minutes
- Cook Time: 35-40 minutes
- Total Time: 50-55 minutes
- Yield: 4 servings 1x
- Category: Side Dish
- Cuisine: American
Ingredients
- 2 medium acorn squash (about 2½ lbs), washed and halved
- 2 tablespoons olive oil (extra virgin preferred)
- 1 teaspoon kosher salt (or to taste)
- ½ teaspoon freshly ground black pepper
- 1 tablespoon maple syrup (optional)
- 6 tablespoons unsalted butter
- 12–15 fresh sage leaves
- ½ teaspoon flaky sea salt (optional, for finishing)
- Pinch red pepper flakes (optional)
Instructions
- Preheat oven to 425°F (220°C). Line a large baking sheet with parchment paper for easy cleanup (optional).
- Slice acorn squash in half from stem to tip. Scoop out seeds with a spoon. Slice halves into ¾-inch crescents. Trim bottoms if needed for stability.
- In a mixing bowl, toss squash slices with olive oil, salt, pepper, and maple syrup if using until evenly coated.
- Arrange squash slices in a single layer on the baking sheet, ensuring they are not overlapping.
- Roast on the middle rack for 20 minutes. Flip slices and roast another 15-20 minutes until golden and fork-tender.
- While squash roasts, melt butter in a small saucepan over medium heat. Stir occasionally until butter foams, turns golden, and smells nutty (about 5-6 minutes).
- Add sage leaves to the brown butter and fry for 30-45 seconds until crisp and dark green. Remove sage leaves and drain on a paper towel.
- Arrange roasted squash on a platter. Drizzle with warm brown butter, scatter crispy sage leaves, and sprinkle with flaky sea salt and red pepper flakes if desired. Serve immediately.
Notes
No need to peel acorn squash—the skin softens and adds texture. For vegan or dairy-free, use plant-based butter. Flip squash halfway and rotate pan for even caramelization. Brown butter can burn quickly; watch closely. Sage must be dry before frying to avoid splattering. Squash can be roasted ahead and reheated; brown butter and sage are best fresh. Try adding parmesan, nuts, or lemon zest for variations.
Nutrition
- Serving Size: About 1 cup (150 g)
- Calories: 180
- Sugar: 7
- Sodium: 400
- Fat: 9
- Saturated Fat: 5
- Carbohydrates: 29
- Fiber: 4
- Protein: 2
Keywords: acorn squash, roasted squash, brown butter, sage, fall recipes, Thanksgiving, gluten-free, vegetarian, easy side dish, comfort food


