If you’ve ever walked into a kitchen and caught the sweet, salty aroma of melting chocolate mingling with roasted pretzels—well, you know what I mean. That scent hits you right in the nostalgia, especially when you’re whipping up something as fun as Witch Finger Pretzel Rods. The first time I made these, it was a rainy October afternoon and my kids were sprawled across the kitchen island, eyes wide with anticipation. I remember pausing mid-dip, chocolate dripping from my spoon, just smiling (the kind of moment where you realize you’ve stumbled onto a treat that’s pure Halloween magic).
Back when I was knee-high to a grasshopper, Halloween treats meant caramel apples and popcorn balls at Grandma’s house. But let’s face it—these Witch Finger Pretzel Rods are the kind of show-stopping treat that makes you wish you’d discovered them years ago. There’s something about turning a simple pretzel rod into a spooky, witchy finger (green chocolate, almond fingernails, and creepy knuckle wrinkles!) that brings out the kid in everyone. My family couldn’t stop sneaking them off the tray—even my husband, who claims he’s “not a sweets guy.” Honestly, I can’t blame them. These are dangerously easy to make and even easier to eat.
Perfect for potlucks, Halloween parties, or just to brighten up your Pinterest board—these Witch Finger Pretzel Rods have become a staple for our family gatherings. I’ve tested this recipe countless times (in the name of research, of course), and it never fails to get those wide-eyed, delighted reactions. They feel like a warm hug in spooky disguise, and trust me, you’re going to want to bookmark this one for every October to come.
Why You’ll Love This Recipe
Sometimes you just need a treat that’s as fun to make as it is to eat. These Witch Finger Pretzel Rods check all the boxes, and I’m speaking from plenty of hands-on experience. Here’s why these are a must-make for your Halloween spread:
- Quick & Easy: You’ll have a tray full of spooky pretzel fingers in under 45 minutes—perfect for those last-minute party prep moments or when your little goblins demand something festive right now.
- Simple Ingredients: Nothing fancy here. Most of the ingredients are pantry staples, and if you’ve got pretzel rods and chocolate wafers, you’re already halfway there.
- Perfect for Halloween Parties: These are always the first thing to disappear from the snack table. Kids love the look, adults love the flavor, and they make for the cutest party photos.
- Crowd-Pleaser: I’ve brought these to playdates, work potlucks, and even trick-or-treat night. The reactions? Total delight. No one can resist those “witchy” details.
- Unbelievably Delicious: The combination of crunchy pretzel, creamy chocolate, and a hint of almond crunch is next-level Halloween comfort food.
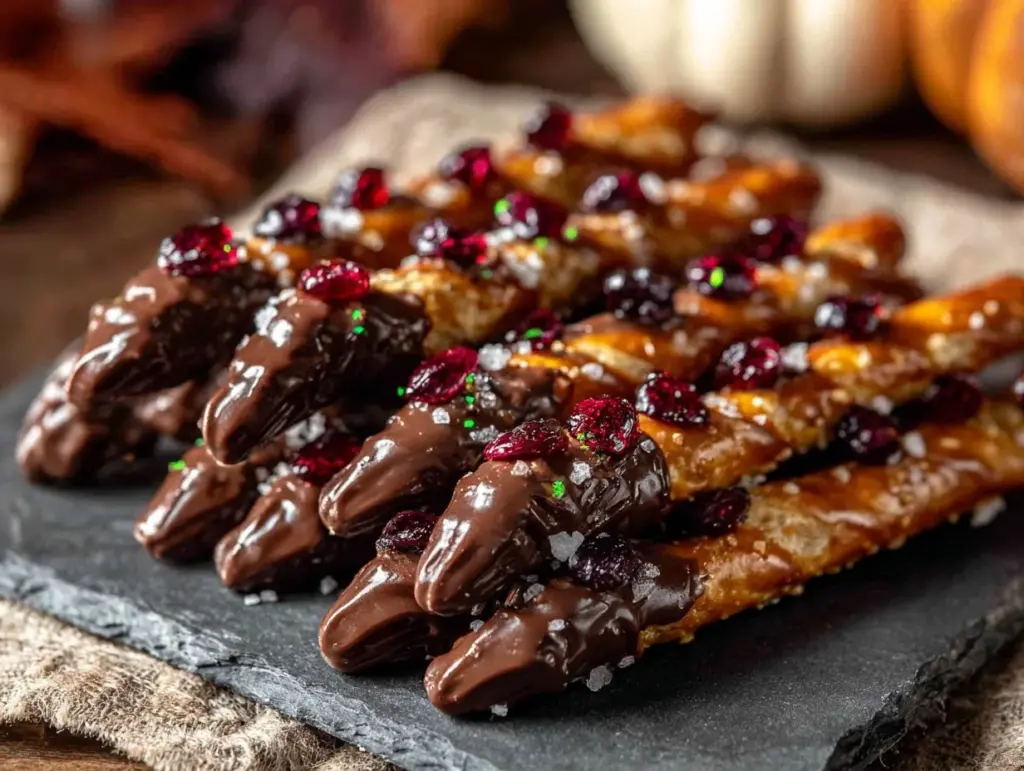
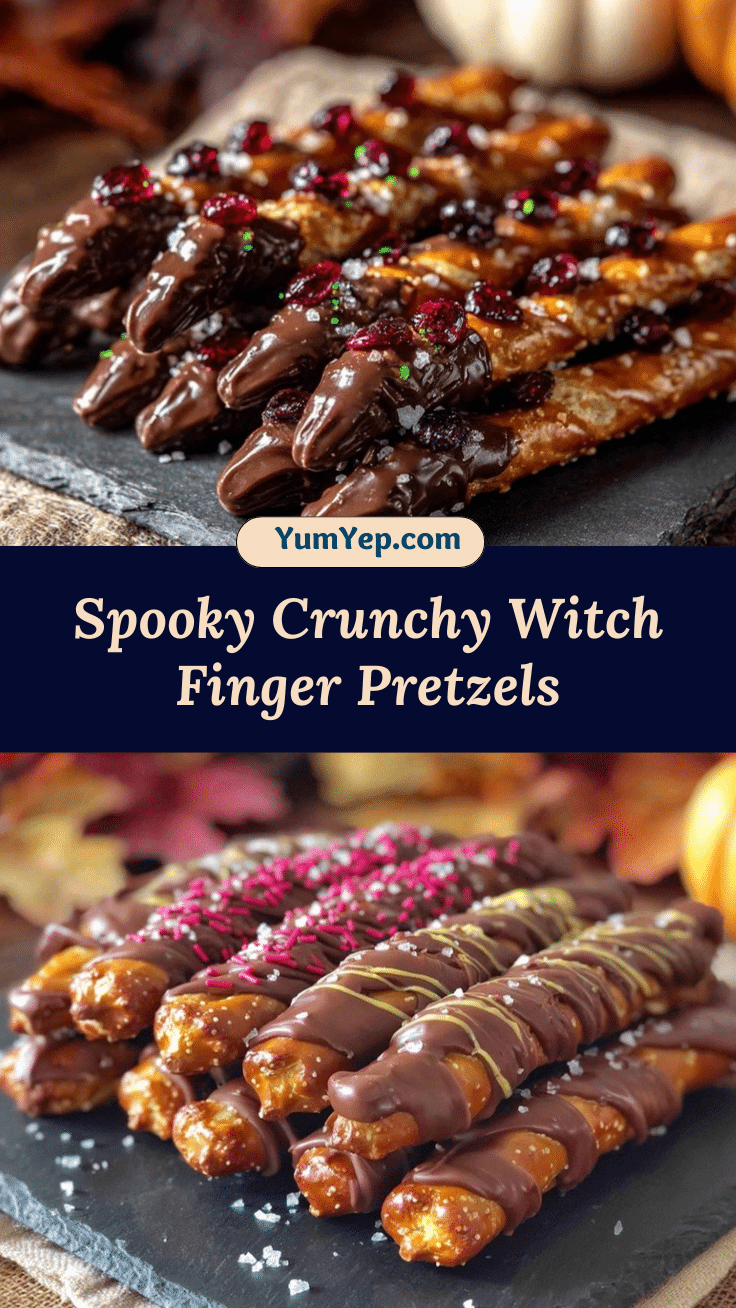
What makes this Witch Finger Pretzel Rods recipe stand out? For starters, I use colored candy melts for that vibrant green hue—no food coloring mess. Pressing sliced almonds on the tip creates a creepy, realistic “nail” (I once swapped in pumpkin seeds for a twist—still spooky, still delicious). The knuckle wrinkles are a simple trick with a butter knife, but they add that eerie, authentic touch.
When you bite into these, it’s the kind of treat that makes you close your eyes for a second. Sweet, salty, and crunchy all at once—comfort food with a Halloween twist. If you want something that’s both impressive and stress-free, this is it. They’re as much fun to make as to eat, and honestly, your guests will think you’re a Halloween genius.
What Ingredients You Will Need
This Witch Finger Pretzel Rods recipe uses simple, wholesome ingredients to deliver bold flavor and a spooky, satisfying crunch. You probably have most of these in your kitchen already, making this treat as convenient as it is festive.
- Pretzel rods (about 18-24 rods; choose thick, sturdy ones for the best “finger” shape)
- Green candy melts (12 oz / 340 g; for that perfect witchy skin—Wilton’s brand works great)
- White candy melts or white chocolate chips (6 oz / 170 g; for “bone” accents if desired)
- Sliced almonds (about 24 slices; these become your witch fingernails—choose whole, unbroken slices)
- Coconut oil (1-2 tsp / 5-10 ml; helps thin the chocolate for smoother dipping—optional but recommended)
- Cocoa powder (just a pinch; for dusting the “knuckles” and adding depth—optional, but it adds a nice rustic touch)
- Black gel food coloring (optional; for extra creepy details, like nail cracks or knuckle lines)
- Sea salt flakes (optional; sprinkle for a salty finish—just a tiny pinch on each rod)
If you need substitutions, here are a few tried-and-true swaps:
- Pretzel rods: Swap for gluten-free pretzel sticks if needed. They work just as well (trust me, I’ve tested them for my gluten-sensitive friends).
- Green candy melts: If you can’t find these, white chocolate chips with a few drops of gel food coloring do the trick. Just stir well for even color.
- Sliced almonds: Pumpkin seeds or sunflower seeds make a fun twist on the “nail”—especially if you’re avoiding nuts.
- Coconut oil: You can use vegetable shortening or skip altogether if you don’t mind slightly thicker chocolate.
Honestly, the ingredient list is flexible. I’ve even swapped in dark chocolate melts for a “zombie finger” look—so don’t stress if you’re missing one thing. The key is sturdy pretzel rods and some sort of edible “nail.” You’ll be amazed how easy it is to make these look Pinterest-worthy!
Equipment Needed
You don’t need a fancy kitchen to make Witch Finger Pretzel Rods, but a few basic tools go a long way. Here’s what I always use and recommend:
- Microwave-safe bowls (for melting candy melts or chocolate—glass bowls work best for even heating)
- Baking sheet (lined with parchment paper for easy cleanup)
- Small silicone spatula (for stirring and scraping down chocolate—trust me, it’s less messy than a spoon)
- Butter knife or toothpick (for making knuckle lines and wrinkles)
- Tweezers or small tongs (optional but super helpful for placing almond nails)
- Cooling rack (not essential but speeds up the setting time)
If you don’t have parchment paper, wax paper works fine. I’ve even used a nonstick silicone mat in a pinch (easy cleanup!). For melting chocolate, a double boiler is classic, but the microwave is way faster. Just watch for overheating—short bursts are best.
Maintenance tip: Wash silicone spatulas and tongs quickly after using chocolate to prevent stubborn residue. If you’re on a budget, regular spoons and forks do the trick—just expect a little more mess. Honestly, Halloween baking is supposed to be a bit messy, right?
Preparation Method

- Prepare your workspace: Line a baking sheet with parchment paper. Set out all your pretzel rods, sliced almonds, and candy melts. Have a butter knife and spatula ready.
(Time: 5 minutes) - Melt the green candy melts: Add green candy melts to a microwave-safe bowl. Microwave in 30-second bursts, stirring between each until smooth. If the chocolate seems thick, stir in 1-2 tsp (5-10 ml) coconut oil. You want a smooth, dippable consistency.
(Time: 2-3 minutes)
Tip: If using white chocolate and food coloring, melt chocolate first then add coloring. Stir well. - Dip the pretzel rods: Hold one end of a pretzel rod and dip about 2/3 of the way into the melted green chocolate. Gently tap off excess chocolate by tapping the rod against the bowl’s edge.
(Time: 15 minutes for a batch)
Note: If the chocolate starts to set, reheat for 10 seconds. - Add the fingernail: While the chocolate is still wet, gently press a sliced almond onto the tip of each rod. Position so the rounded edge mimics a nail. Use tweezers for precision if you like.
(Tip: If the chocolate sets before you add the almond, dab a bit more melted chocolate on the tip as “glue.”) - Create the knuckle wrinkles: Use a butter knife or toothpick to gently score horizontal lines near the tip and midway down the rod, creating “knuckles.” If you want extra drama, dust these areas lightly with cocoa powder or draw lines with black gel food coloring.
(Time: 5-10 minutes) - Set and dry: Place dipped rods on the parchment-lined baking sheet. Let them set at room temperature for 30 minutes. If you’re in a hurry, pop the tray in the fridge for 10-15 minutes.
Warning: Don’t freeze! It can cause the chocolate to crack. - Add bone details (optional): Melt white candy melts and use a toothpick to draw bone-like accents at the “cut end” of the rod. Not necessary, but super cute for extra spook.
(Time: 5 minutes) - Finish and serve: Once the chocolate is fully set, arrange your Witch Finger Pretzel Rods on a festive tray. Sprinkle sea salt flakes for a salty-sweet finish if desired.
Sensory cue: They should look gnarled, green, and just a tiny bit gross—in the best way!
Personal tip: If you’re making these with kids, set up an “assembly line” and let everyone handle a different step. It’s messy, but hey, isn’t that what Halloween is all about?
Cooking Tips & Techniques
After making Witch Finger Pretzel Rods more times than I can count, I’ve learned a few tricks that honestly make a difference:
- Don’t overheat the chocolate: Microwaving in short bursts is key. Chocolate burns fast and gets clumpy—if that happens, stir in a touch of coconut oil to save it.
- Work quickly: Candy melts set faster than you’d think, especially if your kitchen is cool. Dip rods and add almonds immediately for best sticking power.
- Make knuckle wrinkles before the chocolate sets: If you wait too long, the lines won’t form. If you miss that window, use a toothpick dipped in gel coloring to “draw” wrinkles instead.
- Prevent chocolate pooling: Tap off excess chocolate before placing the rod on parchment. Otherwise, you’ll get flat “finger tips.”
- Stagger your dipping: Dip 3-4 rods at a time, then add almonds and wrinkles, then move to the next batch. Keeps the chocolate at the right consistency for each step.
- If using food coloring: Gel is better than liquid for chocolate. Liquid coloring can cause chocolate to seize up (ask me how I learned that one). Always add after melting, not before.
Honestly, my first batch was a mess—chocolate everywhere, almonds sliding off, knuckles that looked more like bruises. But after a few tries, I realized patience and a little assembly line are key. If something goes wrong, just eat the evidence (no one’s judging). The goal is spooky fun, not perfection!
Variations & Adaptations
One of my favorite things about Witch Finger Pretzel Rods is how versatile they are. Here are some variations I’ve tried or dreamed up:
- Gluten-Free Version: Use gluten-free pretzel rods. They’re just as crunchy, and honestly, no one will notice the difference at a party.
- Zombified Fingers: Swap green candy melts for dark chocolate or purple melts. Use pumpkin seeds for nails. Makes for a “rotting zombie” look that’s perfect for older kids or adults.
- Nut-Free Adaptation: Use sunflower seeds or candy-coated chocolate for the nails if you’re avoiding nuts (super handy for classroom treats).
- Flavor Twist: Add a pinch of cinnamon or pumpkin spice to the melted chocolate for a fall flavor boost. I tried this last year and it was a hit with the grown-ups!
- White Witch Fingers: Use white candy melts and add a few drops of blue or lavender food coloring for a frosty witch finger look—great for a “Frozen”-inspired party.
If you want to bake instead of dip, try rolling refrigerated breadstick dough into finger shapes, bake, and then add almond nails with a dab of jam. Totally different, but still spooky and fun! Halloween is all about creativity—don’t be afraid to experiment.
Serving & Storage Suggestions
Witch Finger Pretzel Rods are best served at room temperature—arranged on a Halloween platter with fake cobwebs or cauldron bowls for extra effect. I love pairing these with apple cider or hot chocolate, especially after a chilly night of trick-or-treating.
If you’re prepping ahead, store the finished rods in an airtight container at room temperature for up to 1 week. Place wax paper between layers to prevent sticking. For longer storage, you can refrigerate them, but let them come to room temp before serving for the best crunch.
Reheating isn’t needed, but if the chocolate looks dull after fridge time, let them sit out for 10-15 minutes—they’ll shine right up. Flavors deepen after a day or two, with the pretzel staying crisp and the chocolate mellowing. These travel well, making them perfect for gifting or party favors (wrap in cellophane with a cute ribbon!).
Nutritional Information & Benefits
Each Witch Finger Pretzel Rod contains approximately:
- Calories: 120-150 per rod
- Total fat: 5-7g
- Sodium: 150-200mg
- Sugars: 8-12g
Pretzels offer a satisfying crunch with less fat than many cookies, and almonds add a tiny boost of protein and healthy fats. If you use gluten-free rods or nut-free nails, this treat can fit a variety of dietary needs. Be aware: these do contain wheat and nuts (unless adapted), so check for allergies.
Personally, I love that you get a hit of sweet and salty in every bite—perfect for curbing Halloween sugar overload. Moderation is key, but hey, Halloween only comes once a year!
Conclusion
If you’re searching for a Halloween treat that’s spooky, fun, and totally doable, Witch Finger Pretzel Rods are it. They’re easy enough for kids to help, impressive enough for Pinterest, and just the right mix of creepy and delicious.
Don’t be afraid to tweak the recipe—try different chocolates, swap out nails, or play with colors. That’s half the fun! I keep coming back to this recipe every October, and it’s become a sweet tradition for our family (with plenty of giggles and sticky fingers along the way).
So, what are you waiting for? Give these Witch Finger Pretzel Rods a try, and let me know how yours turn out. Drop your favorite twist in the comments, share your photos, or tell me your funniest Halloween kitchen story. Happy haunting—and happy snacking!
Frequently Asked Questions
How far in advance can I make Witch Finger Pretzel Rods?
You can make them up to a week ahead! Just store in an airtight container at room temperature and they’ll stay crunchy and fresh.
Can I use regular chocolate instead of candy melts?
Absolutely. White or milk chocolate works fine—just add a few drops of gel food coloring for the spooky green effect.
Are Witch Finger Pretzel Rods safe for nut allergies?
If you substitute almonds with sunflower seeds or candy, they’re nut-free. Always check your pretzel brand for allergens, too.
What’s the best way to transport these to a party?
Line a container with wax paper and stack rods in layers. They travel well and don’t melt easily, so they’re perfect for sharing!
Can kids help make Witch Finger Pretzel Rods?
Definitely! Kids love dipping, adding nails, and making wrinkles. Just set out some aprons—things might get a little messy, and that’s part of the fun.
Pin This Recipe!
Witch Finger Pretzel Rods

These Witch Finger Pretzel Rods are a quick, easy, and spooky Halloween treat made with pretzel rods dipped in green chocolate and topped with almond ‘nails.’ Perfect for parties, potlucks, or festive family fun.
- Prep Time: 15 minutes
- Cook Time: 5 minutes
- Total Time: 45 minutes
- Yield: 18-24 rods 1x
- Category: Dessert
- Cuisine: American
Ingredients
- 18–24 pretzel rods (thick, sturdy)
- 12 oz green candy melts (Wilton’s brand recommended)
- 6 oz white candy melts or white chocolate chips (optional, for bone accents)
- 24 sliced almonds (whole, unbroken slices for fingernails)
- 1–2 tsp coconut oil (optional, for thinning chocolate)
- Pinch of cocoa powder (optional, for dusting knuckles)
- Black gel food coloring (optional, for details)
- Sea salt flakes (optional, for sprinkling)
Instructions
- Line a baking sheet with parchment paper. Set out pretzel rods, sliced almonds, and candy melts. Have a butter knife and spatula ready.
- Add green candy melts to a microwave-safe bowl. Microwave in 30-second bursts, stirring between each until smooth. If thick, stir in coconut oil for a smooth consistency.
- Hold one end of a pretzel rod and dip about 2/3 of the way into the melted green chocolate. Tap off excess chocolate.
- While chocolate is wet, gently press a sliced almond onto the tip of each rod to mimic a nail. Use tweezers for precision if desired.
- Use a butter knife or toothpick to gently score horizontal lines near the tip and midway down the rod to create knuckle wrinkles. Optionally, dust with cocoa powder or draw lines with black gel food coloring.
- Place dipped rods on the parchment-lined baking sheet. Let set at room temperature for 30 minutes, or refrigerate for 10-15 minutes if in a hurry.
- Optional: Melt white candy melts and use a toothpick to draw bone-like accents at the cut end of the rod.
- Once chocolate is fully set, arrange Witch Finger Pretzel Rods on a festive tray. Sprinkle sea salt flakes if desired.
Notes
Work quickly as candy melts set fast. Substitute gluten-free pretzel rods or nut-free nails for dietary needs. For best results, dip rods in small batches and add details immediately. Store in an airtight container at room temperature for up to 1 week.
Nutrition
- Serving Size: 1 pretzel rod
- Calories: 120150
- Sugar: 812
- Sodium: 150200
- Fat: 57
- Saturated Fat: 3
- Carbohydrates: 18
- Fiber: 1
- Protein: 2
Keywords: Halloween, pretzel rods, witch fingers, spooky treats, party snacks, easy dessert, kid-friendly, chocolate dipped, festive, almond nails


