“You seriously have to try this,” my friend texted me one hectic Thursday evening, right when I was scrambling to figure out dessert for an unexpected guest. I was skeptical. No-bake cheesecakes always felt a bit dubious to me—too soft, too sweet, or just not quite right. But this Easy No-Bake Oreo Cheesecake with Creamy 5-Ingredient Filling promised simplicity and a taste that could charm even the pickiest sweet tooth. Honestly, it turned out to be one of those accidental wins that stuck around in my recipe rotation.
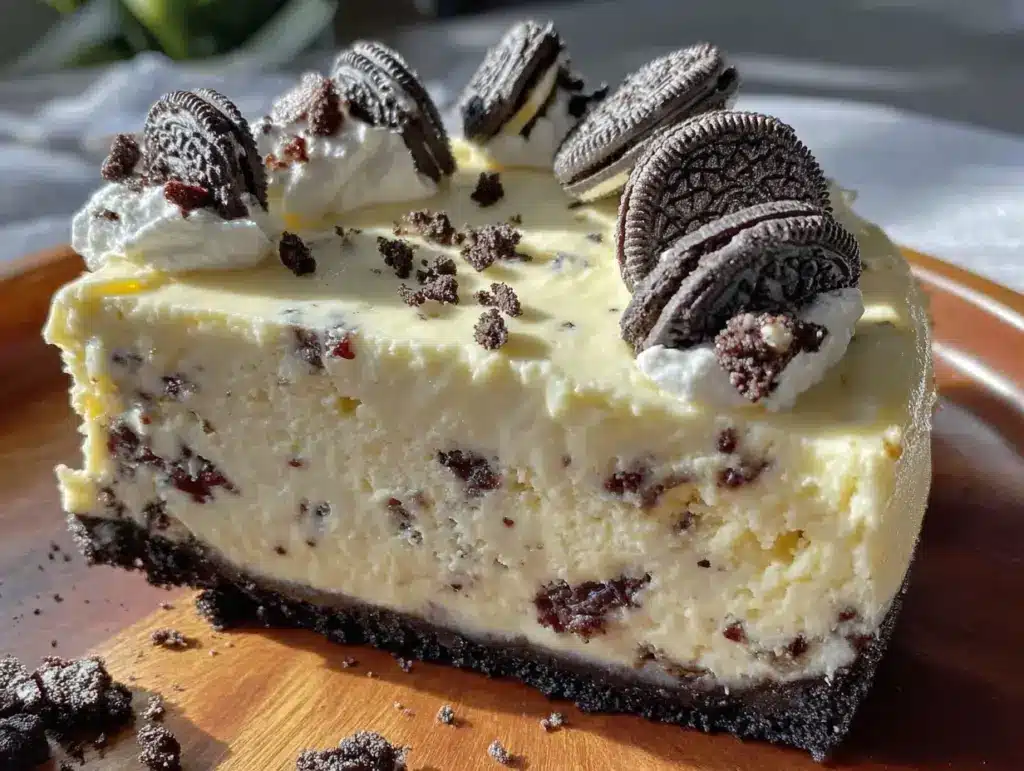
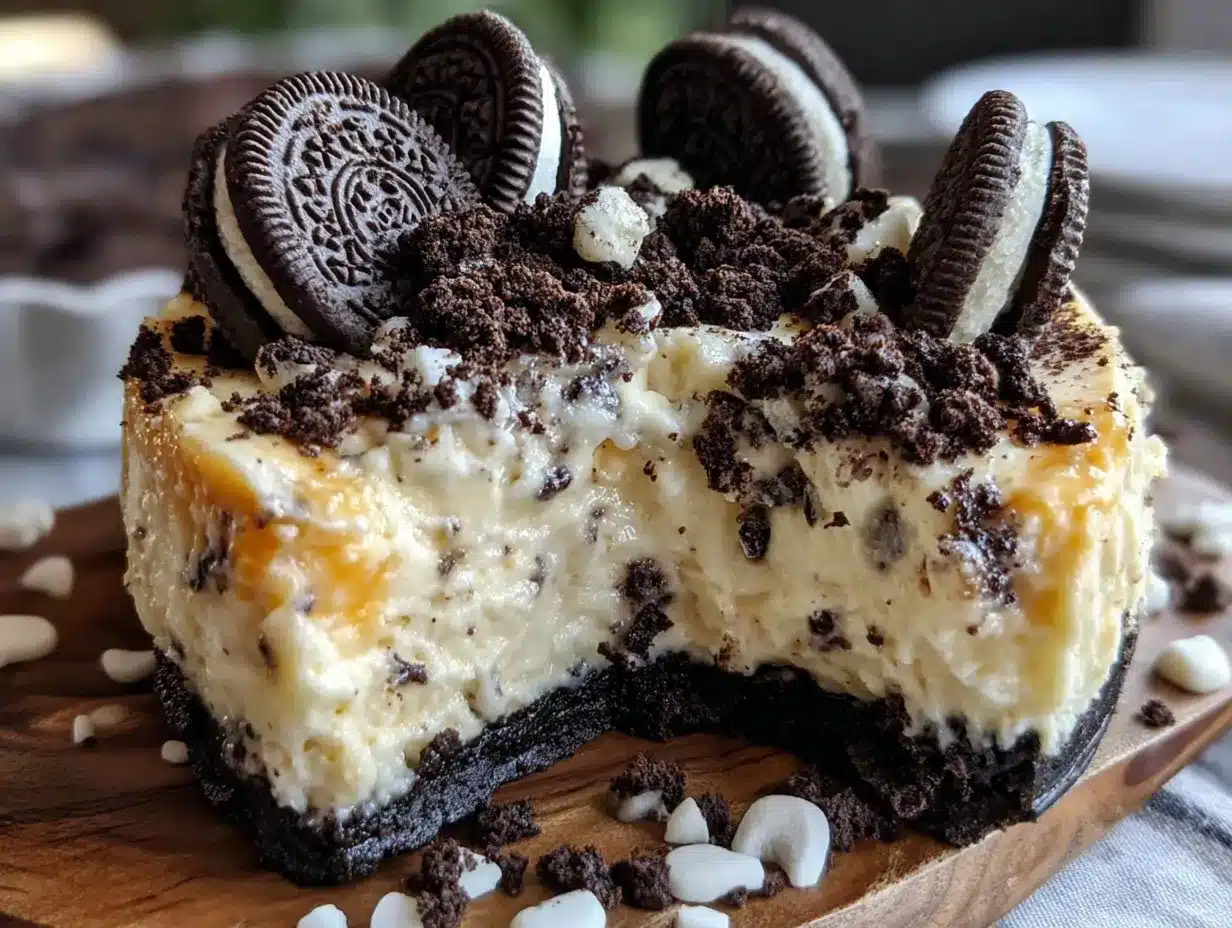
I remember pulling together the crust in less than 10 minutes, using crushed Oreos instead of a usual graham cracker base. That little twist gave the whole cheesecake a chocolatey crunch that felt like a party in every bite. The filling was silky smooth, just creamy enough—not too heavy—thanks to only five ingredients that I always keep stocked. It’s so straightforward, yet the flavors mesh perfectly, making it a standout among other no-bake desserts I’ve tried.
What really hooked me was how foolproof it was. No oven, no complicated steps—just mixing, chilling, and then the reward of a luscious, satisfying slice. It’s the kind of dessert that turns a chaotic evening into a sweet pause, a moment of calm and indulgence. Plus, everyone who’s tasted it keeps asking for the recipe, which honestly, feels pretty great.
This cheesecake definitely earned its spot as a go-to treat, especially when time is tight but dessert cravings are big. It’s not just some quick fix; it’s comfort food that feels special enough to share, yet easy enough to whip up on a whim. I think you’ll find that same quiet joy in it, too.
Why You’ll Love This Recipe
After making this Easy No-Bake Oreo Cheesecake with Creamy 5-Ingredient Filling more times than I can count, I’m convinced it’s one of those rare desserts that hits all the right notes. From busy weeknights to last-minute get-togethers, this cheesecake always delivers.
- Quick & Easy: Ready in under 30 minutes, perfect when you need a dessert without fuss.
- Simple Ingredients: Just five basics—no fancy shopping trips required. You probably have everything already!
- Perfect for Any Occasion: Whether it’s a casual family dinner or a spontaneous party, this cheesecake fits right in.
- Crowd-Pleaser: Kids, adults, Oreo fans—it gets rave reviews across the board.
- Unbelievably Delicious: The creamy filling and Oreo crunch combo is pure comfort food magic.
What sets this recipe apart isn’t just the ease, but the thoughtful balance in texture and taste. Using crushed Oreos for the crust adds a chocolatey crunch that’s way better than plain crumbs. The creamy filling, whipped to just the right consistency, feels indulgent without being too heavy or overly sweet. Plus, no baking means less stress and more time to enjoy the moment.
Honestly, this isn’t just another no-bake cheesecake—it’s the one I reach for when I want a dessert that’s both comforting and impressive without the hassle. Like when I made it for my last brunch and it disappeared before coffee was even halfway done. It’s a recipe that feels like a little celebration, even on an ordinary day.
What Ingredients You Will Need
This Easy No-Bake Oreo Cheesecake recipe relies on simple, wholesome ingredients to create bold flavor and a satisfying texture without any stress. Most of these are pantry staples, and the few fresh items are easy to find year-round.
- Oreo Cookies (about 24 cookies, crushed) – For the crust, I recommend classic Oreos for their perfect chocolate crunch and that signature creamy filling.
- Unsalted Butter (5 tablespoons, melted) – Binds the crust together; salted works too if that’s what you have on hand.
- Cream Cheese (8 ounces / 225 grams, softened) – The base of the filling; using full-fat cream cheese gives the best creamy texture.
- Powdered Sugar (3/4 cup / 90 grams) – Sweetens the filling smoothly without graininess.
- Heavy Whipping Cream (1 cup / 240 ml, cold) – Whipped to fluffy perfection, it lightens the filling for that dreamy texture.
- Vanilla Extract (1 teaspoon) – Adds depth and warmth to the filling.
These ingredients come together with minimal effort, and you can easily swap the heavy cream for a dairy-free alternative like coconut cream if needed. For the crust, if you want to mix things up, I’ve found that using a mix of regular and mint Oreos adds a fun twist during holiday seasons.
If you’re curious about pairing this with other treats, it’s as delicious alongside some snowball cookies for an extra sweet spread or after a cozy brunch featuring my cinnamon roll casserole.
Equipment Needed
- 9-inch (23 cm) springform pan – Ideal for easy removal of the cheesecake; if you don’t have one, a regular cake pan lined with parchment works, but springform is best.
- Mixing bowls – One large for the filling and one for the crust.
- Electric mixer or stand mixer – Helps whip the cream and blend cream cheese smoothly; a hand mixer works fine too.
- Food processor or rolling pin – For crushing the Oreos finely; I use a food processor for speed, but a zip-top bag and rolling pin do the trick.
- Spatula and spoon – For folding and spreading the filling evenly.
If you’re on a budget, a hand mixer and a sturdy zip-top bag for crushing cookies are perfectly fine substitutes. I’ve also learned that keeping your cream cheese at room temperature really helps get a smooth filling without lumps, so plan ahead for that little step.
Preparation Method
- Prepare the crust: Crush about 24 Oreo cookies into fine crumbs using a food processor or by placing them in a zip-top bag and rolling with a rolling pin. It should look like coarse sand with some small chunks for texture.
- Mix crust ingredients: Transfer the crumbs to a bowl and stir in 5 tablespoons (70 grams) melted unsalted butter until everything looks evenly moistened. This mixture should hold together when pressed.
- Press the crust: Pour the mixture into a 9-inch (23 cm) springform pan and press firmly and evenly into the bottom using the back of a spoon or your fingers. Aim for a compact layer without cracks. Pop it in the fridge while you make the filling, about 10 minutes.
- Make the filling base: In a large bowl, beat 8 ounces (225 grams) softened cream cheese until smooth and creamy, about 2-3 minutes on medium speed. This prevents lumps and gives a silky texture.
- Add sugar and vanilla: Gradually add 3/4 cup (90 grams) powdered sugar and 1 teaspoon vanilla extract, mixing until fully combined and smooth. The filling should taste sweet but balanced.
- Whip the cream: In a separate chilled bowl, whip 1 cup (240 ml) cold heavy whipping cream until stiff peaks form. It should hold shape when you lift the whisk, but be careful not to overwhip or it’ll become grainy.
- Fold whipped cream: Gently fold the whipped cream into the cream cheese mixture using a spatula. Fold slowly to keep as much air as possible, which makes the filling light and fluffy.
- Combine with Oreo chunks: Reserve about 6 crushed Oreos and fold them into the filling for extra cookie bits throughout the cheesecake.
- Assemble the cheesecake: Spoon the creamy filling over the chilled crust and smooth the surface evenly. Sprinkle the reserved crushed Oreos on top for a pretty finish.
- Chill: Refrigerate the cheesecake for at least 4 hours, preferably overnight, to let it set firm and allow flavors to meld beautifully.
- Serve: Release the springform pan sides carefully and slice with a sharp knife dipped in hot water for clean cuts.
Pro tip: If you find your crust isn’t holding well, add a tablespoon more melted butter next time. Also, always soften the cream cheese fully—cold lumps can ruin the smoothness of your filling.
Cooking Tips & Techniques
Working with no-bake cheesecakes is all about texture and patience. One thing I’ve learned is that the filling’s creaminess depends on how well you whip the cream and fold it in. Rushing this step can lead to a dense or uneven cheesecake.
Another tip: make sure your Oreo crust is pressed firmly and evenly. I like to use the bottom of a glass for this; it applies more pressure than a spoon and creates a compact base that won’t crumble when sliced.
One mistake I made early on was skipping the chilling time—impatient, I sliced it too early, and the cheesecake was a mess. Let it chill at least 4 hours, but overnight is best for clean slices and flavor development.
Also, don’t skip softening the cream cheese. Cold cream cheese lumps are tough to smooth out and can leave you with a gritty filling. Room temperature for about 30 minutes usually does the trick.
If you want to speed things up, whip the cream while the crust chills in the fridge—multitasking always helps when time is tight.
Variations & Adaptations
This Easy No-Bake Oreo Cheesecake is pretty versatile, and I’ve tried a few tweaks that worked well.
- Mint Oreo Cheesecake: Swap regular Oreos for mint-flavored ones for a refreshing twist, perfect around holidays.
- Gluten-Free: Use gluten-free sandwich cookies (like gluten-free Oreos) for those avoiding gluten.
- Dairy-Free: Replace cream cheese and heavy cream with coconut cream and a dairy-free cream cheese alternative for a vegan-friendly version.
- Chocolate Overload: Add 1/4 cup (25 grams) cocoa powder to the filling for a richer, chocolate cheesecake.
- Fruit Topping: Top with fresh berries or a drizzle of raspberry sauce for a fruity contrast.
I personally tried the mint Oreo version last Christmas, and it was a hit next to my cranberry orange bread. The flavors complemented each other beautifully, balancing sweet and tangy.
Serving & Storage Suggestions
This cheesecake is best served chilled, straight from the fridge. The texture is perfectly creamy and holds its shape, making each slice look neat and inviting. I like to serve it on a simple white plate to let the Oreo contrast pop visually.
It pairs nicely with a cup of strong coffee or even a creamy hot cocoa on colder days. For gatherings, slice into small portions because it’s rich and satisfying—everyone appreciates a modest, indulgent treat.
Store leftovers tightly covered in the refrigerator for up to 4 days. The flavors actually deepen a bit overnight, so it tastes even better the next day. If you need to store longer, wrap it well and freeze for up to 1 month; thaw overnight in the fridge before serving.
When reheating, it’s best to serve chilled, but if you want a softer texture, let it sit at room temperature for about 15 minutes before slicing.
Nutritional Information & Benefits
Each slice of this Easy No-Bake Oreo Cheesecake offers a delicious treat with estimated values around 350 calories, 25 grams of fat, and 30 grams of carbohydrates per serving (based on 12 slices). The richness comes primarily from cream cheese and heavy cream, so it’s definitely a dessert to savor in moderation.
The cream cheese provides a good dose of calcium and protein, while Oreos add that nostalgic chocolate flavor everyone loves. If you opt for dairy-free or gluten-free versions, you can adjust to fit your dietary needs without losing the creamy texture.
From a wellness perspective, this cheesecake is a reminder that treats can be simple, made with real ingredients, and enjoyed as part of a balanced lifestyle. It’s one of those desserts that doesn’t need endless additions to feel special.
Conclusion
This Easy No-Bake Oreo Cheesecake with Creamy 5-Ingredient Filling is the kind of recipe that surprises you with its simplicity and wins you over with every bite. Whether you’re new to cheesecake or just looking for a quick, no-fuss dessert, it offers reliability and a rich, satisfying flavor that feels like a little celebration.
Feel free to tweak it to your liking—add a bit of mint, switch up the cookies, or try a lighter dairy-free version. That’s part of the fun and what keeps this recipe fresh in my kitchen.
Personally, I love how it brings people together, no matter the occasion. If you try it, I’d love to hear your tweaks and how it turned out for you. There’s something special about sharing a simple but perfect cheesecake with friends and family—one slice at a time.
Frequently Asked Questions
Can I use a different cookie for the crust instead of Oreos?
Absolutely! Graham crackers, chocolate wafer cookies, or gluten-free sandwich cookies work great. Just crush them finely and mix with melted butter as the base.
Do I have to chill the cheesecake overnight?
While 4 hours is the minimum for it to set, chilling overnight helps the flavors meld and the texture firm up for cleaner slices.
Can I make this cheesecake ahead of time for a party?
Yes! It holds well in the fridge for up to 4 days and can be frozen up to a month. Just thaw in the fridge before serving.
What if I don’t have a springform pan?
You can use a regular cake pan lined with parchment paper, though removing the cheesecake might be a bit trickier. A springform pan is ideal for easy release.
Is there a vegan version of this cheesecake?
Yes, swap cream cheese and heavy cream for dairy-free alternatives like vegan cream cheese and coconut cream. Use vegan cookies for the crust to keep it fully plant-based.
Pin This Recipe!

Easy No-Bake Oreo Cheesecake Recipe with Creamy 5-Ingredient Filling You Must Try
A quick and easy no-bake Oreo cheesecake with a creamy 5-ingredient filling and a chocolatey Oreo crust. Perfect for busy weeknights or last-minute gatherings.
- Prep Time: 15 minutes
- Cook Time: 0 minutes
- Total Time: 4 hours 15 minutes
- Yield: 12 servings 1x
- Category: Dessert
- Cuisine: American
Ingredients
- 24 Oreo Cookies, crushed
- 5 tablespoons unsalted butter, melted
- 8 ounces cream cheese, softened
- 3/4 cup powdered sugar
- 1 cup heavy whipping cream, cold
- 1 teaspoon vanilla extract
Instructions
- Crush about 24 Oreo cookies into fine crumbs using a food processor or by placing them in a zip-top bag and rolling with a rolling pin.
- Transfer the crumbs to a bowl and stir in 5 tablespoons melted unsalted butter until evenly moistened.
- Press the mixture firmly and evenly into the bottom of a 9-inch springform pan. Refrigerate for about 10 minutes.
- In a large bowl, beat 8 ounces softened cream cheese until smooth and creamy.
- Gradually add 3/4 cup powdered sugar and 1 teaspoon vanilla extract, mixing until smooth.
- In a separate chilled bowl, whip 1 cup cold heavy whipping cream until stiff peaks form.
- Gently fold the whipped cream into the cream cheese mixture to keep it light and fluffy.
- Reserve about 6 crushed Oreos and fold them into the filling.
- Spoon the filling over the chilled crust and smooth the surface. Sprinkle reserved Oreos on top.
- Refrigerate for at least 4 hours or overnight to set.
- Carefully release the springform pan sides and slice with a sharp knife dipped in hot water for clean cuts.
Notes
Soften cream cheese to room temperature before mixing to avoid lumps. Press crust firmly and evenly for best results. Chill cheesecake at least 4 hours or overnight for clean slices and flavor development. For a firmer crust, add an extra tablespoon of melted butter. Whip cream carefully to stiff peaks but avoid overwhipping.
Nutrition
- Serving Size: 1 slice (1/12 of che
- Calories: 350
- Sugar: 22
- Sodium: 220
- Fat: 25
- Saturated Fat: 15
- Carbohydrates: 30
- Fiber: 1
- Protein: 5
Keywords: no-bake cheesecake, Oreo cheesecake, easy dessert, quick cheesecake, 5-ingredient cheesecake, no oven dessert, creamy cheesecake


