“Hey, did you bring the dessert?” my cousin asked me right as I walked into the backyard, juggling a stack of graduation cards and a too-heavy camera bag. Honestly, last-minute party food isn’t really my forte, but this time I wasn’t about to show up empty-handed. That’s when I remembered a quick fix I’d stumbled on during a particularly chaotic week—these Easy No-Bake Oreo Graduation Dessert Cups.
I had whipped these up on a Tuesday night when I barely had energy to think, let alone bake. No oven, no fuss, just crushed Oreos, creamy filling, and a few simple steps. The skeptical part of me thought, “Can a no-bake dessert really hit the spot?” But oh, it did. At that party, everyone—kids, grown-ups, even the picky eaters—kept coming back for more. The way the crunchy cookie bits mixed with the smooth cream was oddly satisfying, the perfect sweet treat for celebrating milestones without the stress.
There’s something about these cups that feels just right for graduation parties—the kind of dessert that looks fancy but doesn’t make you sweat in the kitchen. Plus, they’re easy to customize and don’t require last-minute dashing around to grab weird ingredients. So yeah, I keep making these for celebrations now, quietly confident they’ll be a hit. They’re honestly the kind of sweet that makes you pause for a sec and think, “Yep, this was worth it.”
Why You’ll Love This Recipe
This Easy No-Bake Oreo Graduation Dessert Cups recipe has become my go-to for celebrations, and here’s why you might want to keep it in your back pocket too:
- Quick & Easy: Takes about 15 minutes to prep, making it perfect for last-minute party needs or when you’re juggling a million things.
- Simple Ingredients: You probably already have Oreos, cream cheese, and a few pantry staples hanging around—no fancy shopping required.
- Perfect for Graduations & Parties: These cups look charming and festive, ideal for potlucks, family gatherings, or any milestone event.
- Crowd-Pleaser: I’ve watched kids and adults alike devour these, and trust me, they’ll disappear fast.
- Unbelievably Delicious: The creamy texture balanced with Oreo crunch is a combo that feels indulgent but never heavy.
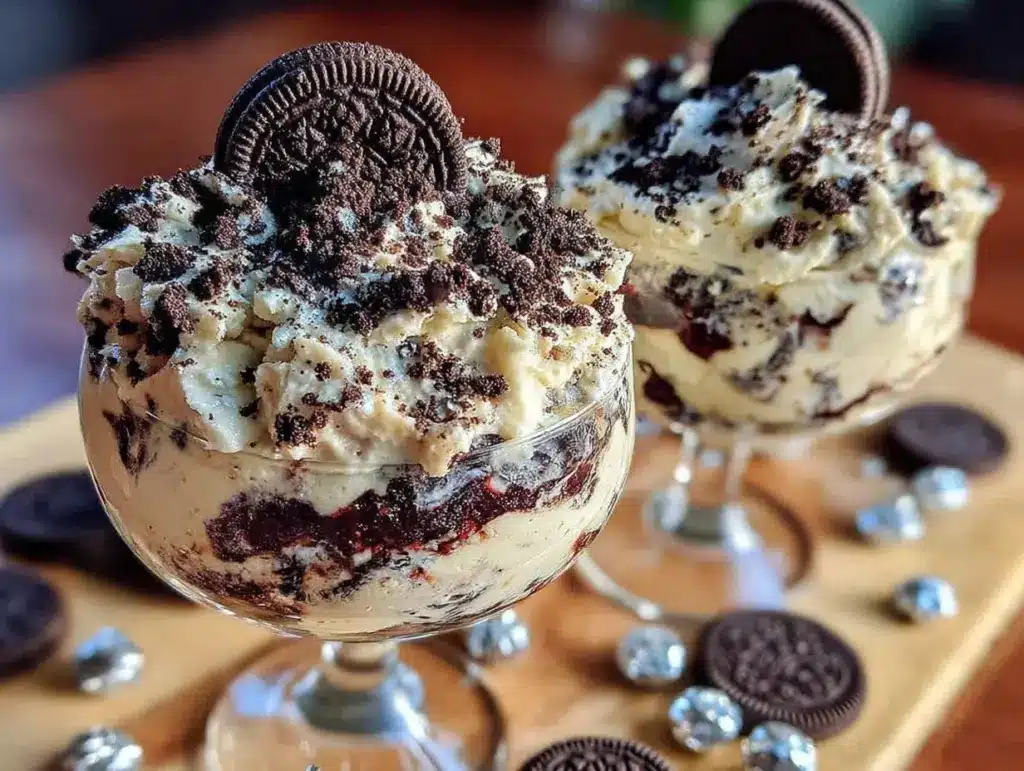
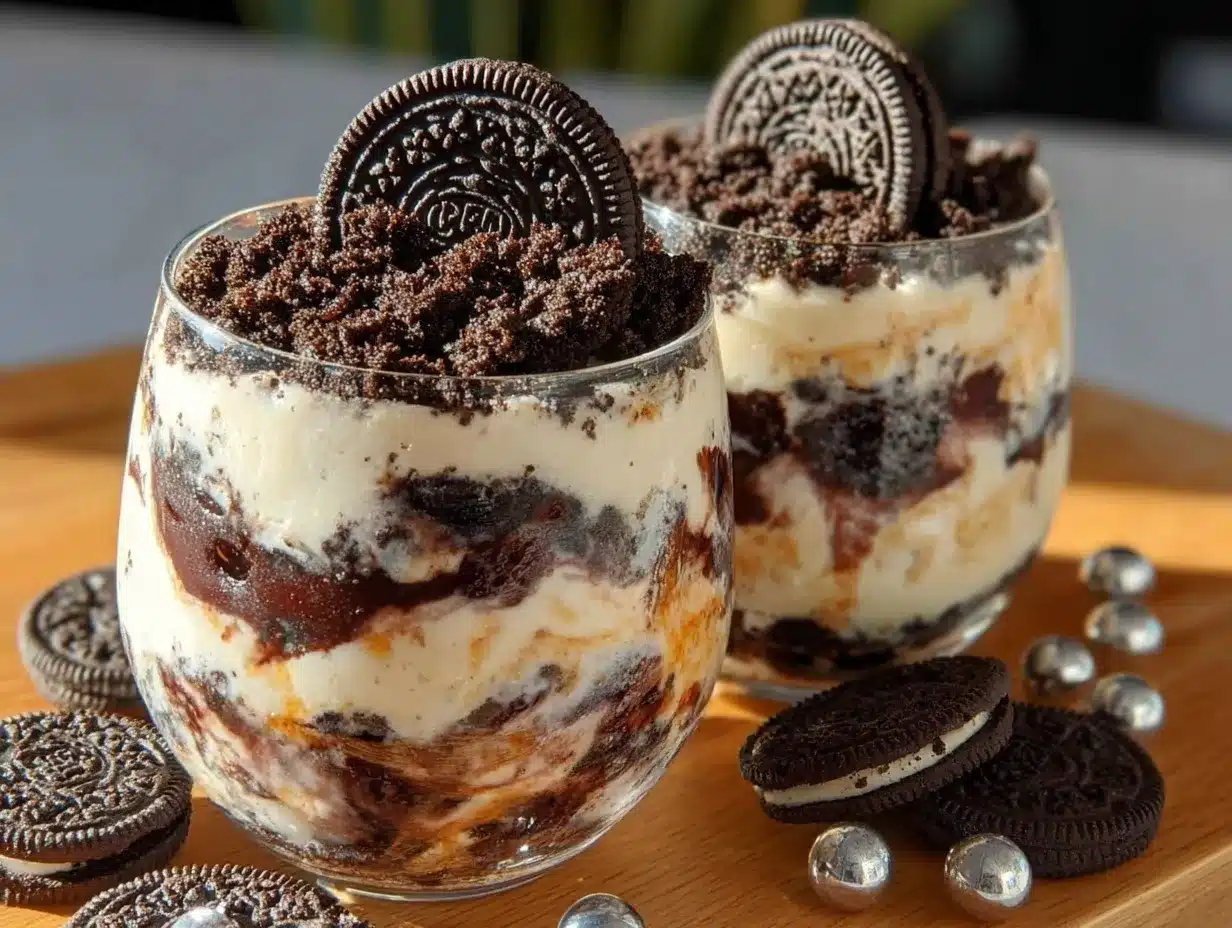
What sets this dessert apart is the way the filling is whipped to just the right fluffiness, blending cream cheese and whipped topping for a smooth, luscious mouthfeel that contrasts beautifully with the crunchy Oreo base. Plus, layering the crushed cookies with creamy filling in clear cups adds that fun visual pop that’s perfect for celebrations. It’s not just another Oreo dessert—it’s the one I trust to bring smiles, every single time.
Honestly, it’s the kind of treat that makes you want to close your eyes after the first bite and just savor the moment, which feels pretty special during busy celebrations. And if you’re into desserts like the cinnamon roll casserole or crave something crunchy like the crispy candied pecans, this Oreo dessert cups recipe fits right in with that vibe—easy, comforting, and absolutely satisfying.
What Ingredients You Will Need
This recipe uses simple, wholesome ingredients to deliver bold flavor and satisfying texture without the fuss. Most are pantry staples, and Oreos are pretty much a party essential anyway.
- Oreos, crushed (about 24 cookies) – You want a good mix of finely crushed crumbs and some chunkier pieces for texture. I usually go with the classic sandwich cookies, but double stuff works well if you prefer extra cream.
- Cream cheese, softened (8 oz / 225 g) – Adds richness and a slight tang that balances the sweetness. I like using full-fat for best flavor, but reduced-fat works too.
- Powdered sugar (1 cup / 120 g) – For sweetness and smooth blending with cream cheese.
- Whipped topping (8 oz / 227 g) – I usually use store-bought whipped topping like Cool Whip for ease, but homemade whipped cream will give a fresher taste if you have time.
- Vanilla extract (1 tsp) – Just a hint to deepen the flavor.
- Milk (2-3 tbsp / 30-45 ml) – To loosen the cream cheese mixture slightly for a smoother texture.
- Mini Oreos or extra crushed Oreos for garnish – Optional but makes it look festive and fun.
If you want a dairy-free option, swap cream cheese with a plant-based version and use coconut whipped topping. For gluten-free, look for gluten-free sandwich cookies—you’d be surprised how tasty the alternatives can be!
Equipment Needed
- Mixing bowls – At least two, one for the crushed Oreos and one for the filling.
- Electric mixer or hand whisk – An electric mixer makes whipping the cream cheese and topping easier and fluffier, but a strong arm and whisk will do if you don’t mind a bit of workout.
- Spoon or spatula – For folding the whipped topping gently into the cream cheese mixture.
- Measuring cups and spoons – For accuracy, especially with powdered sugar and vanilla.
- Clear plastic or glass cups – To assemble and serve the dessert cups. Small mason jars or dessert cups about 4–6 oz (120–180 ml) size work perfectly.
- Food processor or plastic bag and rolling pin – For crushing Oreos. If you don’t have a food processor, just put the cookies in a sturdy plastic bag and bash them gently with a rolling pin or heavy pan.
For budget-friendly setups, I often use old jam jars or repurposed small glasses—makes for a cute presentation without extra cost. Also, an electric hand mixer from brands like KitchenAid or Cuisinart can really smooth the process if you have one on hand.
Preparation Method
- Crush the Oreos: Place about 24 Oreos in a food processor and pulse until you get mostly fine crumbs with some small chunks. If you don’t have a processor, put the Oreos in a sealed plastic bag and crush gently with a rolling pin. Set aside about 1/3 cup (40 g) of the crushed Oreos for topping.
Tip: Leaving some chunks adds great texture contrast in the dessert cups. - Make the cream cheese filling: In a large bowl, beat 8 oz (225 g) softened cream cheese with 1 cup (120 g) powdered sugar and 1 tsp vanilla extract until smooth and creamy—about 2-3 minutes with an electric mixer.
Note: Softened cream cheese is key here; if it’s too cold, lumps will form. - Add milk: Slowly add 2-3 tbsp (30-45 ml) milk to loosen the mixture just a bit. It should be thick but spreadable.
- Fold in whipped topping: Gently fold 8 oz (227 g) whipped topping into the cream cheese mixture with a spatula. Be careful not to overmix—you want to keep the airy texture.
Sensory cue: The filling should look light, fluffy, and creamy. - Assemble the dessert cups: Spoon a tablespoon of crushed Oreos into the bottom of each cup, then layer with 2-3 tablespoons of the cream cheese filling. Repeat to create 2-3 layers, finishing with the reserved crushed Oreos on top.
Tip: Using a piping bag or a plastic bag with a corner snipped off can make layering neater. - Chill: Refrigerate the dessert cups for at least 2 hours to set and let the flavors meld. They can be made up to 24 hours ahead.
Warning: Don’t skip chilling—this dessert tastes best cold and holds together nicely. - Serve and enjoy: Garnish with mini Oreos or a small dollop of whipped topping if you like, then dig in!
Cooking Tips & Techniques
Getting these No-Bake Oreo Dessert Cups just right takes a few little tricks I’ve picked up over time. First, always soften your cream cheese to room temperature before mixing. Trying to mix cold cream cheese leads to lumps and uneven texture, and honestly, no one wants that.
When folding in the whipped topping, do it gently with a spatula—this keeps the filling light and airy. Overmixing can make it dense and heavy, which defeats the whole purpose of a no-bake treat that feels fluffy. Also, crushing the Oreos to a mix of fine crumbs and small chunks gives the perfect crunch and contrast.
If you’re short on time, prepping the cups in advance and chilling them overnight is a lifesaver. Just cover tightly with plastic wrap to keep them fresh. On the flip side, if you find the filling too loose, add a bit more powdered sugar or chill the mixture before assembling.
One mistake I made early on was layering too thickly in one go, which made the cups hard to eat. Breaking it down into smaller layers helps keep every bite balanced. Plus, clear cups really show off the layers beautifully, so presentation matters here!
Variations & Adaptations
While the classic Oreo and cream cheese combo is a winner, you can totally tweak this dessert to suit your style or dietary needs.
- Fruit twist: Add fresh berries like strawberries or raspberries between layers for a bright, fresh flavor that cuts through the sweetness.
- Chocolate lover’s version: Mix in a tablespoon of cocoa powder into the cream cheese filling or drizzle melted chocolate on top for extra decadence.
- Peanut butter delight: Swirl in some creamy peanut butter (about 1/4 cup) into the cream cheese mixture for a rich, nutty flavor that pairs amazingly with Oreos.
- Gluten-free option: Use gluten-free sandwich cookies instead of Oreos to cater to gluten sensitivities without missing out on the fun.
- Dairy-free adaptation: Swap cream cheese with plant-based cream cheese and use coconut whipped topping to keep it vegan-friendly.
I once tried adding a layer of crushed crispy candied pecans in the mix to add a sweet crunch, and it was a hit—gave the dessert an unexpected texture twist that guests loved.
Serving & Storage Suggestions
Serve these Easy No-Bake Oreo Graduation Dessert Cups chilled straight from the fridge for the best experience—the creamy layers hold together nicely and the Oreo bits stay crunchy. They look adorable on any dessert table, especially when garnished with mini Oreos or a sprig of mint.
Pair these dessert cups with a light beverage like sparkling lemonade or iced tea to balance the richness. For a brunch or party spread, they go well alongside savory bites like the spinach dip breadsticks for a nice sweet-savory combo.
To store, cover the cups tightly with plastic wrap or lids and keep in the refrigerator for up to 3 days. They freeze well too—just thaw in the fridge overnight before serving. If the topping softens after freezing, a quick stir with a spoon can help refresh the texture.
Flavors actually deepen after chilling overnight, so if you can prep a day ahead, even better. Just remember to add the final garnish fresh before serving for that extra pop.
Nutritional Information & Benefits
Each serving of these dessert cups provides a sweet treat with moderate calories and a decent balance of fats and sugars typical of no-bake desserts. The cream cheese offers some protein and calcium, while Oreos contribute carbohydrates and a touch of fiber.
While not a low-calorie snack, these cups are portion-controlled, making it easier to enjoy without going overboard. For a lighter version, swapping in light cream cheese and reduced-fat whipped topping cuts down fat content.
For those watching gluten or dairy, the recipe is adaptable to gluten-free cookies and plant-based alternatives, which I’ve done often to accommodate friends with allergies.
From a wellness standpoint, this dessert is an occasional indulgence that also brings joy and celebration, which really counts in my book.
Conclusion
These Easy No-Bake Oreo Graduation Dessert Cups are a no-fuss, crowd-winning sweet that fits perfectly into any celebration, especially when you need a quick dessert that looks impressive. The blend of creamy, crunchy, and sweet is just right, and the recipe’s flexibility means you can make it your own with simple swaps or add-ins.
I keep coming back to this recipe because it never lets me down—and because honestly, it makes me feel a little less frazzled when hosting. If you try it out, feel free to tweak it and make it yours. And hey, I’d love to hear how your version turned out in the comments below. Sharing desserts like this really feels like sharing a little happiness, doesn’t it?
FAQs
Can I make these dessert cups ahead of time?
Yes! They actually taste better after chilling at least 2 hours or overnight. Just cover them tightly and keep refrigerated until serving.
What can I use instead of Oreos?
You can use any sandwich cookie you like, gluten-free cookies, or even crushed chocolate graham crackers for a different flavor and texture.
Is it possible to make these dessert cups vegan?
Absolutely. Use plant-based cream cheese and coconut whipped topping, along with vegan sandwich cookies, to keep the recipe vegan-friendly.
Can I substitute the whipped topping with whipped cream?
Yes, homemade whipped cream works beautifully but is less stable, so serve soon after making. Store-bought whipped topping holds up better for longer events.
How many dessert cups does this recipe make?
This recipe yields about 8 cups, depending on the size of your serving containers (4–6 oz / 120–180 ml each).
Pin This Recipe!
Easy No-Bake Oreo Graduation Dessert Cups

A quick and easy no-bake dessert featuring layers of crushed Oreos and creamy filling, perfect for graduation parties and celebrations.
- Prep Time: 15 minutes
- Cook Time: 0 minutes
- Total Time: 2 hours 15 minutes
- Yield: 8 servings 1x
- Category: Dessert
- Cuisine: American
Ingredients
- 24 Oreos, crushed (about 24 cookies)
- 8 oz (225 g) cream cheese, softened
- 1 cup (120 g) powdered sugar
- 8 oz (227 g) whipped topping (e.g., Cool Whip)
- 1 tsp vanilla extract
- 2–3 tbsp (30–45 ml) milk
- Mini Oreos or extra crushed Oreos for garnish (optional)
Instructions
- Crush the Oreos using a food processor or place in a sealed plastic bag and crush with a rolling pin. Set aside about 1/3 cup (40 g) of crushed Oreos for topping.
- In a large bowl, beat softened cream cheese with powdered sugar and vanilla extract until smooth and creamy, about 2-3 minutes with an electric mixer.
- Slowly add milk to loosen the mixture slightly until thick but spreadable.
- Gently fold whipped topping into the cream cheese mixture with a spatula, keeping the mixture light and airy.
- Spoon a tablespoon of crushed Oreos into the bottom of each cup, then layer with 2-3 tablespoons of cream cheese filling. Repeat to create 2-3 layers, finishing with reserved crushed Oreos on top.
- Refrigerate the dessert cups for at least 2 hours to set and let flavors meld. They can be made up to 24 hours ahead.
- Garnish with mini Oreos or a small dollop of whipped topping if desired, then serve.
Notes
Always soften cream cheese to room temperature before mixing to avoid lumps. Fold whipped topping gently to keep filling light and airy. Use a mix of fine crumbs and chunks of Oreos for texture contrast. Chill at least 2 hours or overnight for best flavor and texture. Can be made ahead and stored covered in the refrigerator for up to 3 days or frozen.
Nutrition
- Serving Size: One dessert cup (abo
- Calories: 320
- Sugar: 22
- Sodium: 210
- Fat: 20
- Saturated Fat: 10
- Carbohydrates: 30
- Fiber: 1
- Protein: 4
Keywords: no-bake dessert, Oreo dessert, graduation dessert, party treat, easy dessert, Oreo cups, creamy dessert


