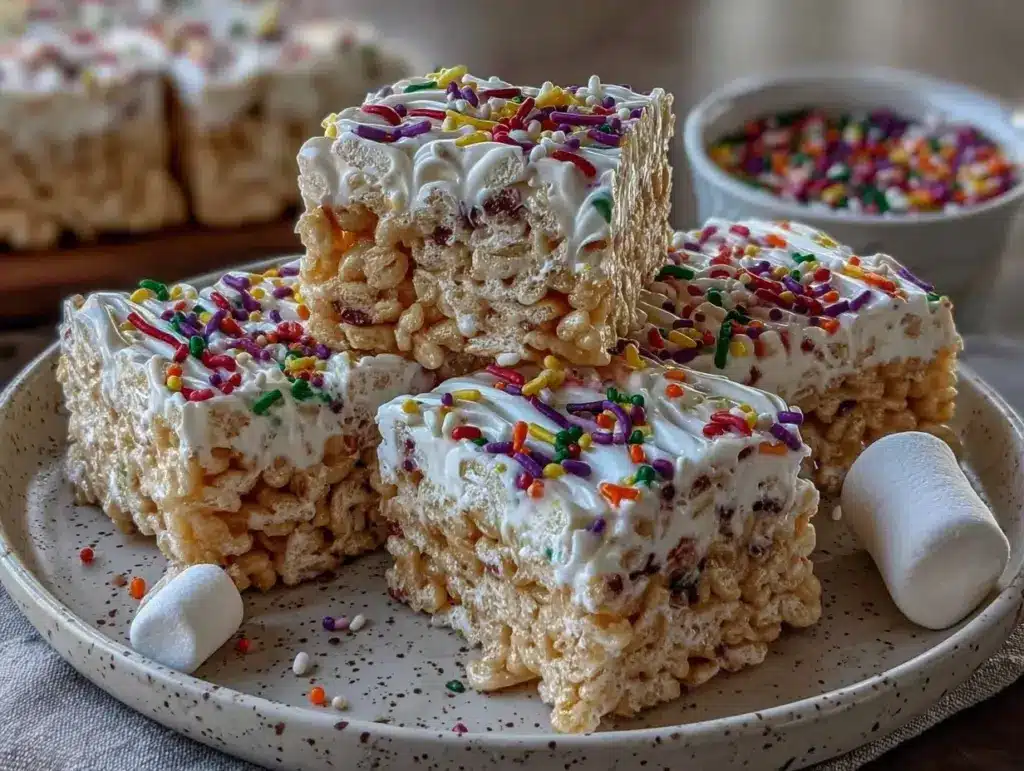
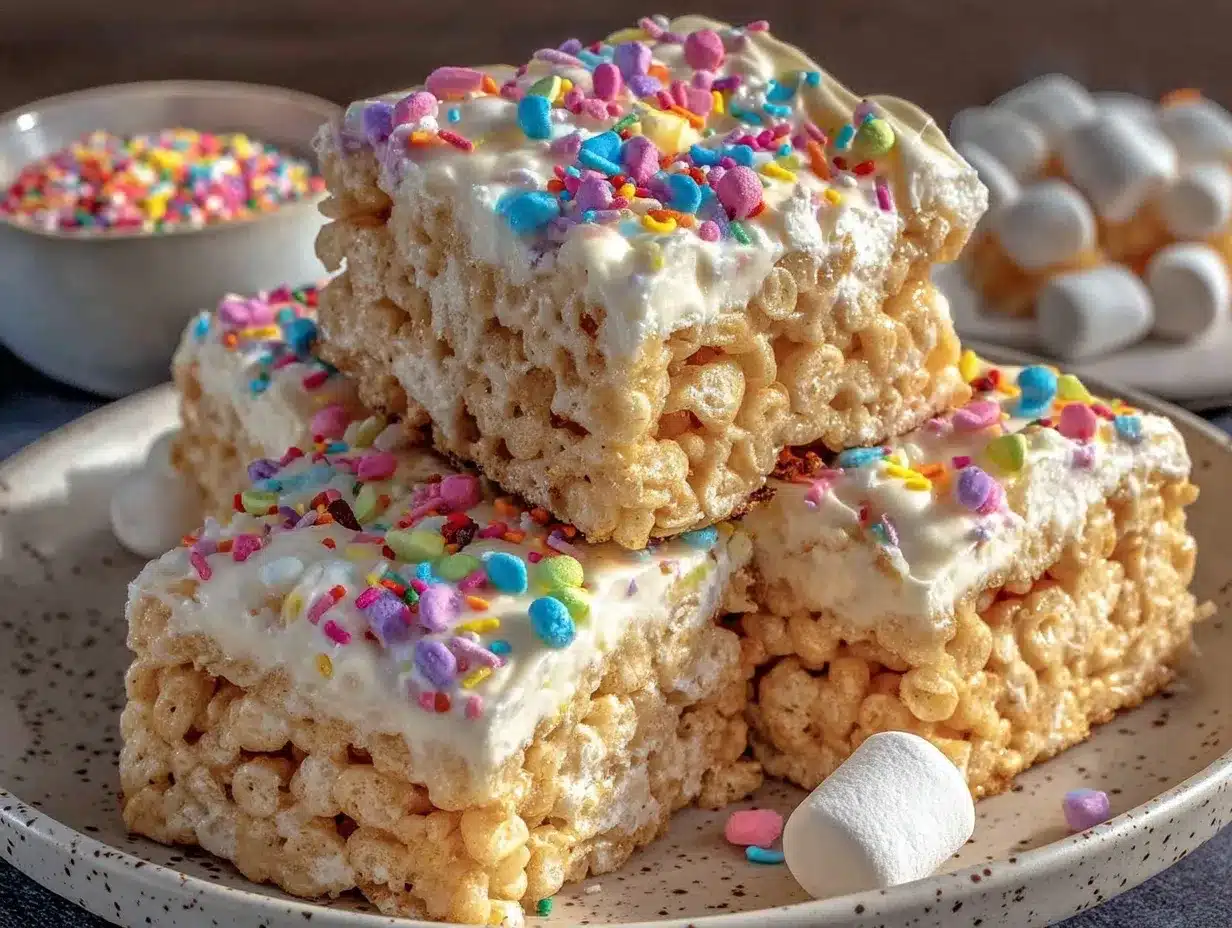
Imagine biting into a perfectly chewy, crunchy, and lightly sweet treat that feels like a childhood favorite but packed with nourishing protein. That irresistible combination of crispy rice cereal, nutty richness, and just the right amount of sweetness is what makes these Healthy Protein Rice Krispies a game-changer. The first time I made these, I was craving something indulgent yet guilt-free—something I could snack on post-workout or share with my family without worrying about unhealthy ingredients. Let me tell you, these were gone in minutes. Even my kids, who typically shy away from anything labeled “healthy,” couldn’t resist sneaking extra bites.
This recipe has quickly become one of my go-to favorites, especially for busy days when I need a quick energy boost. It’s the kind of snack that feels like a treat but keeps you fueled and satisfied for hours. Whether you’re meal-prepping for the week, hosting friends who appreciate a healthier dessert option, or simply indulging your inner child, these Healthy Protein Rice Krispies are everything you could want: easy, delicious, and wholesome. Trust me, you’ll want to keep this recipe bookmarked—it’s a keeper for life!
Why You’ll Love This Recipe
- Quick & Easy: Comes together in under 15 minutes with no baking required.
- Protein-Packed: A healthier twist on a classic treat, with added protein to keep you energized.
- Simple Ingredients: No hard-to-find items—you likely have most of these in your pantry already.
- Perfect for Any Occasion: Great for kids’ lunchboxes, pre-workout snacks, or a healthier dessert option at parties.
- Crowd-Pleaser: Loved by adults and kids alike (even picky eaters enjoy these!).
- Unbelievably Delicious: The perfect mix of chewy, sweet, and nutty flavors that feels indulgent but isn’t.
What sets this recipe apart is the balance of flavor and nutrition. By swapping out traditional marshmallows with a protein-packed binder, you’re creating a treat that satisfies your sweet tooth while supporting your health goals. Plus, it’s flexible enough to adapt to your dietary preferences—whether you’re gluten-free, dairy-free, or just trying to cut back on sugar.
What Ingredients You Will Need
These Healthy Protein Rice Krispies use simple, wholesome ingredients to deliver big flavor and a satisfying texture. Here’s what you’ll need:
- Crispy rice cereal: The base of the recipe that provides the crunch. Look for gluten-free options if needed.
- Protein powder: Vanilla-flavored works best, but you can use chocolate or unflavored depending on your preference.
- Nut butter: Creamy peanut butter or almond butter is ideal for binding the ingredients and adding richness (use unsweetened for a healthier option).
- Honey or maple syrup: A natural sweetener that helps hold everything together while adding a touch of sweetness.
- Coconut oil: Adds moisture and helps create a silky texture.
- Dark chocolate chips: Optional, but highly recommended for a touch of indulgence.
- Vanilla extract: Just a splash to enhance the flavor.
- Sea salt: A pinch to balance the sweetness and add depth.
Feel free to swap or add ingredients based on your preferences. For example, you can use sunflower seed butter for a nut-free version or add mix-ins like chia seeds or shredded coconut for extra texture.
Equipment Needed
- Large mixing bowl: Perfect for combining all the ingredients without making a mess.
- Spatula: A silicone spatula works best for mixing sticky ingredients and pressing the mixture into the pan.
- 8×8-inch baking dish: The ideal size for this recipe to create even layers.
- Parchment paper: Helps with easy removal and cleanup.
- Small saucepan: For melting the coconut oil and sweetener together.
If you don’t have parchment paper, you can grease the pan lightly with coconut oil to prevent sticking. And if you don’t have a mixing bowl, a large pot can work in a pinch!
Preparation Method
- Line an 8×8-inch baking dish with parchment paper, leaving some overhang for easy removal.
- In a small saucepan, melt the coconut oil over low heat. Add the nut butter, honey or maple syrup, and vanilla extract. Stir gently until the mixture is smooth and fully combined. Remove from heat.
- In a large mixing bowl, combine the crispy rice cereal and protein powder. Stir well to ensure the protein powder is evenly distributed.
- Pour the melted coconut oil and nut butter mixture over the dry ingredients. Mix thoroughly until all the cereal is coated and the mixture starts to stick together.
- If using dark chocolate chips or other mix-ins, fold them in gently.
- Transfer the mixture to the prepared baking dish. Use a spatula to press the mixture evenly into the pan. Press firmly to ensure it holds its shape.
- Place the pan in the refrigerator for at least 30 minutes to set.
- Once set, use the parchment paper to lift the Rice Krispies out of the pan. Cut into squares or bars and serve.
Pro tip: If you’re having trouble with the mixture sticking together, add a bit more nut butter or honey to help bind it. If the mixture feels too sticky, add a sprinkle of crispy rice cereal.
Cooking Tips & Techniques
- Choose the Right Protein Powder: Not all protein powders behave the same. Whey protein tends to blend smoothly, while plant-based powders may require a bit more liquid.
- Use Fresh Ingredients: Make sure your nut butter is fresh and creamy, and your crispy rice cereal hasn’t gone stale.
- Don’t Skip the Parchment Paper: Trust me, it makes removing and cutting the Rice Krispies so much easier.
- Press Firmly: When transferring the mixture to the pan, use the back of a spatula or your hands (lightly greased) to press it down firmly for a compact texture.
- Customize the Flavor: Add a pinch of cinnamon or a dash of cocoa powder to switch things up.
And here’s a little secret: if your mixture feels too dry, don’t panic. A tiny splash of milk will work wonders to bring everything together again!
Variations & Adaptations
- Gluten-Free: Use certified gluten-free crispy rice cereal to make this snack suitable for gluten-sensitive eaters.
- Dairy-Free: Swap the whey protein powder with a high-quality plant-based protein powder and ensure your chocolate chips are dairy-free.
- Low-Sugar: Use sugar-free maple syrup and unsweetened nut butter to reduce the sugar content without sacrificing flavor.
- Seasonal Twist: Add dried cranberries and a sprinkle of cinnamon for a festive fall version.
- Extra Crunch: Toss in a handful of crushed nuts or seeds for added texture and nutrition.
My personal favorite variation? Swapping peanut butter for almond butter and adding a handful of shredded coconut—it’s like a tropical escape in every bite!
Serving & Storage Suggestions
These Healthy Protein Rice Krispies are best served chilled for maximum chewiness. Arrange them on a platter or a rustic wooden board for a casual yet charming presentation, and garnish with a sprinkle of sea salt or a drizzle of melted dark chocolate.
Store the Rice Krispies in an airtight container in the refrigerator for up to one week. They also freeze beautifully—wrap them individually in plastic wrap and store in a freezer-safe bag for up to one month. To enjoy, simply let them thaw at room temperature for 10-15 minutes or pop them in the microwave for a few seconds.
Bonus tip: When stored overnight, the flavors meld together even more, making them taste even better the next day!
Nutritional Information & Benefits
Here’s a breakdown of the approximate nutritional values per serving (based on 12 bars):
- Calories: 120
- Protein: 6g
- Carbohydrates: 14g
- Fats: 5g
- Fiber: 2g
Not only are these Rice Krispies delicious, but they’re also a fantastic way to sneak in some extra protein. The nut butter provides healthy fats, while the protein powder supports muscle recovery and keeps you feeling full longer. Plus, using natural sweeteners like honey or maple syrup means you’re skipping the refined sugar without sacrificing flavor.
Conclusion
These Healthy Protein Rice Krispies are everything you want in a snack—easy to make, incredibly tasty, and packed with nutrition. Whether you’re a gym-goer looking for a post-workout boost or a parent trying to provide healthier treats for your kids, this recipe ticks all the boxes.
Feel free to get creative and make it your own! Add your favorite mix-ins, try different nut butters, or experiment with flavors to suit your taste buds. Honestly, this recipe has become such a staple in my house, and I can’t wait for you to try it.
If you make these, let me know how they turned out in the comments below. Did you try any fun variations? Don’t forget to share this recipe with friends—it’s too good to keep to yourself! Happy snacking!
FAQs
Can I make these Rice Krispies without protein powder?
Absolutely! Simply leave out the protein powder and reduce the amount of nut butter slightly to ensure the mixture still binds well.
What type of protein powder works best?
Vanilla whey protein is ideal for a smooth texture, but you can use plant-based protein if you prefer a dairy-free option.
Can I make these vegan?
Yes! Use maple syrup instead of honey, dairy-free chocolate chips, and plant-based protein powder for a fully vegan version.
How do I prevent the mixture from sticking to my hands?
Lightly grease your hands with coconut oil before pressing the mixture into the pan—it works like a charm!
Can I double the recipe?
Definitely! Use a larger pan (such as 9×13 inches) and double all the ingredients. These are great for meal prepping or sharing at gatherings.
Pin This Recipe!
Healthy Protein Rice Krispies Recipe Packed with Flavor

A chewy, crunchy, and lightly sweet treat packed with nourishing protein, perfect for a post-workout snack or a healthier dessert option.
- Prep Time: 15 minutes
- Cook Time: No cooking required
- Total Time: 45 minutes (including chilling time)
- Yield: 12 bars 1x
- Category: Dessert
- Cuisine: American
Ingredients
- 3 cups crispy rice cereal
- 1/2 cup vanilla protein powder
- 1/2 cup creamy peanut butter or almond butter (unsweetened)
- 1/3 cup honey or maple syrup
- 2 tablespoons coconut oil
- 1/4 cup dark chocolate chips (optional)
- 1 teaspoon vanilla extract
- Pinch of sea salt
Instructions
- Line an 8×8-inch baking dish with parchment paper, leaving some overhang for easy removal.
- In a small saucepan, melt the coconut oil over low heat. Add the nut butter, honey or maple syrup, and vanilla extract. Stir gently until the mixture is smooth and fully combined. Remove from heat.
- In a large mixing bowl, combine the crispy rice cereal and protein powder. Stir well to ensure the protein powder is evenly distributed.
- Pour the melted coconut oil and nut butter mixture over the dry ingredients. Mix thoroughly until all the cereal is coated and the mixture starts to stick together.
- If using dark chocolate chips or other mix-ins, fold them in gently.
- Transfer the mixture to the prepared baking dish. Use a spatula to press the mixture evenly into the pan. Press firmly to ensure it holds its shape.
- Place the pan in the refrigerator for at least 30 minutes to set.
- Once set, use the parchment paper to lift the Rice Krispies out of the pan. Cut into squares or bars and serve.
Notes
If the mixture feels too dry, add a splash of milk to bring it together. For a nut-free version, use sunflower seed butter. Customize flavors with cinnamon or cocoa powder.
Nutrition
- Serving Size: 1 bar
- Calories: 120
- Fat: 5
- Carbohydrates: 14
- Fiber: 2
- Protein: 6
Keywords: Healthy, Protein, Rice Krispies, Snack, Dessert, Gluten-Free, Dairy-Free, Low-Sugar


